Sega Dinosaur King cab - Conversion to JAMMA - Updated 31/3/16

Show off your wares.
User avatar
Paulie
Opens wallet, moths fly out
Posts: 2599
Joined: September 28th, 2011, 5:43 pm
Location: East Ardsley, West Yorks
eBay: retro-paulie
Initials: PSG

Re: Sega Dinosaur King conversion to JAMMA

Post by Paulie »

crunchywasp wrote:
I like to use these wee buggers for keying harnesses:

http://www.leshoparcade.com/fiche_produ ... ting%20pin"
They look really nice Mark
Devil Soundwave wrote:I use a squashed Hama bead to key harnesses. Fits perfectly.
That really is a good idea, I have a load of hama beads too.

Too late now, but both are great options for when I need to key in the future
User avatar
pubjoe
Fosters Political Ambitions
Posts: 10032
Joined: August 19th, 2008, 8:58 am
Location:

Re: Sega Dinosaur King conversion to JAMMA

Post by pubjoe »

paulie wrote:Be careful when shopping for a JAMMA Harness, there is just so much crap out there. I don’t know anywhere that sells decent brand new ones although DS (Arcade Japan) is currently working on this. I have a few of the cheap ones and they are cheap because they are ****.
Does anywhere currently sell a decent new harness.

I want to do a rewire. My soldering skills are passable at best. I'm okay with stuff that stays in place like EPROM pins but when I've added a couple of wires to a jamma harness - well they worked but they ain't pretty (still, they match the rest of the wiring).

I was thinking of getting a cheapo harness and replacing the power wires as others have suggested. My thinking is that even if the cheap harnesses are ****, they can't be much worse than I could manage. ...But then again if they're that bad, using one would defeat the whole purpose of rewiring.

So, what's a better option?

Also, Paulie do you mind if I move this harness discussion to a new thread?
User avatar
geotrig
Potato!
Posts: 7765
Joined: December 5th, 2008, 1:14 pm
Location: ._.
eBay: ._.

Re: Sega Dinosaur King conversion to JAMMA

Post by geotrig »

i think the bobroberts site is supposed to have decent ones but iirc it impossible to order from outside of the us, i've never seen on ein the flesh so have no idea really .

is the wiring that bad in your s ? i'd be tempted to leave it rather than use a **** one
Image

<trk>:I remember catching a big fat one and my friend said "throw it back in, that one already tastes like wood"
User avatar
pubjoe
Fosters Political Ambitions
Posts: 10032
Joined: August 19th, 2008, 8:58 am
Location:

Re: Sega Dinosaur King conversion to JAMMA

Post by pubjoe »

I have left it as it is so far but yeah, it's pretty bad. It's a tangled mess due to odd lengths of wire which are taut from the PSU and excessively slack from controls, the jamma connector looks like it's been soldered by me! (...in a hurry), the connector has a death grip on PCBs, and it's missing CP terminal blocks which is inconvenient when I swap CPs. I could try sorting those things but for the time it'd take I might as well start afresh. Also, my monitor is flakey until at least twenty minutes after powering on and I'm sure the shoddy wiring doesn't help.

The cab is in otherwise lovely shape. All parts of the body are great and the monitor is nice once it's warmed up for a while. I feel the wiring is it's major let down.
User avatar
geotrig
Potato!
Posts: 7765
Joined: December 5th, 2008, 1:14 pm
Location: ._.
eBay: ._.

Re: Sega Dinosaur King conversion to JAMMA

Post by geotrig »

pubjoe wrote: I was thinking of getting a cheapo harness and replacing the power wires as others have suggested. My thinking is that even if the cheap harnesses are ****, they can't be much worse than I could manage. ...But then again if they're that bad, using one would defeat the whole purpose of rewiring.
in theory this sounds good and from your description could improve things , the problem i had with one before was that 1-2 of the button wires werent soldered on greatly but that could have been an exception as the rest were soldered well , tbh it was an old woodie and it did the job in replacing a mashup of wiring.

one thing that did bug me more than anyhting was the actual connector it just didnt feel like anything like the "old one's" but it was still solid enough
Image

<trk>:I remember catching a big fat one and my friend said "throw it back in, that one already tastes like wood"
User avatar
Paulie
Opens wallet, moths fly out
Posts: 2599
Joined: September 28th, 2011, 5:43 pm
Location: East Ardsley, West Yorks
eBay: retro-paulie
Initials: PSG

Re: Sega Dinosaur King conversion to JAMMA

Post by Paulie »

pubjoe wrote:Paulie do you mind if I move this harness discussion to a new thread?
Not at all :)
pubjoe wrote:I was thinking of getting a cheapo harness and replacing the power wires as others have suggested. My thinking is that even if the cheap harnesses are ****, they can't be much worse than I could manage. ...But then again if they're that bad, using one would defeat the whole purpose of rewiring.

So, what's a better option?
If you want an el cheapo one PJ, I'm happy to send you a couple for free but be warned they are complete ****, I wouldn't waste my time on them but it's your choice, If you want some photos drop me a pm :)

Better option is to wait to see if DS gets some in or put a wanted ad up for a nice used one or maybe some one could make you one :)
User avatar
Paulie
Opens wallet, moths fly out
Posts: 2599
Joined: September 28th, 2011, 5:43 pm
Location: East Ardsley, West Yorks
eBay: retro-paulie
Initials: PSG

Re: Sega Dinosaur King conversion to JAMMA

Post by Paulie »

Well my garage is still freezing so rather than shivering whilst trying to solder the second loom I thought I'd do something that would work up a bit of a sweat.

I don't know if anyone in the community makes metal control panels for DK/MK/L&B. I think Fran does or at least has done jolly nice perspex ones, but as I enjoy **** about...

This started life as a splash back, but when the old kitchen was ripped out I salvaged it as it looked to be ideal for control panels. Its approx 6' x 2'
Image

If you enjoy a good hand job then this should be right up your strada :hinthint:
Firstly this was (well mostly) done with 3 hand tools, a Jr hacksaw a flat file and a round file. Obviously I'm in no rush and I'm just enjoying my hobby, there's something nice about using hand tools, it just slows everything down to a really nice pace, such a welcome break from 'busy life'. I say mostly as I used a jigsaw to cut out a rough shape otherwise I'd have had 6' of sheet metal flapping all over the bench and I used a drill to aid the jigsaw around the two relatively tight inner turns. I could have done it all by hand but even I'm not that keen. But if I had wanted to do it quicker remember there's more than one way to skin a cat.

Firstly I stripped the original control panel. The card reader is held in place by IIRC 4x M4 nuts and the buttons are screw ins, I used a button wrench to loosen the nuts as I had one in the tool box, like this http://www.arcadeworlduk.com/products/A ... rench.html"

Front
Image

Back
Image

I drew around my 'template' in marker pen
Image

Then roughly cut it out (with a jigsaw), it's so much easier working with a small bit of metal rather than a 6' sheet, I then taped it to the template, I used double sided tape but as it was so cold the condensation was preventing a good bond so I banged a load of parcel tape around it for good measure. I then cut it out in it's entirety relatively neatly with a Jr hacksaw
Image

As you can see I left approx 1mm excess so I could then file down to the exact size/shape I required
Image

Before filing
Image

The edges have been filed to size/shape and the sticky tape cleaned off
Image

Next time: I will be mostly drilling, punching and experimenting with flush head self clinching studs.

For those of you who don't know what a self clinching stud is - Ideally I would like to use some M4 flush head self clinching studs for the joystick and earth mounts like on Sega and probably most other metal control panels, but I've not used them before so this may well not work. The problem is that my panel is a stainless steel which is of course a bit harder than a mild steel which means it will be more difficult to work with as I don't have a press. I'll have to improvise as the studs must be installed using a squeezing action, a quick impact eg big hammer will not allow sufficient time for the sheet material to cold flow. The other concern is that the studs need to be harder/stronger than the panels and as I found them on ebay I'm not too hopeful, but it's always interesting to try something new.
Last edited by Paulie on November 26th, 2016, 7:36 pm, edited 1 time in total.
User avatar
CPS2
Street Fighter
Posts: 1993
Joined: August 19th, 2008, 10:03 pm
Location: Leeds

Re: Sega Dinosaur King conversion to JAMMA

Post by CPS2 »

:awe:

Looking great, can't wait to see what they look like when they are finished.
User avatar
KmanSweden
KmanSweden
Posts: 1242
Joined: October 13th, 2010, 10:37 am
Location: Stockholm, Sweden
eBay: KmanSweden
Initials: PKK

Re: Sega Dinosaur King conversion to JAMMA

Post by KmanSweden »

Nice work. :D
Up the Irons!
User avatar
crunchywasp
stompin' an' jumpin'
Posts: 8101
Joined: February 10th, 2012, 2:51 pm
Location: Northern Ireland
eBay: crunchywasp
Initials: MAK

Re: Sega Dinosaur King conversion to JAMMA

Post by crunchywasp »

Your handjobs are second to none. Excellent work Paul :clap:
Image
User avatar
geotrig
Potato!
Posts: 7765
Joined: December 5th, 2008, 1:14 pm
Location: ._.
eBay: ._.

Re: Sega Dinosaur King conversion to JAMMA

Post by geotrig »

excellent stuff paulie, i suppose you'll use the left overs to experiement on 1st and not the panel :) , interested to see what you com up with for a press , the only thing i could think of is trying to use a vice somehow but not sure if you could get a good enough press from it
Image

<trk>:I remember catching a big fat one and my friend said "throw it back in, that one already tastes like wood"
User avatar
Paulie
Opens wallet, moths fly out
Posts: 2599
Joined: September 28th, 2011, 5:43 pm
Location: East Ardsley, West Yorks
eBay: retro-paulie
Initials: PSG

Re: Sega Dinosaur King conversion to JAMMA

Post by Paulie »

Thanks chaps :)
crunchywasp wrote:Your handjobs are second to none
:fastlove:
geotrig wrote:i suppose you'll use the left overs to experiement on 1st and not the panel :)
Yes, I think I'd be asking for a fubar if I dove straight in and used the panel.
geotrig wrote:interested to see what you com up with for a press , the only thing i could think of is trying to use a vice somehow but not sure if you could get a good enough press from it
Using a nice big metal work vice was my first thought but it might be a bit 'jumpy' and not generate the pressure required anyway. I'll have a look at what my dad has in his garage, maybe something will jump out at me. TBH I'm doubtful that I'll get satisfactory results as the metal I'm using is a wee bit on the hard side. If that does turn out to be the case then I'll have to knock up some kind of mounting plate. I'm also a little concerned that my hole punches also may not be up to the job, I have a step drill that should be fine although it may be less accurate.

I used a 4.5mm HSS bit to drill the 8 holes, again I just used the original panel as a template. Use a centre punch to give your drill a guide, and a little lubrication will prolong the useful life of your bit. Take it nice and slow, use a decent bit, don't let it overheat and you should be ok. Remember you can buy dill bits in singles so there's no need to spend a fortune on big fancy looking sets. IMVHO it's so much better to buy singles and put your own small set of usefully sized, quality bits together than buying a bazillion piece budget/ fancy looking set. It will probably end up costing a similar amount and the set will no doubt contain a ton of the stuff that you will never use anyway so this way you only spend money on what you'll use and should make jobs easier, quicker, more enjoyable and safer they should last much much longer too.
Image

Looks like a nice enough fit when installed.
Image
User avatar
codecrank
Posts: 466
Joined: January 9th, 2011, 7:32 pm
Location: NSA Central

Re: Sega Dinosaur King conversion to JAMMA

Post by codecrank »

shiny :D
User avatar
jase
Posts: 690
Joined: September 14th, 2008, 3:18 pm
Location:

Re: Sega Dinosaur King conversion to JAMMA

Post by jase »

The new panel is looking good. :awe:
Image
p1pkin
Posts: 31
Joined: August 7th, 2014, 12:35 am
Location:

Re: Sega Dinosaur King conversion to JAMMA

Post by p1pkin »

well done! really nice looking cab and especially control panel

speaking of such cabs, anyone got one containing such card ?
don't know where this photo comes from, but I suppose somewhere from this forum.

Image
User avatar
Roan
Please Continue...
Posts: 64
Joined: October 14th, 2014, 1:56 am
Location: Lima - Perú

Re: Sega Dinosaur King conversion to JAMMA

Post by Roan »

Nice proyect, I want to see more :thumbup: :-D :thumbupright:
User avatar
Paulie
Opens wallet, moths fly out
Posts: 2599
Joined: September 28th, 2011, 5:43 pm
Location: East Ardsley, West Yorks
eBay: retro-paulie
Initials: PSG

Re: Sega Dinosaur King conversion to JAMMA

Post by Paulie »

It’s been an absolute age since I last posted anything on the progress of these cabs. They are up and running although I have a couple of little questions to ask before I actually start playing on them (Safety first) but I’ll wait until I get to the relevant part of the write up before asking anything as I have lots of photos :)

You get two shelves in these cabs, a rather generous top one and a smaller lower one.
I had originally thought I would lay the internals out like in the the SNK SC19-4 cabs with the psu and service panel to the front of the base and the shelves could both be used for PCB’s. But space was a little tight in the base due to a metal plate which is welded in place also the service panel would have required a lot of modification to fit. I could of course have gotten around these issues but I felt that mounting the service panel on the bottom shelf and knocking up a new MDF base for the XFMR and JAMMA switching PSU like in Franco’s project was the better option.

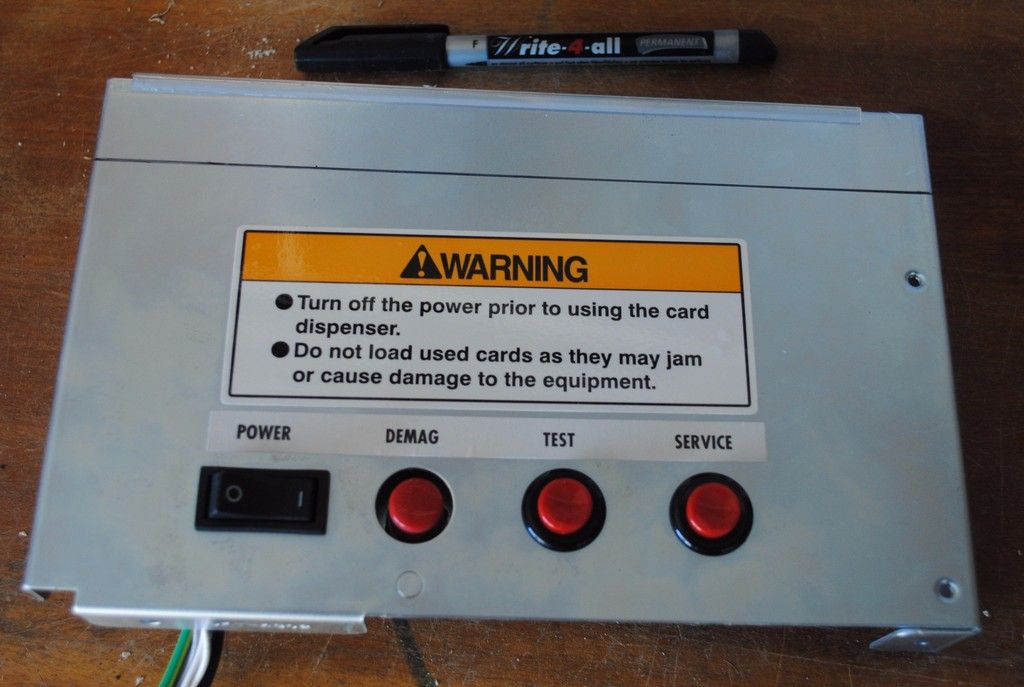
The service panel is too tall to be mounted on the lower shelf without any modification as it was originally sited on the roomier top shelf. Fortunately it only needs the top trimming off so it’s a really quick job.
My first question: Is there any benefit to cutting down the rest of the shielding and putting it all back albeit on the lower shelf now that he original hardware has been ripped out? The only thing that will now be on the lower shelf is the service panel. I’m sure the answer will be no but I’ve kept all the bits and bobs just in case. This isn’t an how to guide but nevertheless I don’t want people to stumble across my thread and be misinformed.

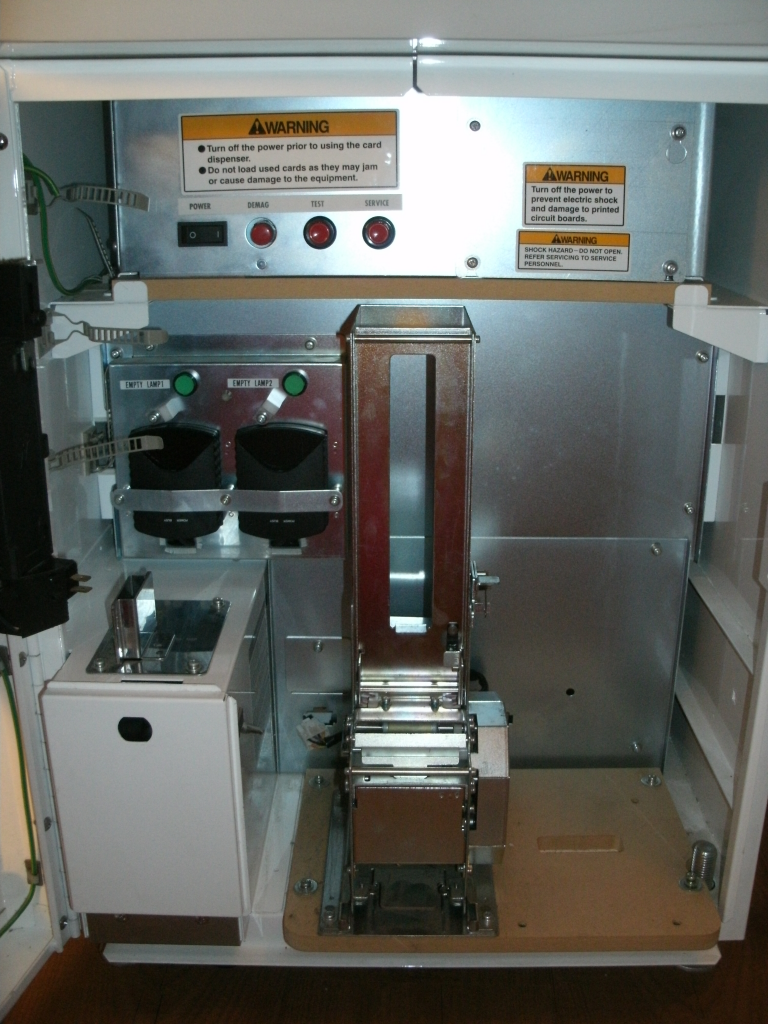
Top shelf, this is how it was when I got the cab complete with service panel and shielding
Image

Service panel marked up, really to be cut down
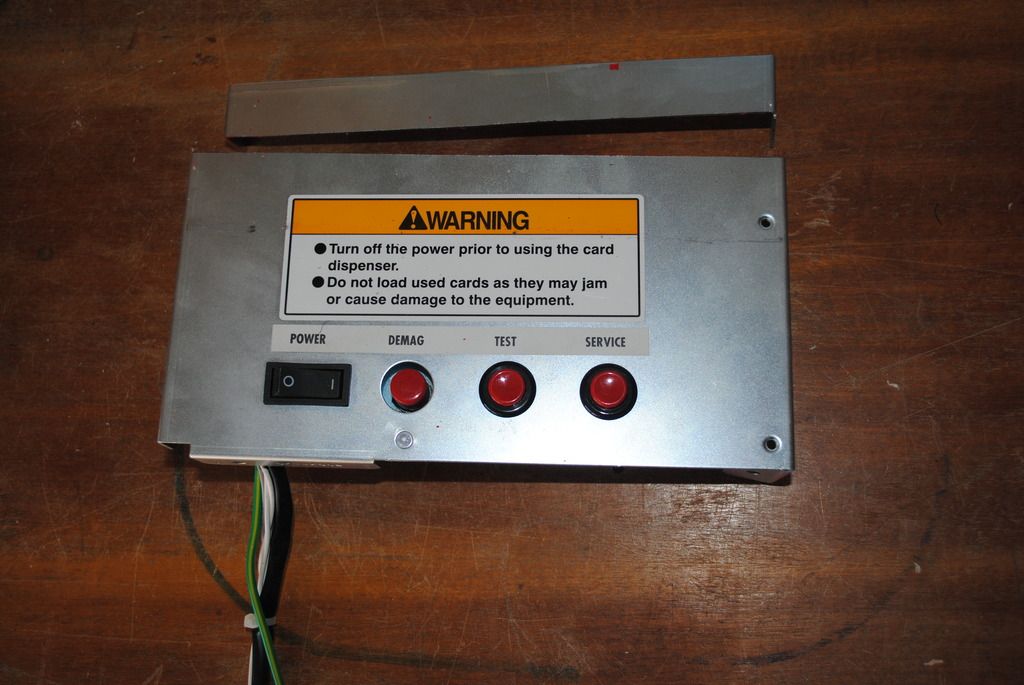
Image

Cut to size
Image


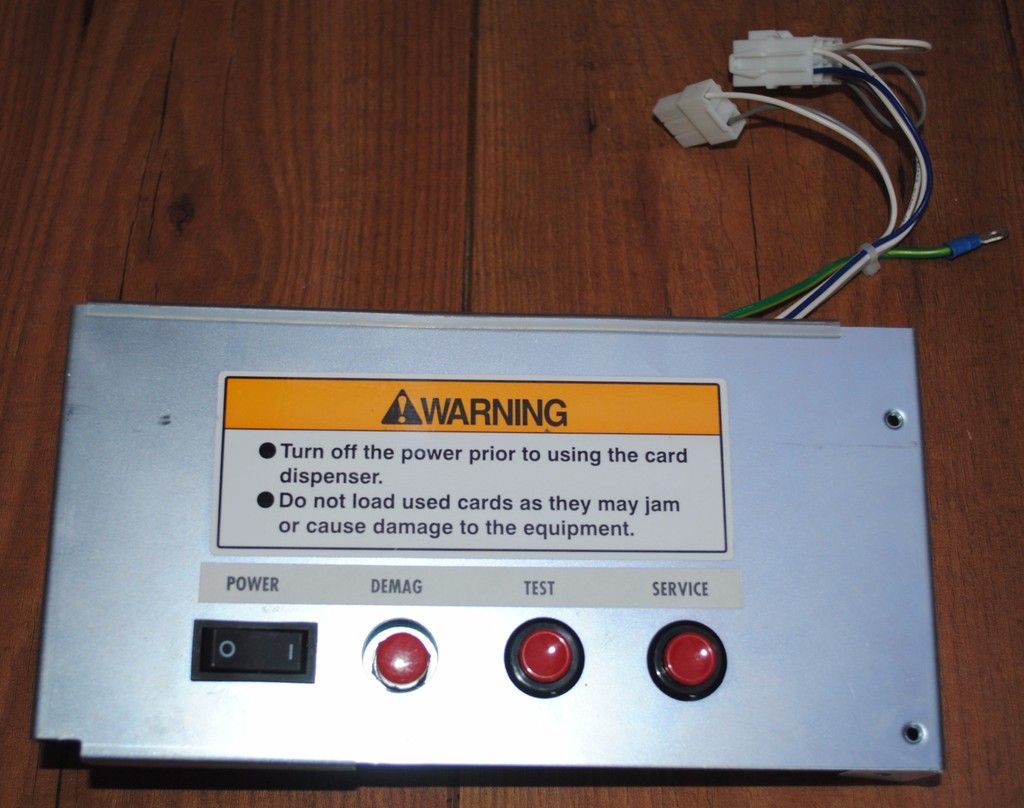
Burs removed and the protective plastic strip reapplied
Image

The cab is rammed full of cable clips which will make it all neat and tidy when it comes to adding the wiring but not all of them are needed. I’ll probably make new shelves if ever I have a spare bit of 12mm MDF. There’s nothing wrong with these ones but they have a few holes from the mounting of the original hardware, so why not.

I left just 2 cable clips on the lower shelf
Image

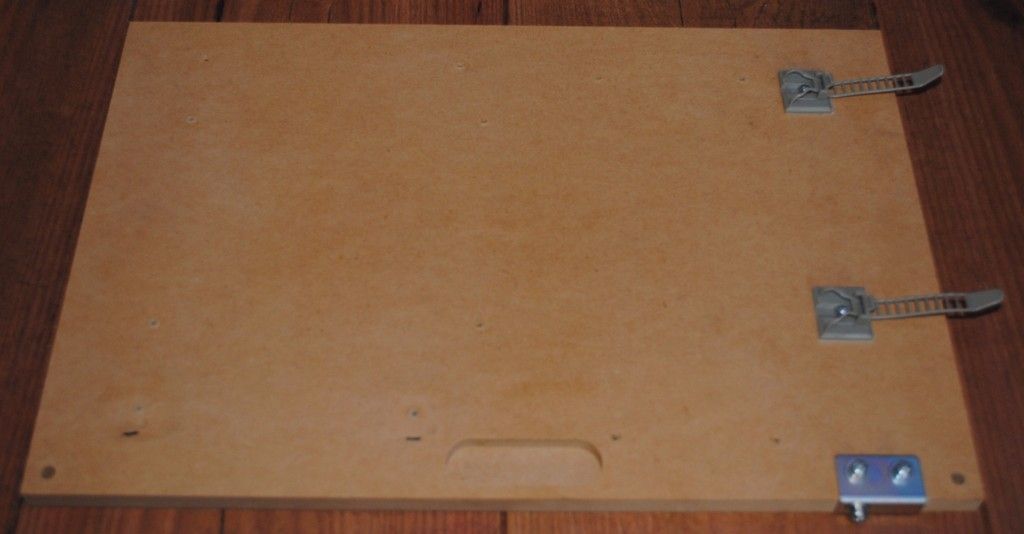
I removed them all from the top ‘PCB’ shelf. As you can see it’s a decent sized bit of real estate for such a small cab.
Image


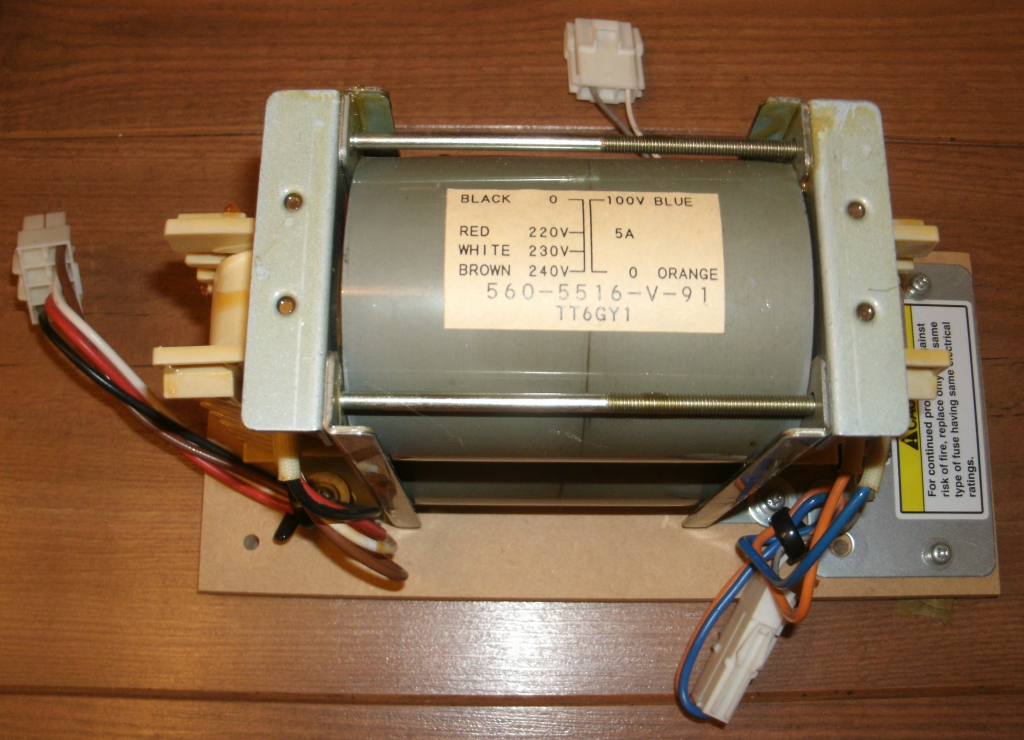
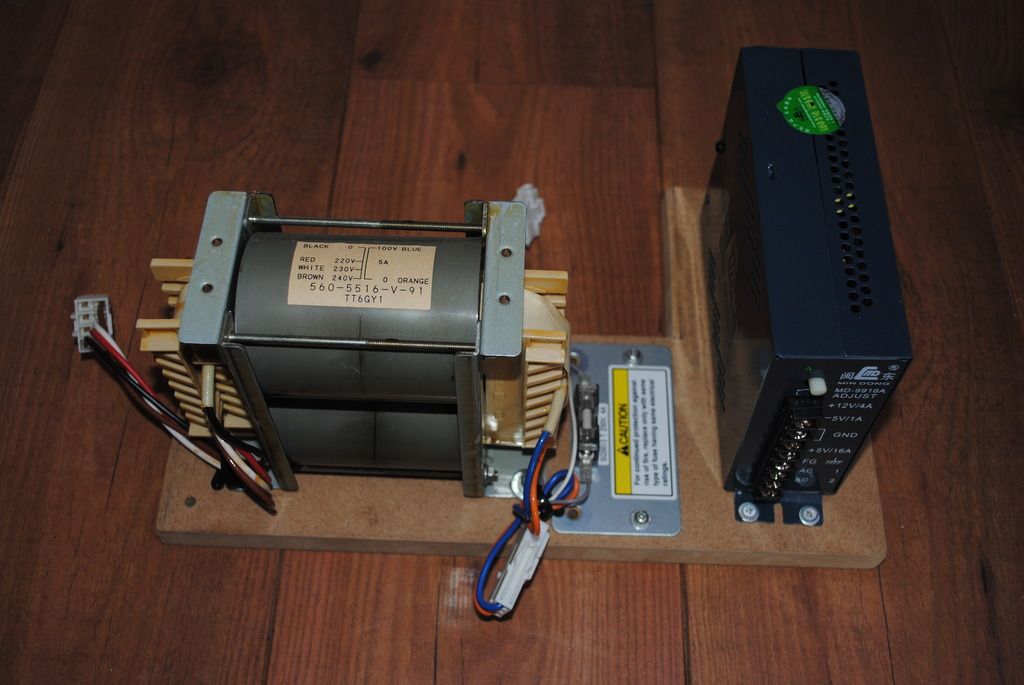
Both my cabs had a XFMR to step the voltage down for the monitor, but no wiring for a traditional switching JAMMA power supply. The first thing I needed to do was to knock up a new MDF base to mount the existing XFMR and a new PSU. I had a left over scrap of MDF in the garage, it’s thicker than the original and it’s been knocked about so it has some slight splitting down one side, (I'm picky and it really is something and nothing) it doesn't matter about the depth but again I'm picky so I’ll make a perfect replacement when I pick up an off cut. I’ll get my router out for the edges too just to make it extra nice but I couldn't be bothered to do that for these ‘temporary’ ones. The new base is just a simple ‘L’ shape. If you use the original as a template then you already have the perfect placement for all of the necessary holes. Use a forstner bit to drill larger holes on the reverse in order to mount the threaded hardware to the correct depth. The XMFR MDF base originally comes with Claw nuts and the front card dispenser MDF mounting base (which is also not required) originally comes with barbed inserts :ugeek: so take your pick which to re-purpose, they both do the same job. Just poke them out with an old screwdriver and tap them into the new one. Use a pair of pliers to hold an old sturdy bolt and use that to tap the hardware into position, don’t hold the bolt without the pliers, if the bolt slips and you **** your finger it WILL hurt!

The original
Image

The new mounting plate marked up, I got two out of this off cut
Image

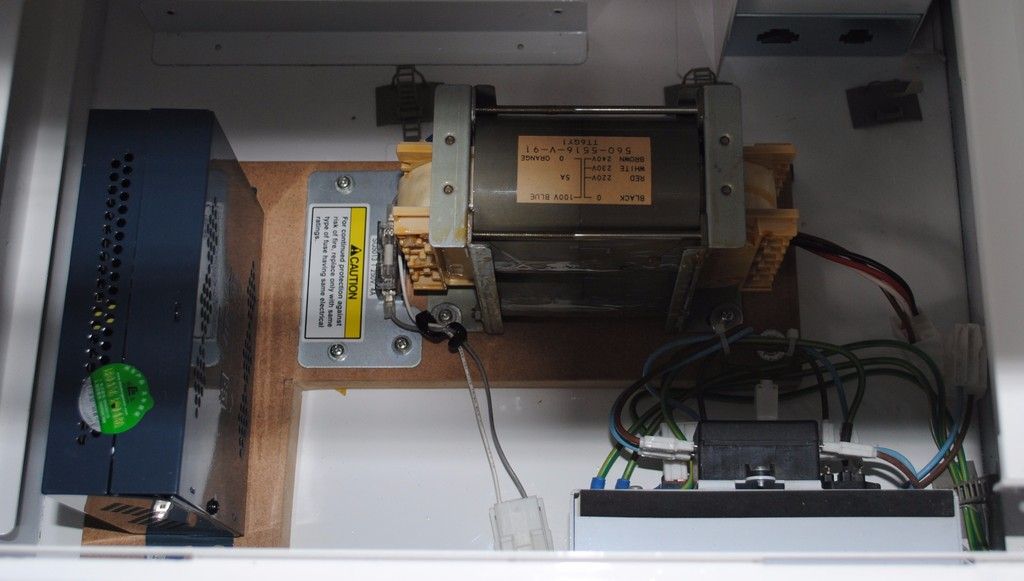
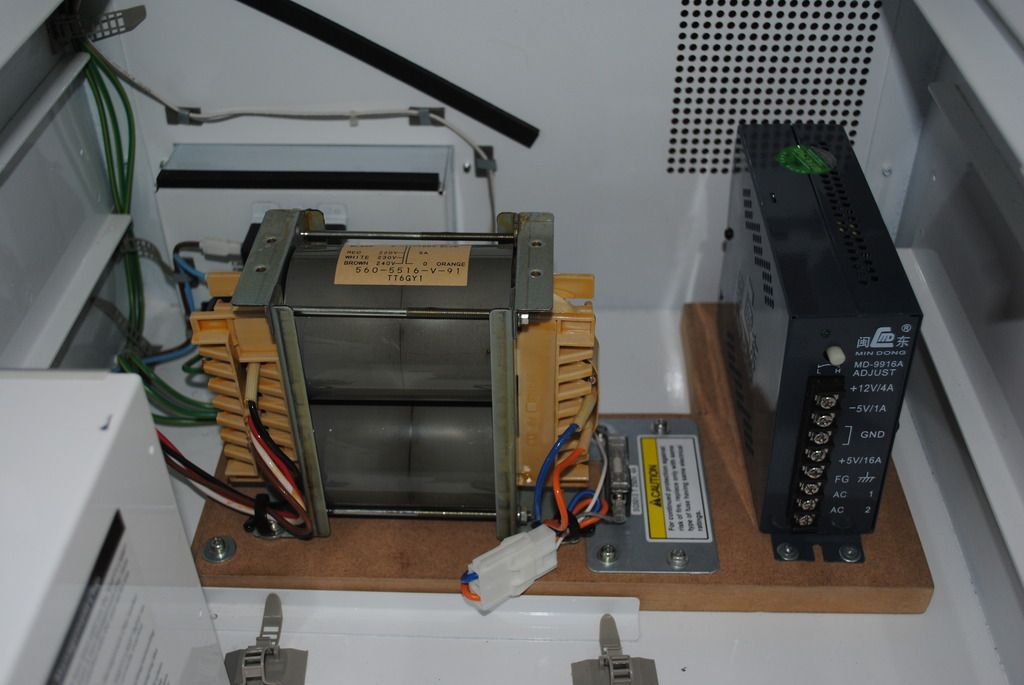
XFMR and new PSU mounted in position
Image

Underside
Image

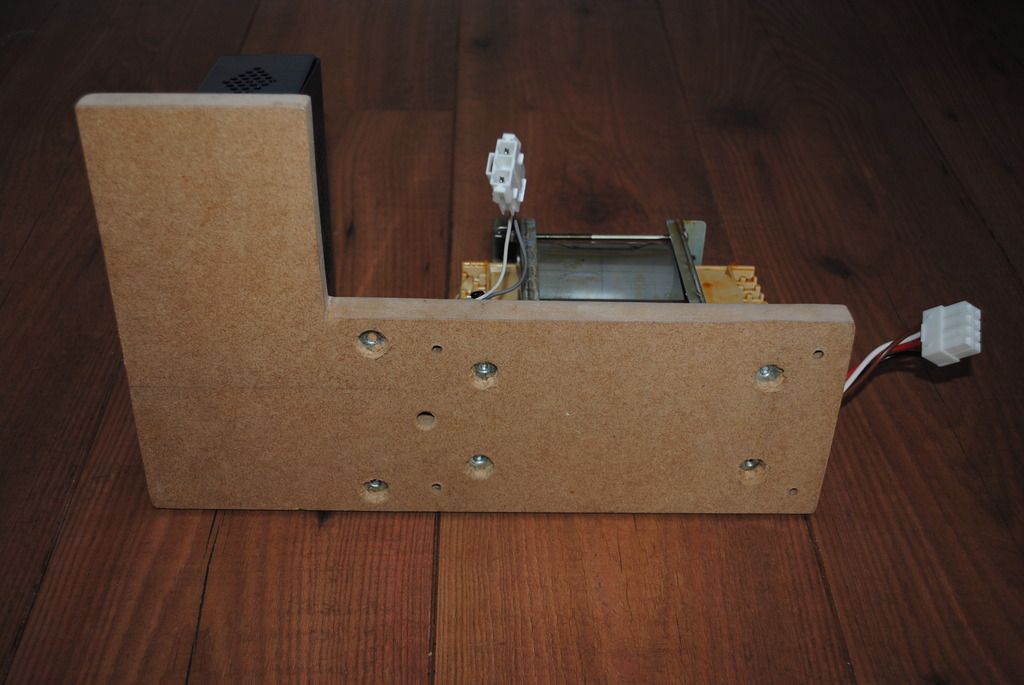
New base Installed in the cab, rear view
Image

And front view
Image

Shelves and service panel installed, rear view. As you can see plenty of space on that top shelf
Image

and front view
Image

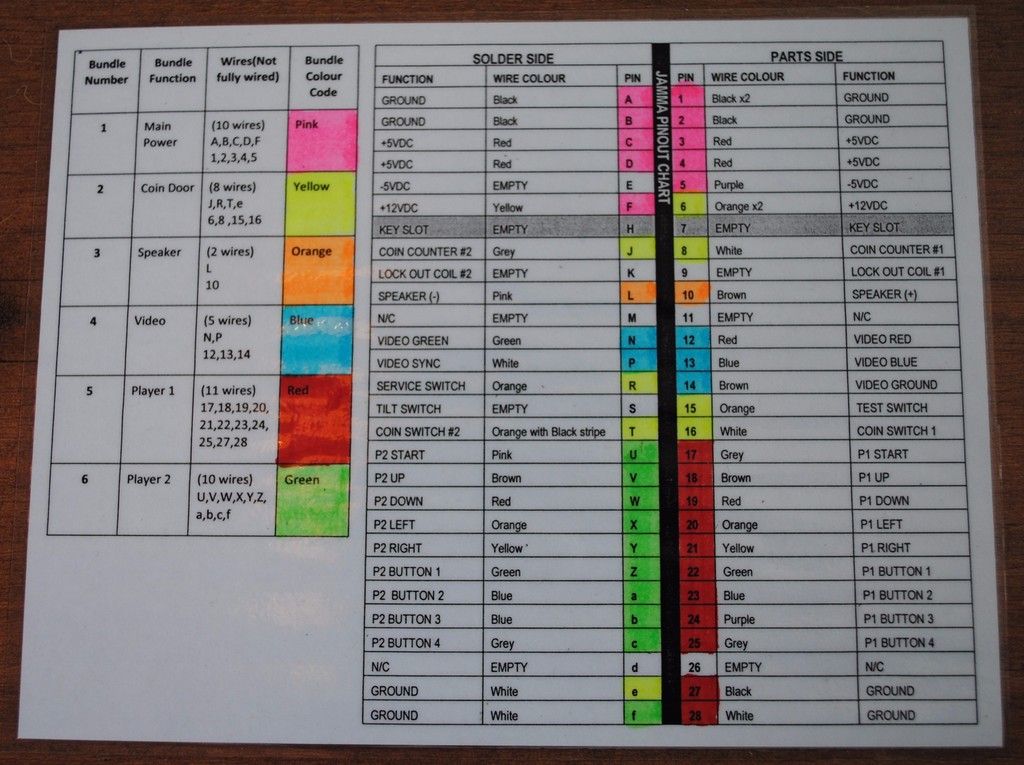
If you are wondering what's that on the base of the cab, then it’s this handy little table. So I can quickly cross reference the JAMMA harness, when I come to install it.
Image[/quote]
Last edited by Paulie on November 26th, 2016, 7:40 pm, edited 2 times in total.
User avatar
TheRedKnight
CNITELIEF
Posts: 3458
Joined: March 19th, 2012, 7:22 am
Location: Finland
eBay: aaaveajajaja

Re: Sega Dinosaur King conversion to JAMMA

Post by TheRedKnight »

Nice work. :thumbupright:

Now when do we get to see a proper front and back view of you? :whoopsie:
Emulation's nice when done well
User avatar
Paulie
Opens wallet, moths fly out
Posts: 2599
Joined: September 28th, 2011, 5:43 pm
Location: East Ardsley, West Yorks
eBay: retro-paulie
Initials: PSG

Re: Sega Dinosaur King conversion to JAMMA

Post by Paulie »

TheRedKnight wrote:Now when do we get to see a proper front and back view of you? :whoopsie:
PM incoming :fastlove:
User avatar
crunchywasp
stompin' an' jumpin'
Posts: 8101
Joined: February 10th, 2012, 2:51 pm
Location: Northern Ireland
eBay: crunchywasp
Initials: MAK

Re: Sega Dinosaur King conversion to JAMMA

Post by crunchywasp »

Please add me to the cc list :fastlove:

Excellent work as always 8-)
Image