Sega Dinosaur King cab - Conversion to JAMMA - Updated 31/3/16

Show off your wares.
User avatar
Paulie
Opens wallet, moths fly out
Posts: 2599
Joined: September 28th, 2011, 5:43 pm
Location: East Ardsley, West Yorks
eBay: retro-paulie
Initials: PSG

Sega Dinosaur King cab - Conversion to JAMMA - Updated 31/3/16

Post by Paulie »

I've been after a new cab for a while now so chuffed to have picked up a pair of Sega Dinosaur King cabinets from Andy Geezer.

DK cabs in da house :awe:
Image

Theeb seems to like them
Image

I know a few people have documented their cabs journey and plenty of other folks own them so we'll just have to see what happens to mine.

Franco's awesome thread

Jodo's Dino King to JAMMA thread

Muddy's great How to Jamma convert a Sega Dinosaur King thread

Muddymusic's lovely G&G conversion it's actually a more comprehensive read Here and Here

Spectre's conversion (sadly the photos seem to be no more)

kjeffery's Dreamcast conversion

Setch's Mushi King conversion

BTW if you stumble across or have documented your own Dino/ L&B/ Mushi journey and I've not linked to it above PLMK and I'll add a link here :)

If you do have one of these cabs then check out the AO wiki entry, there's a scan of the English manual (for all 3 cabs). I've already printed one off, although I've not really had a chance to look at it yet but I'm sure it will be useful, especially the schematics/ wiring diagrams at the back.

Down to business
My first job is to strip them down and give them a good clean.
Last edited by Paulie on November 26th, 2016, 7:23 pm, edited 5 times in total.
User avatar
geotrig
Potato!
Posts: 7765
Joined: December 5th, 2008, 1:14 pm
Location: ._.
eBay: ._.

Re: Sega Dinosaur King conversion to JAMMA

Post by geotrig »

Paulie wrote: My first job is to strip them down and give them a good clean.
Not sure if your talking about the kids or the cabs :awe:

looking forward to this paulie ,you might even be finished before franco :awe:
Image

<trk>:I remember catching a big fat one and my friend said "throw it back in, that one already tastes like wood"
User avatar
TheRedKnight
CNITELIEF
Posts: 3458
Joined: March 19th, 2012, 7:22 am
Location: Finland
eBay: aaaveajajaja

Re: Sega Dinosaur King conversion to JAMMA

Post by TheRedKnight »

geotrig wrote:
Paulie wrote:
looking forward to this paulie ,you might even be finished before franco :awe:
:lol:

Nice gets Paulie! Maybe a VS game setup where the other side is X-men themed and the other one is all Street Fighter? :whoopsie:
Emulation's nice when done well
User avatar
Paulie
Opens wallet, moths fly out
Posts: 2599
Joined: September 28th, 2011, 5:43 pm
Location: East Ardsley, West Yorks
eBay: retro-paulie
Initials: PSG

Re: Sega Dinosaur King conversion to JAMMA

Post by Paulie »

geotrig wrote:
Paulie wrote: My first job is to strip them down and give them a good clean.
Not sure if your talking about the kids or the cabs :awe:

looking forward to this paulie ,you might even be finished before franco :awe:
:lol:

First job is to strip the cabs in preparation for giving them a really good clean. You might have seen all this before in other peoples conversion threads but hey ho :)

Do yourself a favour and download / print off the owners manual from the AO wiki it’s useful for identifying fixings, part names / numbers, plus there are a couple of fairly straightforward wiring diagrams located at the back. My cabs just need a switching power supply, an appropriate loom building and once I've knocked up a control panel I should be good to go. I think they are just missing the POP, locks, game board, Power board, I/O boards and the associated wiring loom.

So lets get on with the stripping :fastlove:

Please note that most of these photos were taken after I had cleaned both cabs. I've now realised there was a problem with the SD card I was using but found this out only after it had lost over half of the photos I had taken :roll:


Tools required
T20 Torx bit - required for control panel and a couple of other screws or possibly not (see below)
A couple of small Philips bits - required for removing the screws
Box tube spanners / Sockets - Required for removing the hasp and also for the bolt control panel earth and the cut earth's too

Removing the hasp
There are 3 bolts located on the inner of the right hand side of the cab and 3 more tucked away inside of the coin box, just remove the bolts and the hasp will come free. I also removed the credit counter tray (2 truss screws) to make a bit more space. I like to use box tube spanners for these kinds of jobs as I said its a fairly confined space in the coin box and the length of the thread can prevent short sockets from actually getting over the nut, also you can apply a decent amount of leverage with minimal effort with these tools. I highly recommend picking up a set when you see them cheaply as they are really useful to have in the tool box.
Nuts located through the three circular holes
Image

Control panel removed
Both of mine were held in place by 8 M4 x 12 chrome Torx bolts (T20), the same ones as found on Naomi’s but the manual states that they were originally truss screws. I don’t know if this is correct as a regular truss screw seems like a poor choice of fixing for any cabinet area that is accessible to inquisitive hands. Once the screws have been removed I just disconnected the the earth and it was free.
Image

Front mask removed
First remove the 3 M4 x 12 screws and cup nuts that hold the cover plate to the board bracket then remove the 4 M4 x 12 screws, again an odd choice of fixing why not Torx? I'm guessing the monitor has been out at some point as it's missing the nut and bush from the top left (if anyone has a spare original bush please will you drop me a pm).
Image

Inside
This is what both of mine looked like inside (Note the two cut ends of an earth cable, front door and above the coin box)
Image

Inside the Front door
Image

Removing the card dispenser and slide MDF base
Just remove the 4 philips M4 x 20 screws
Image

I found a bunch of L&B cards in one of the dispensers and some Dino King cards in the other.
Image

Removing the, lower partition, RFID chip and upper partition
Dead easy, just remove all the M4 x8 screws. You'll be now left with the two shelves and the XFMR, in the base.
Image

This is now what the inside looks like from the **** end
The rear door is held in place by two torx screws (T20)
Image

XFMR
Image

XFMR underside of MDF base
Some cool Japanese writing :awe:
Image

AC Unit
Image

Top shelf
This still has the power, demag, test and service switches and some wiring
Image

Bottom shelf
Image

Gubbins
This is what came out of one of the cabs (both were the same), I don't think there's a great deal here that is of much use
Image

Empty
Image

Now for a bit of spit and polish
Last edited by Paulie on September 5th, 2016, 9:19 pm, edited 4 times in total.
User avatar
crunchywasp
stompin' an' jumpin'
Posts: 8101
Joined: February 10th, 2012, 2:51 pm
Location: Northern Ireland
eBay: crunchywasp
Initials: MAK

Re: Sega Dinosaur King conversion to JAMMA

Post by crunchywasp »

Great stuff Paul and thorough as ever. I love your tinkering and restoration threads :whoopsie:
Image
User avatar
Devil Soundwave
Doesn't go to eleven
Posts: 4713
Joined: January 7th, 2009, 11:56 pm
Location: Wetherby, Yorkshire
eBay: DevilSoundwave

Re: Sega Dinosaur King conversion to JAMMA

Post by Devil Soundwave »

Wish you'd converted the Mushi I have. Whoever did the wiring changeover to JAMMA was a total butcher. Splices all over the place, plus they have used a really **** Chinese harness. Still, works though so musn't grumble.
User avatar
Paulie
Opens wallet, moths fly out
Posts: 2599
Joined: September 28th, 2011, 5:43 pm
Location: East Ardsley, West Yorks
eBay: retro-paulie
Initials: PSG

Re: Sega Dinosaur King conversion to JAMMA

Post by Paulie »

crunchywasp wrote:Great stuff Paul and thorough as ever. I love your tinkering and restoration threads :whoopsie:
:) Thanks Mark
Devil Soundwave wrote:Wish you'd converted the Mushi I have. Whoever did the wiring changeover to JAMMA was a total butcher. Splices all over the place, plus they have used a really **** Chinese harness. Still, works though so musn't grumble.
That's a shame DS, but the main thing is that it's safe and its working. You could always make another loom at some point, I've been told it's a really easy job but as I haven't started to make my loom yet I better wait before I comment.
User avatar
jase
Posts: 690
Joined: September 14th, 2008, 3:18 pm
Location:

Re: Sega Dinosaur King conversion to JAMMA

Post by jase »

Awesome read Paul, it's great to see how your getting on with these. :awe:
Image
User avatar
Paulie
Opens wallet, moths fly out
Posts: 2599
Joined: September 28th, 2011, 5:43 pm
Location: East Ardsley, West Yorks
eBay: retro-paulie
Initials: PSG

Re: Sega Dinosaur King conversion to JAMMA

Post by Paulie »

jase wrote:Awesome read Paul, it's great to see how your getting on with these. :awe:
Thanks Jase :)

Cabinet #1 is relatively clean but cabinet #2 is filthy.
Both have their fair share of scrapes and marks but almost all of these look to be superficial (looks like whatever has made contact with the cabs has left it's paint on the DK and fortunately not the other way around) so should clean up nicely and it shouldn't take too long especially as I now have a little helper :D
Image

For cleaning I use
Soft cloths - for washing/ wiping and buffing
Stiff paint brush - pretty good for flicking the dust out of all the nooks and cranny's
Lighter fluid - removes sticky residue
Magic eraser (make sure you buy a Flash branded one) - these are really very good for cleaning all the scrapes and grime off your cab
Stellar stainless steel cleaner - this is ace for all kinds of impossible to remove marks that magic erasers can’t handle, great for tough stains, permanent marker etc
Novus 3, 2, 1 - polishing plastics

As I've already said, unfortunately I've lost a lot of my photos so these next eight are what Andy originally sent me

Cabinet #1 (the clean one)
Front
Image

Back
Image

LHS
Image

RHS
Image

Cabinet #2 (the dirty ****)
Front
Image

Back
Image

LHS
Image

RHS
Image

Some of the marks
Image

:-D :D :D
Image

Brushing the last bit of dirt out
Image

Image

I still need to give the plastics a proper finishing polish but I hope you agree that they are looking pretty nice now :awe:

Next job is to wire them for JAMMA
Last edited by Paulie on November 26th, 2016, 7:31 pm, edited 2 times in total.
User avatar
emphatic
Breastfeeds when required
Posts: 5907
Joined: April 7th, 2009, 4:14 pm
Location: Alingsås, Sweden
eBay: jorgen_sjolander
Initials: JOR

Re: Sega Dinosaur King conversion to JAMMA

Post by emphatic »

Well done! Cute helper too!
User avatar
FrancoB
J+ member of the year finalist!
Posts: 4796
Joined: June 8th, 2009, 10:42 pm
Location: Oxfordshire
eBay: francosquashking
Initials: FRN

Re: Sega Dinosaur King conversion to JAMMA

Post by FrancoB »

Oh awesome Paulie, I've only just seen this :)

Really looking forward to this, I always enjoy your resto threads and you're off to your usual great start with lots of pictures and information documented. I'm sure this will be a 'go to' thread in future. :thumbupright:
User avatar
Chempop
Please Continue...
Posts: 1045
Joined: May 13th, 2011, 6:13 pm
Location: North East USA
eBay: Weegzon
Initials: GLX

Re: Sega Dinosaur King conversion to JAMMA

Post by Chempop »

Adorable kiddo! You think you’ll do custom art and the whole nine?
User avatar
Devil Soundwave
Doesn't go to eleven
Posts: 4713
Joined: January 7th, 2009, 11:56 pm
Location: Wetherby, Yorkshire
eBay: DevilSoundwave

Re: Sega Dinosaur King conversion to JAMMA

Post by Devil Soundwave »

The whole nine metres?
User avatar
Paulie
Opens wallet, moths fly out
Posts: 2599
Joined: September 28th, 2011, 5:43 pm
Location: East Ardsley, West Yorks
eBay: retro-paulie
Initials: PSG

Re: Sega Dinosaur King conversion to JAMMA

Post by Paulie »

FrancoB wrote:Oh awesome Paulie, I've only just seen this :)

Really looking forward to this, I always enjoy your resto threads and you're off to your usual great start with lots of pictures and information documented. I'm sure this will be a 'go to' thread in future. :thumbupright:
Cheers Fran :)

Yours will always be the definitive mini cab thread :awe:
Chempop wrote:Adorable kiddo! You think you’ll do custom art and the whole nine?
Thanks mate :D

I hope to eventually get full custom art although I don't know what yet.
Devil Soundwave wrote:The whole nine metres?
Feet?
User avatar
Rossyra
Supermod
Posts: 7902
Joined: February 12th, 2009, 1:24 am
Location: UK

Re: Sega Dinosaur King conversion to JAMMA

Post by Rossyra »

Looking good P-dizz
Image
User avatar
Paulie
Opens wallet, moths fly out
Posts: 2599
Joined: September 28th, 2011, 5:43 pm
Location: East Ardsley, West Yorks
eBay: retro-paulie
Initials: PSG

Re: Sega Dinosaur King conversion to JAMMA

Post by Paulie »

Cheers Rosco :D

The JAMMA harness
Be careful when shopping for a JAMMA harness, I don't know of anywhere that sells decent brand new ones. I've been given a few of the cheap 'Chinese' ones and they are cheap for a reason.

Brand new 'Chinese' harness
The pins are loose and are of poor quality, the solder points are extremely shoddy, the edge is not marked up just a lttle Chinese writing, there's 17 unused pins, and even when they are used it's a waste of time. There's one wire covering Ground, it's the same story on the +5. Even worse though these power wires are clearly marked 18AWG yet the copper is as thin as a human hair, it just has an extra thick rubber outer. Complete junk!
Image

If you are not yet familiar with the JAMMA pinout then now's the time to google. Note on a JAMMA harness edge connector there is no pin, G, I, O or Q and there is both upper and lower case pins ABCDEF/abcdef

My pinout reference charts and home made ID edge connector labels. I only had acess to a B&W printer so coloured them in with felt tips :awe:
Image

For my first cab
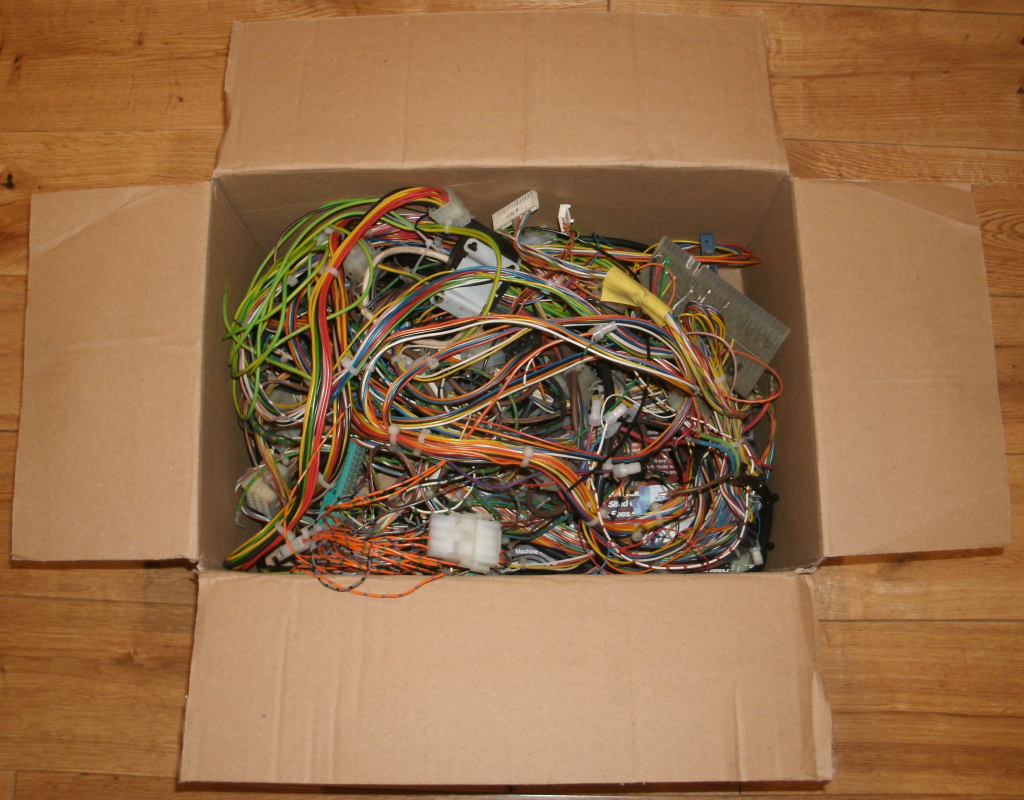
I got a pre loved JAMMA loom from Mo (videotronics). I’ve no idea what cab it originally came from but its a really nice quality loom but it was in need of a good clean and a few of the wires required some attention. The audio lines (10, 11, L & M) were connected to a large molex about 12” from the edge connector. A few of other wires had been cut and spliced, again near to the edge connector. None of this was really a problem at all but I found it unsightly so I just desoldered these wires, cut them just past the connector / splices, then resoldered them back in place.

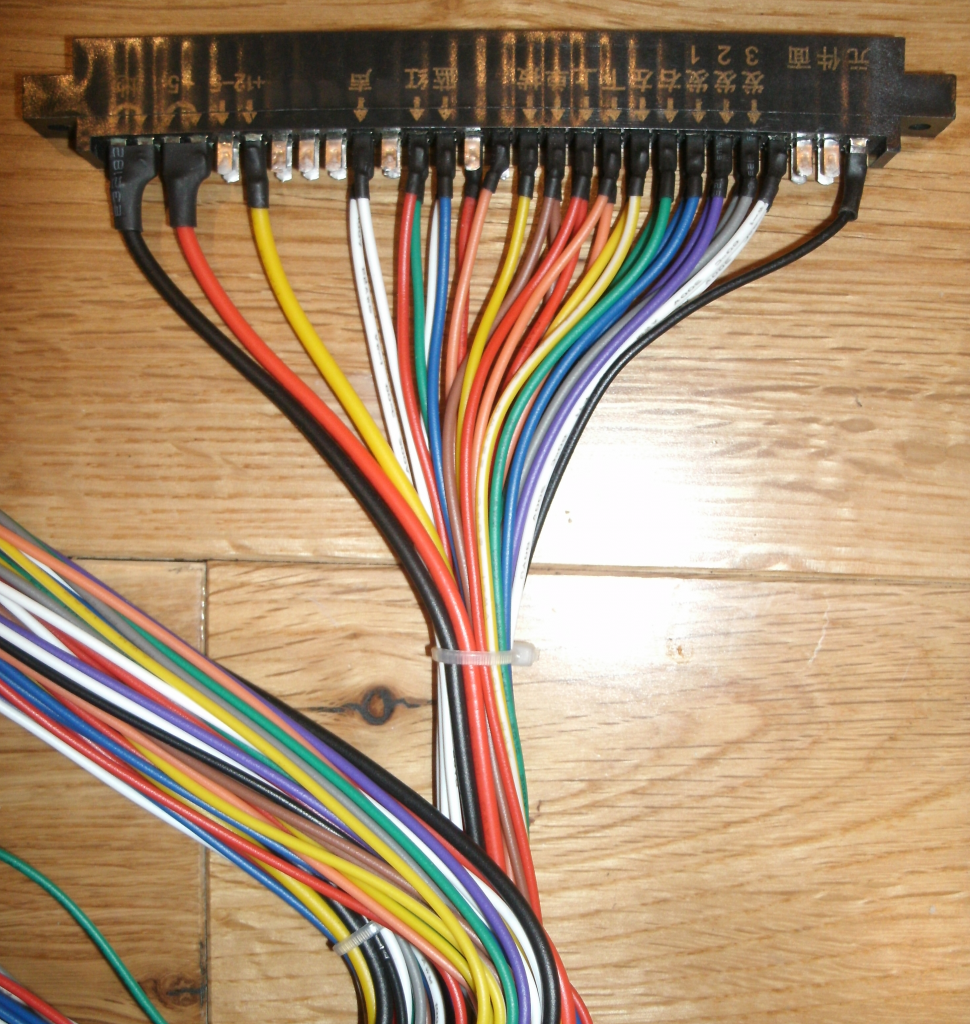
This is what Mo sent me (absolute bargain for £11.99 delivered, arrived in less than 24hrs too)
Image

I put the wires into 6 bundles (I saw this tip on Bob Roberts) so that’s what all of the colours on the edge connector refer to.
Pink - Power - A,B,C,D,E,F,1,2,3,4,5
Yellow - Coin door - J,K,R,S,T,e,6,8,9,15,16
Orange - Audio - L,M,10,11
Blue - Video - N,P,12,13,14
Red - Player 1 - 17,18,19,20,21,22,23,24,25,26,27,28
Green - Player 2 - U,V,W,X,Y,Z,a,b,c,d,f
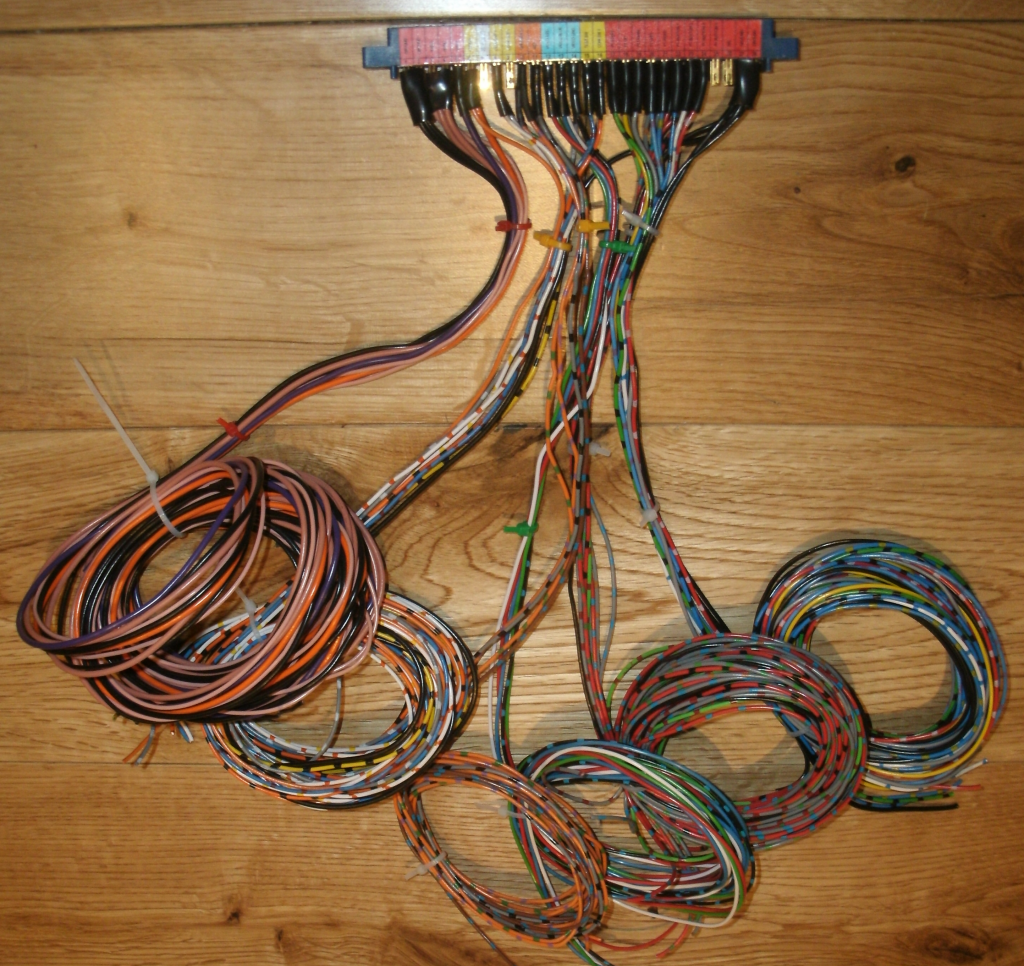
Much better
Image

I need to test fit the loom for length then I can deal with the unterminated ends. But before I do that I want to finish the 2nd harness off which I started this evening. I had to call it a day though as it's bloody freezing in my garage.

For the second cab I decided to wire a harness from scratch. Its not a difficult job so don’t be put off giving this a go. I'm not the quickest with an iron and I would say I'm a novice, I have basic soldering skills, but that’s all that’s required for this task. I already had everything I needed so it seemed silly not to make one myself. I thought I could save time by not wiring up the player 2 controls but as Franco quite rightly pointed out
FrancoB wrote:you don't need to wire anything up to P2s controls if you're not planning on using them but I probably would add wires to them anyway as it's only a few extra wires to add and it would be much easier in future if you do end up needing them which would avoiding uninstalling the whole loom to solder them on if you hadn't added them initially.
What you will need is to make a JAMMA harness
Edge connector, I already had a few in my spares box
Wire. 54 lengths. Wire length depends on your model of cab. Depending where you get your information from, you’ll need 12 lengths of 18/20AWG for the power wires and 42 lengths of 20/22AWG for the rest. Andy very kindly gave me a mountain of wire, I already had some and Mo sent loads of extras with his harness so I’ve got it coming out of my ears.
Heatshrink
Wire stripper
Soldering iron
Solder (leaded)
Flux pen
Helping hands is a useful tool to have too
Multimeter
Cable ties
Harness ID label

This is how I did it.
Firstly I made and printed off a little colour coded ID label. I’ll be putting the wires into 6 bundles as I did with the other harness.

I then Keyed the harness. You can either melt a blob of solder on connectors H/7 or remove these pins and cut a bit of plastic to size and pop it in there. This will prevent any FUBARS as now the harness cannot be plugged in upside down.
I use wire strippers to strip the end of the wire then I give it a twist
I slip a length of heat shrink over the end of the wire and slide it up/ out of the way for later
When soldering I keep my iron tip clean and tin it with a little leaded solder
I always tin both the wire and the pin
I then apply a little flux with a flux pen
I heat the pin and then bring the wire to the pin and apply a little leaded solder
I use a multimeter to test continuity
I slide the heatshrink in place and use a lighter to shrink it
Last edited by Paulie on September 5th, 2016, 9:49 pm, edited 1 time in total.
User avatar
crunchywasp
stompin' an' jumpin'
Posts: 8101
Joined: February 10th, 2012, 2:51 pm
Location: Northern Ireland
eBay: crunchywasp
Initials: MAK

Re: Sega Dinosaur King conversion to JAMMA

Post by crunchywasp »

Great stuff Paul. Those Chinese JAMMA harnesses really are junk :problem:

I like to use these wee buggers for keying harnesses:

http://www.leshoparcade.com/fiche_produ ... ting%20pin"
Image
User avatar
Devil Soundwave
Doesn't go to eleven
Posts: 4713
Joined: January 7th, 2009, 11:56 pm
Location: Wetherby, Yorkshire
eBay: DevilSoundwave

Re: Sega Dinosaur King conversion to JAMMA

Post by Devil Soundwave »

crunchywasp wrote:Great stuff Paul. Those Chinese JAMMA harnesses really are junk :problem:

I like to use these wee buggers for keying harnesses:

http://www.leshoparcade.com/fiche_produ ... ting%20pin"
I use a squashed Hama bead to key harnesses. Fits perfectly.
User avatar
crunchywasp
stompin' an' jumpin'
Posts: 8101
Joined: February 10th, 2012, 2:51 pm
Location: Northern Ireland
eBay: crunchywasp
Initials: MAK

Re: Sega Dinosaur King conversion to JAMMA

Post by crunchywasp »

Ahh, good thinking.
Image
User avatar
Devil Soundwave
Doesn't go to eleven
Posts: 4713
Joined: January 7th, 2009, 11:56 pm
Location: Wetherby, Yorkshire
eBay: DevilSoundwave

Re: Sega Dinosaur King conversion to JAMMA

Post by Devil Soundwave »

crunchywasp wrote:Ahh, good thinking.
You have to pull the pins out from the key point first though.