Sega Naomi restoration WIP - Updated Sept 2015
-
crunchywasp

- stompin' an' jumpin'
- Posts: 8101
- Joined: February 10th, 2012, 2:51 pm
- Location: Northern Ireland
- eBay: crunchywasp
- Initials: MAK
Re: Sega Naomi restoration work in progress Updated Tues 10/

-
emphatic

- Breastfeeds when required
- Posts: 5907
- Joined: April 7th, 2009, 4:14 pm
- Location: Alingsås, Sweden
- eBay: jorgen_sjolander
- Initials: JOR
Re: Sega Naomi restoration work in progress Updated Tues 10/
Man, that's hot!
My games: http://www.emphatic.se
-
Paulie

- Opens wallet, moths fly out
- Posts: 2599
- Joined: September 28th, 2011, 5:43 pm
- Location: East Ardsley, West Yorks
- eBay: retro-paulie
- Initials: PSG
-
instant_classic

- Actually Loves Take That
- Posts: 980
- Joined: February 10th, 2009, 9:47 pm
- Location: Wales
- Initials: DAF
Re: Sega Naomi restoration work in progress Updated Tues 10/
woah great job on them there hoofs
-
Paulie
- Opens wallet, moths fly out
- Posts: 2599
- Joined: September 28th, 2011, 5:43 pm
- Location: East Ardsley, West Yorks
- eBay: retro-paulie
- Initials: PSG
Re: Sega Naomi restoration work in progress Updated Tues 10/
Well carrying on the one step forward two steps back theme.
I got the transformer today which came with a ton of the wiring too. So how did I find my parcel when I got home from work,? I'll tell you, the box looked like it had been kicked all the way from the sender to me and it was **** wet through, and why was it **** wet through? because myhermes had thoughtfully left it out in the rain for me whilst I was at work I'm sure they just dumped it whilst I was out as they knew anyone would be **** off to be given such an abused parcel and they knew there was a good chance the contents was dammaged, the cardboard box was just trashed. When I saw it may heart sank thankfully against all the odds after drying everything out the transformer works, but not everything in the package survived the journey.
The casualty

The transformer has a slightly smaller footprint to the one that was in my cab so I have to make a new board for it to be secured to as the bolts don't marry the threads now. The RHS speaker has a faint hum and the LHS is blowing like af00kin hurricane so I've got to find a pair of replacement speakers
On a lighter note Crag has some of the M4x12 chrome torx security bolts I needed and another CPO for the 2L10B panel I've made so I've got those coming which is good.
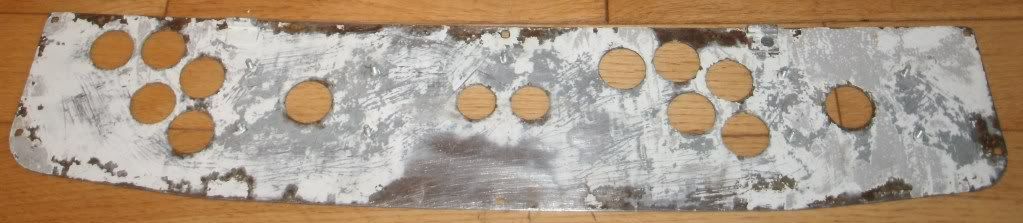
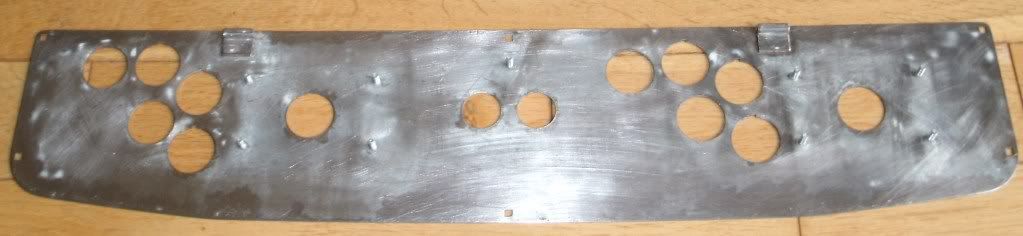
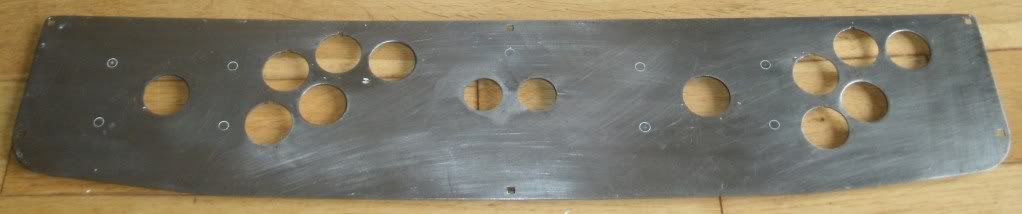
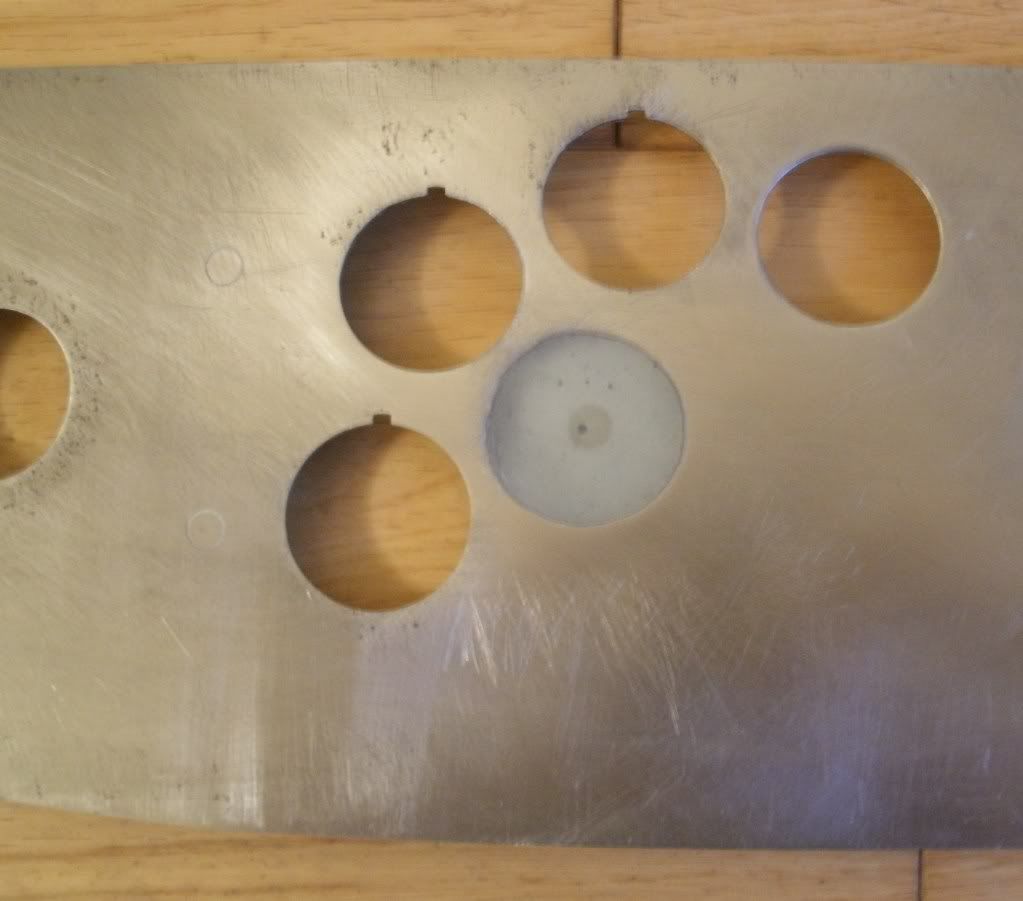
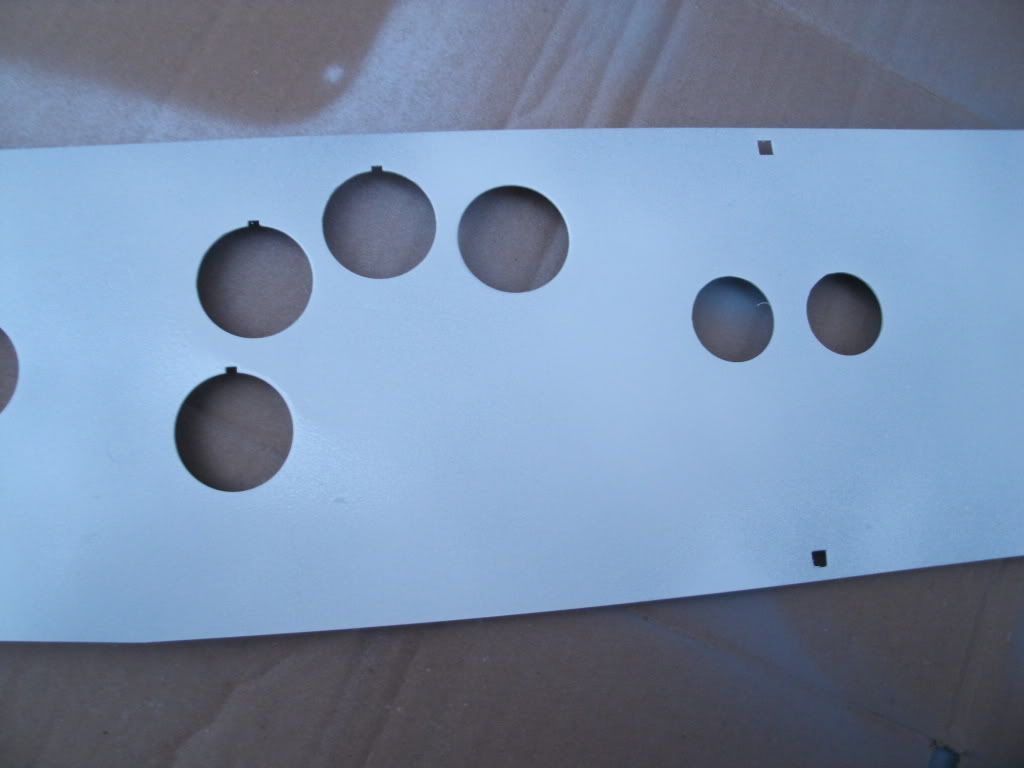
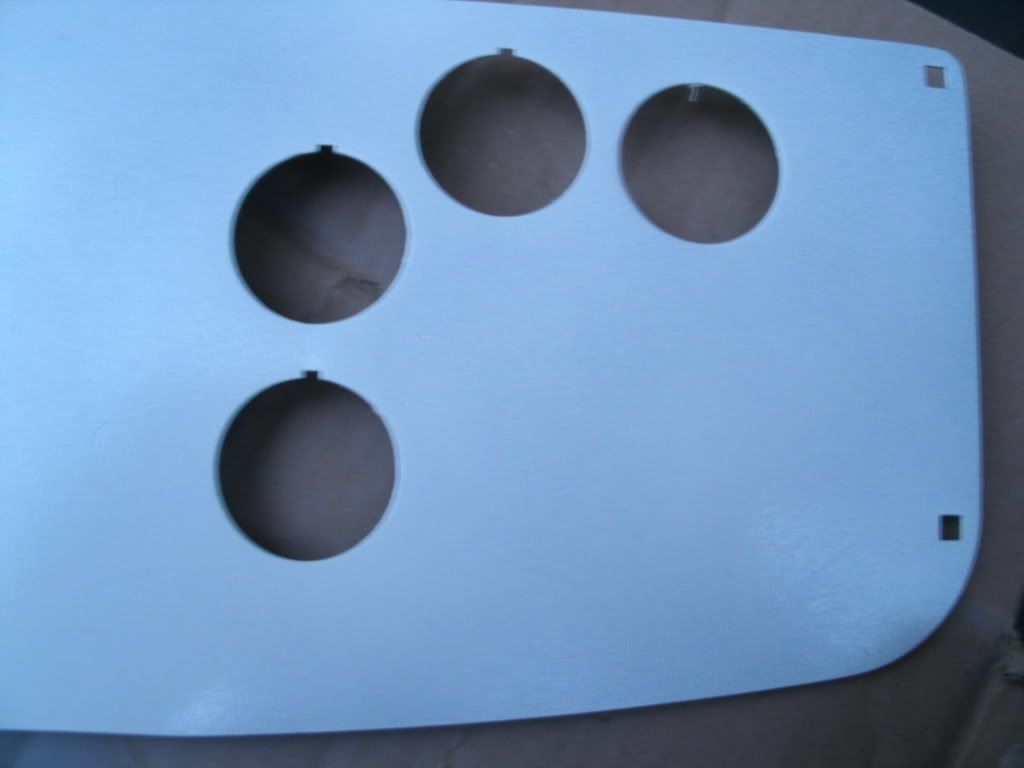
Fixed the CP that I turned into Swiss cheese
The repair was dead easy, al I used was a washer and some epoxy. I nitromorsed the panel but it's nothing like as feirce as it used to be and I ran out half way through so I sanded the rest by hand. I stuck the washer to the reverse of the control panel with epoxy flipped it over and filled the face hole with epoxy. If you do this make sure you overfill the hole and sand back as it will sink slightly. I sanded the excess epoxy, primed it and it's had two coats of white but I need to pick up another can as I don't have enough for another two coats which is what it will require.
Nirtomorsed I had run out at this point so the rest had to come off by hand
Finished by hand
Filled with jizz err I mean epoxy
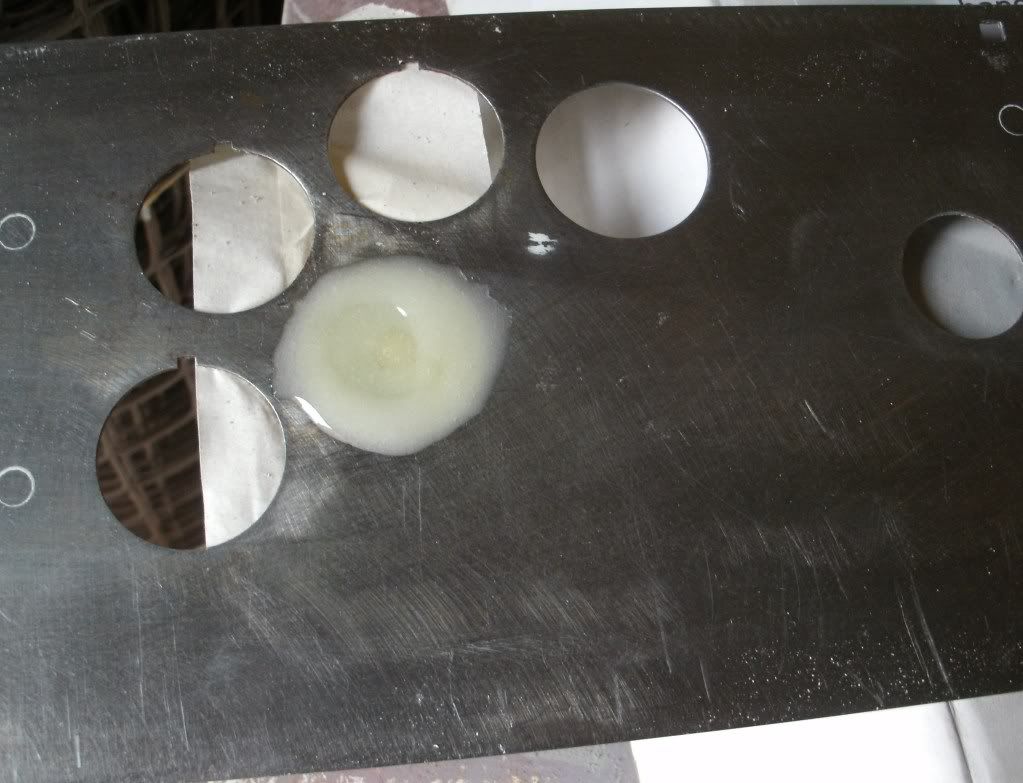
Epoxy sanded
Reverse of the repair

Primed and after two coat of white (still needs 2 more coats) and as if by magic, repair what repair these pics are a bit dark as it's 10pm and I've just given it its 2nd coat but wanted to take a piccy for you all.
P1
P2
I'm still not sure on button colours so any input of button colours would be very welcome, but please bear in mind both will have official orange UK Naomi overlays.
For the 2L10B panel I was thinking of using the same colours as on the Atomiswave FOTNS move list LG, Y, R, B DG and R for P1&P2, & R ball tops but do not know where I can get or if indeed 2 shades of green (light and dark) buttons exist, I've checked out a few places to no avail.
For the 2L8B panel I was thinking of using all red or maybe the good ol Neo colour scheme R, Y, G, B and Y for P1&P2 & R ball tops
I got the transformer today which came with a ton of the wiring too. So how did I find my parcel when I got home from work,? I'll tell you, the box looked like it had been kicked all the way from the sender to me and it was **** wet through, and why was it **** wet through? because myhermes had thoughtfully left it out in the rain for me whilst I was at work
The casualty
The transformer has a slightly smaller footprint to the one that was in my cab so I have to make a new board for it to be secured to as the bolts don't marry the threads now. The RHS speaker has a faint hum and the LHS is blowing like af00kin hurricane so I've got to find a pair of replacement speakers
On a lighter note Crag has some of the M4x12 chrome torx security bolts I needed and another CPO for the 2L10B panel I've made so I've got those coming which is good.
Fixed the CP that I turned into Swiss cheese
The repair was dead easy, al I used was a washer and some epoxy. I nitromorsed the panel but it's nothing like as feirce as it used to be and I ran out half way through so I sanded the rest by hand. I stuck the washer to the reverse of the control panel with epoxy flipped it over and filled the face hole with epoxy. If you do this make sure you overfill the hole and sand back as it will sink slightly. I sanded the excess epoxy, primed it and it's had two coats of white but I need to pick up another can as I don't have enough for another two coats which is what it will require.
Nirtomorsed I had run out at this point so the rest had to come off by hand
Finished by hand
Filled with jizz err I mean epoxy
Epoxy sanded
Reverse of the repair
Primed and after two coat of white (still needs 2 more coats) and as if by magic, repair what repair
P1
P2
I'm still not sure on button colours so any input of button colours would be very welcome, but please bear in mind both will have official orange UK Naomi overlays.
For the 2L10B panel I was thinking of using the same colours as on the Atomiswave FOTNS move list LG, Y, R, B DG and R for P1&P2, & R ball tops but do not know where I can get or if indeed 2 shades of green (light and dark) buttons exist, I've checked out a few places to no avail.
For the 2L8B panel I was thinking of using all red or maybe the good ol Neo colour scheme R, Y, G, B and Y for P1&P2 & R ball tops
Last edited by Paulie on July 14th, 2012, 12:13 am, edited 1 time in total.
-
crunchywasp
- stompin' an' jumpin'
- Posts: 8101
- Joined: February 10th, 2012, 2:51 pm
- Location: Northern Ireland
- eBay: crunchywasp
- Initials: MAK
Re: Sega Naomi restoration work in progress Updated Sat 14/7
MyHermes  bunch of **** goons
  sorry to hear that.
Excellent job on that CP!
Keep it up
Excellent job on that CP!
Keep it up
-
Paulie
- Opens wallet, moths fly out
- Posts: 2599
- Joined: September 28th, 2011, 5:43 pm
- Location: East Ardsley, West Yorks
- eBay: retro-paulie
- Initials: PSG
Re: Sega Naomi restoration work in progress Updated Sat 14/7
I was fizzing when I saw the parcel sopping wet and all beat up, and my heart just sank. Now I've calmed down I'm just thankful that the transformer works, I didn't need the broken board but thats not the point.
Cheers Mark I'm getting there now, theres been a few set backs over the last few weeks, but when I get some new speakers I should be ok.
Cheers Mark
-
denson

- Please Continue...
- Posts: 517
- Joined: February 22nd, 2012, 10:36 am
- Location: Norwich, Norfolk
- eBay: chubba100
Re: Sega Naomi restoration work in progress Updated Sat 14/7
Wow Paulie! Those panels look sweet! and I know how it feels to come home to a sopping wet parcel, glad the transformer was ok though 
-
FrancoB

- J+ member of the year finalist!
- Posts: 4796
- Joined: June 8th, 2009, 10:42 pm
- Location: Oxfordshire
- eBay: francosquashking
- Initials: FRN
Re: Sega Naomi restoration work in progress Updated Sat 14/7
Jeezus christ Paulie. There is some awesome work going on there! 
Nice work on drilling/punching the panels. I know how hard it is to get them located accurately, thats why I cheated and used that jig . If you are just a couple of mm off it looks **** but you have do a great job, kudos.
Did you repaint the hoofs? Which paint did you use?
Nice work on drilling/punching the panels. I know how hard it is to get them located accurately, thats why I cheated and used that jig
Did you repaint the hoofs? Which paint did you use?
-
Paulie
- Opens wallet, moths fly out
- Posts: 2599
- Joined: September 28th, 2011, 5:43 pm
- Location: East Ardsley, West Yorks
- eBay: retro-paulie
- Initials: PSG
Re: Sega Naomi restoration work in progress Updated Sat 14/7
Cheers Franco, you didn't cheat you did it the propper way so kudos to you buddy I don't have all the tackle to make a metal jig and location rings etc and sadly I no longer have access to a well kitted out shop so I rocked it freestyle
Yep I sprayed the hooves I quite enjoy preping and spraying metal. Its off the shelf Halfords own brand paint I'm away today but I'll give you the colour when I get home tomorrow. iirc I think its one of the vauxhall cols. It's a very nice match, BTW I use Halfords own lac too. For white and primer I use rustoleum which I like as it has a nice nozzle for a good fine mist.
Yep I sprayed the hooves I quite enjoy preping and spraying metal. Its off the shelf Halfords own brand paint I'm away today but I'll give you the colour when I get home tomorrow. iirc I think its one of the vauxhall cols. It's a very nice match, BTW I use Halfords own lac too. For white and primer I use rustoleum which I like as it has a nice nozzle for a good fine mist.
Last edited by Paulie on July 15th, 2012, 3:37 pm, edited 1 time in total.
-
instant_classic
- Actually Loves Take That
- Posts: 980
- Joined: February 10th, 2009, 9:47 pm
- Location: Wales
- Initials: DAF
Re: Sega Naomi restoration work in progress Updated Sat 14/7
What FB says....Great work on them panels mate!! Proper good effort!!
-
AeroCityMayor

- Previously alien_mame
- Posts: 2005
- Joined: July 25th, 2009, 1:05 pm
- Location: West Yorks, UK
- eBay: air_fortless
- Initials: ACM
Re: Sega Naomi restoration work in progress Updated Sat 14/7
Jesus H Christ!!!Paulie wrote: I don't have all the tackle to make a metal jig and location rings etc and sadly I no longer have access to a well kitted out shop so I rocked it freestyle
Totally awesome d00d!
Cheers,
Ralph.

-
emphatic
- Breastfeeds when required
- Posts: 5907
- Joined: April 7th, 2009, 4:14 pm
- Location: Alingsås, Sweden
- eBay: jorgen_sjolander
- Initials: JOR
Re: Sega Naomi restoration work in progress Updated Sat 14/7
Seriously awesome panel work, bud!
My games: http://www.emphatic.se
-
Paulie
- Opens wallet, moths fly out
- Posts: 2599
- Joined: September 28th, 2011, 5:43 pm
- Location: East Ardsley, West Yorks
- eBay: retro-paulie
- Initials: PSG
Re: Sega Naomi restoration work in progress Updated Sat 14/7
Back home now, The paint is Halfords own brand Vauxhall Astro Silver metalic spray paint. The item code is 453498.FrancoB wrote:Did you repaint the hoofs? Which paint did you use?
HTH
-
FrancoB
- J+ member of the year finalist!
- Posts: 4796
- Joined: June 8th, 2009, 10:42 pm
- Location: Oxfordshire
- eBay: francosquashking
- Initials: FRN
-
Paulie
- Opens wallet, moths fly out
- Posts: 2599
- Joined: September 28th, 2011, 5:43 pm
- Location: East Ardsley, West Yorks
- eBay: retro-paulie
- Initials: PSG
Re: Sega Naomi restoration work in progress Updated Sat 14/7
No worries F
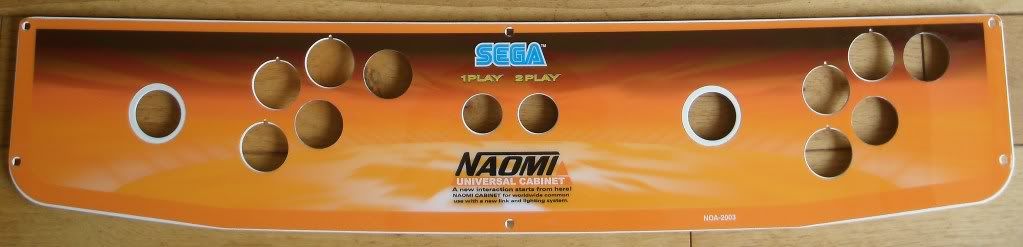
Not had any time this weekend to work of the cab, but I have just applied a NOS NOA-2003 overlay that I got from Craig a few weeks ago to my 2L10B panel. I have another overlay on it's way that I'll apply to the 2L8B panel.
This is really easy to apply, I just fixed in place with masking tape then peeled part of the backing off and stuck it down then I removed the rest of the masking tape and applied the rest of the overlay. Cutting the holes out for the extra buttons was not difficult but the laminate is fairly thick so you have to apply a fair bit of pressure and make sure you use a very good blade (I used a new blade for each hole). I made about 8 cuts through the face (like when cutting a cake) then I let the blade follow the metal edge of the hole. I'm really pleased with how this has come out I have a pair of Seimitsu LS-56-01 joysticks with red ball tops these fit the panel without mounting plates. I still havn't sorted any buttons out for it, so I'll try to get on with that this week.
It looks like its been applied all off to one side but it hasn't, I must have taken the photo at a funny angle, it looked the same as this when I took a pic of the last overlay I applied, I really need to brush up my terrible photography skillz
Not had any time this weekend to work of the cab, but I have just applied a NOS NOA-2003 overlay that I got from Craig a few weeks ago to my 2L10B panel. I have another overlay on it's way that I'll apply to the 2L8B panel.
This is really easy to apply, I just fixed in place with masking tape then peeled part of the backing off and stuck it down then I removed the rest of the masking tape and applied the rest of the overlay. Cutting the holes out for the extra buttons was not difficult but the laminate is fairly thick so you have to apply a fair bit of pressure and make sure you use a very good blade (I used a new blade for each hole). I made about 8 cuts through the face (like when cutting a cake) then I let the blade follow the metal edge of the hole. I'm really pleased with how this has come out
It looks like its been applied all off to one side but it hasn't, I must have taken the photo at a funny angle, it looked the same as this when I took a pic of the last overlay I applied, I really need to brush up my terrible photography skillz
-
denson
- Please Continue...
- Posts: 517
- Joined: February 22nd, 2012, 10:36 am
- Location: Norwich, Norfolk
- eBay: chubba100
Re: Sega Naomi restoration work in progress Updated Sat 14/7
That panel looks awesome Paulie, good work!
-
crunchywasp
- stompin' an' jumpin'
- Posts: 8101
- Joined: February 10th, 2012, 2:51 pm
- Location: Northern Ireland
- eBay: crunchywasp
- Initials: MAK
-
jase

- Posts: 690
- Joined: September 14th, 2008, 3:18 pm
- Location:
Re: Sega Naomi restoration work in progress Updated Sat 14/7
What he said! Awesome work, lookin forward to seeing it in the cab!crunchywasp wrote:Looks ace!

-
instant_classic
- Actually Loves Take That
- Posts: 980
- Joined: February 10th, 2009, 9:47 pm
- Location: Wales
- Initials: DAF
Re: Sega Naomi restoration work in progress Updated Sat 14/7
Yeah once again looks the biz, good stuff paulie