Good job Paulie and I can't wait to see it all finished
Sega Naomi restoration WIP - Updated Sept 2015
-
instant_classic

- Actually Loves Take That
- Posts: 980
- Joined: February 10th, 2009, 9:47 pm
- Location: Wales
- Initials: DAF
Re: Sega Naomi restoration work in progress Updated Fri 25/5
You are doing a great job with this cab, hard to imagine the shape it was originally in now 
Good job Paulie and I can't wait to see it all finished
Good job Paulie and I can't wait to see it all finished
-
Paulie

- Opens wallet, moths fly out
- Posts: 2599
- Joined: September 28th, 2011, 5:43 pm
- Location: East Ardsley, West Yorks
- eBay: retro-paulie
- Initials: PSG
Re: Sega Naomi restoration work in progress Updated Fri 25/5
Thanks mate, I've now drilled the legs so I'll post some pictures and a little write up 
-
Paulie
- Opens wallet, moths fly out
- Posts: 2599
- Joined: September 28th, 2011, 5:43 pm
- Location: East Ardsley, West Yorks
- eBay: retro-paulie
- Initials: PSG
Re: Sega Naomi restoration work in progress Updated Fri 25/5
As promised, drilling the legs.
Tools I used
Leg off cuts
Tape measure
Pencil
Centre punch
Drill & bits
Jigsaw & a suitable blade
Files,1 round and 1 flat
I used my leg off cuts as templates and marked out what needed to be drilled. Dead easy and the only bits of advice I can give are:
Double check that you are using the correct off cut when measuring and marking out your new leg as you really don't want to drill out the right leg out only to discover you used the left leg as the template.
Double check that the template is the correct way up.
Finally measure twice cut once.
If you do those 3 things then any potential fubars should be avoided.
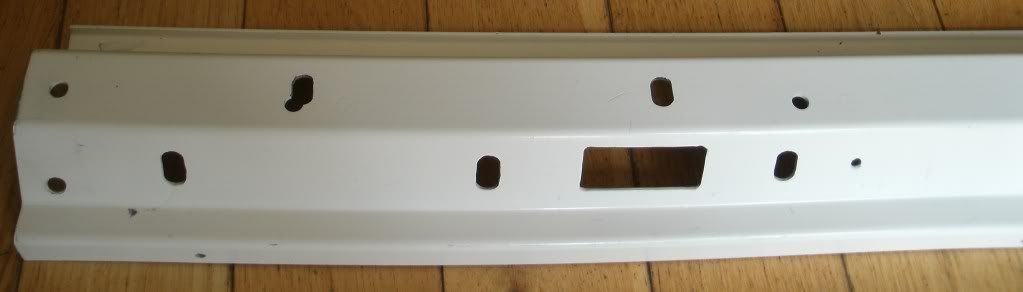
Sorry I forgot to take a picture of it all marked out and only realised when almost all the drilling had been done so this is the best I could do

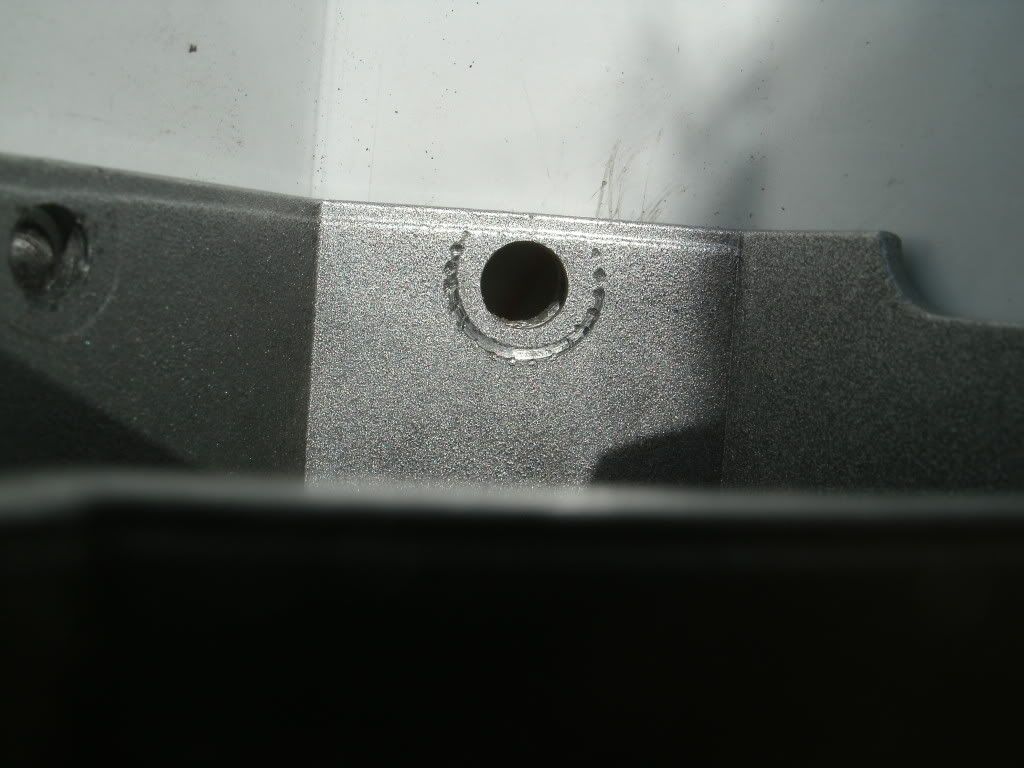
I used a centre punch to mark the metal, if you don't have one then improvise, use a sturdy screw or something similar to make an indentation in the metal. If you do that your bit should not wander. I used a small drill bit to make a pilot hole and the used a step bit to widen the holes, I only used that as it was the first suitable bit I found when digging through my tool boxes. As the holes are 'pill' shaped I drilled holes at either side of the 'pill' and finally I used a couple of files to join the holes and neaten things up.
I know it looks like it, but I haven't effed this up honestly (there is a hole already in the legs, but annoyingly it's location is not quite where you need it be)
For the rectangular holes I drilled a hole in each of the 4 corners and then I used a jigsaw to cut out the shape then I used a file to smooth off the edges. if you don't have a jigsaw the you could always chain drill it.
Use the hoof as a template and drill out the 2 holes.
I have read people use bolts & a self tapping screw to fix the hoof when chopped. A bolt would need a flat and very shallow head for it to sit correctly so alternatively I could chop a suitable bolt, thread the hole and add a bit of epoxy for good measure. I've not done this yet as I need to respray the hoof's and I haven't picked up the paint yet so that will be my next job but I'll let you know which method I end up doing.
One down one to go
I did exactly the same with the other leg but before I had neatened everything up on the second leg I partly reassembled the cab just so I could double check everything was positioned and sitting correctly.
Roughly drilled leg (checking positioning)
Control panel bucket sitting fine


Everything looks ok
So I disassembled the bit of cab I had put back together and I neatened the second leg up.
I'll post some piccys of the hoof's when I respray them and fix them to the leg
Tools I used
Leg off cuts
Tape measure
Pencil
Centre punch
Drill & bits
Jigsaw & a suitable blade
Files,1 round and 1 flat
I used my leg off cuts as templates and marked out what needed to be drilled. Dead easy and the only bits of advice I can give are:
Double check that you are using the correct off cut when measuring and marking out your new leg as you really don't want to drill out the right leg out only to discover you used the left leg as the template.
Double check that the template is the correct way up.
Finally measure twice cut once.
If you do those 3 things then any potential fubars should be avoided.
Sorry I forgot to take a picture of it all marked out and only realised when almost all the drilling had been done so this is the best I could do
I used a centre punch to mark the metal, if you don't have one then improvise, use a sturdy screw or something similar to make an indentation in the metal. If you do that your bit should not wander. I used a small drill bit to make a pilot hole and the used a step bit to widen the holes, I only used that as it was the first suitable bit I found when digging through my tool boxes. As the holes are 'pill' shaped I drilled holes at either side of the 'pill' and finally I used a couple of files to join the holes and neaten things up.
I know it looks like it, but I haven't effed this up honestly (there is a hole already in the legs, but annoyingly it's location is not quite where you need it be)
For the rectangular holes I drilled a hole in each of the 4 corners and then I used a jigsaw to cut out the shape then I used a file to smooth off the edges. if you don't have a jigsaw the you could always chain drill it.
Use the hoof as a template and drill out the 2 holes.
I have read people use bolts & a self tapping screw to fix the hoof when chopped. A bolt would need a flat and very shallow head for it to sit correctly so alternatively I could chop a suitable bolt, thread the hole and add a bit of epoxy for good measure. I've not done this yet as I need to respray the hoof's and I haven't picked up the paint yet so that will be my next job but I'll let you know which method I end up doing.
One down one to go
I did exactly the same with the other leg but before I had neatened everything up on the second leg I partly reassembled the cab just so I could double check everything was positioned and sitting correctly.
Roughly drilled leg (checking positioning)
Control panel bucket sitting fine
Everything looks ok
So I disassembled the bit of cab I had put back together and I neatened the second leg up.
I'll post some piccys of the hoof's when I respray them and fix them to the leg
-
skykappah

- One of dese bad boys
- Posts: 1440
- Joined: February 17th, 2011, 8:24 pm
- Location: South Yorkshire, UK.
- eBay: Skykappa
Re: Sega Naomi restoration work in progress Updated Fri 8/6/
Great job you are doing here.  It's so gonna help me do mine once I get to it.
Loving robots since the 80's.
-
Spectre

- By Spectre
- Posts: 1694
- Joined: January 22nd, 2009, 5:42 pm
- Location: Suffolk, UK
- eBay: spectre-uk
- Initials: JIM
Re: Sega Naomi restoration work in progress Updated Fri 8/6/
Lovely work and enjoying the attention to detail in the thread
Marquees: http://spectre.myartsonline.com/
-
Paulie
- Opens wallet, moths fly out
- Posts: 2599
- Joined: September 28th, 2011, 5:43 pm
- Location: East Ardsley, West Yorks
- eBay: retro-paulie
- Initials: PSG
-
emphatic

- Breastfeeds when required
- Posts: 5907
- Joined: April 7th, 2009, 4:14 pm
- Location: Alingsås, Sweden
- eBay: jorgen_sjolander
- Initials: JOR
Re: Sega Naomi restoration work in progress Updated Fri 8/6/
Very awesome!
My games: http://www.emphatic.se
-
instant_classic
- Actually Loves Take That
- Posts: 980
- Joined: February 10th, 2009, 9:47 pm
- Location: Wales
- Initials: DAF
Re: Sega Naomi restoration work in progress Updated Fri 8/6/
This thread has inspired me to hunt down a Naomi and restore it to former levels of glory, I just know it wont be a patch on this 
-
AeroCityMayor

- Previously alien_mame
- Posts: 2005
- Joined: July 25th, 2009, 1:05 pm
- Location: West Yorks, UK
- eBay: air_fortless
- Initials: ACM
Re: Sega Naomi restoration work in progress Updated Fri 8/6/
WOW d00d, tanfaskit! 
I'd like to echo the sentiment about presentation of detail - more pics and infos than you can shake a stick at.
Well done d00d!
Cheers,
Ralph.
I'd like to echo the sentiment about presentation of detail - more pics and infos than you can shake a stick at.
Well done d00d!
Cheers,
Ralph.

-
crunchywasp

- stompin' an' jumpin'
- Posts: 8101
- Joined: February 10th, 2012, 2:51 pm
- Location: Northern Ireland
- eBay: crunchywasp
- Initials: MAK
Re: Sega Naomi restoration work in progress Updated Fri 8/6/
Awesome work! Looking forward to the next update

-
MrSandman

- Posts: 356
- Joined: October 9th, 2010, 9:00 pm
- Location: Germany
- eBay: bigpileofshame
- Initials: NOR
Re: Sega Naomi restoration work in progress Updated Fri 8/6/
Great work! This is a really nice thread!
It's impressive what deciation and hard work can do.
Thanks for sharing and documenting .
It's impressive what deciation and hard work can do.
Thanks for sharing and documenting
"Hans, I've just noticed something."
-
Paulie
- Opens wallet, moths fly out
- Posts: 2599
- Joined: September 28th, 2011, 5:43 pm
- Location: East Ardsley, West Yorks
- eBay: retro-paulie
- Initials: PSG
Re: Sega Naomi restoration work in progress Updated Fri 8/6/
Cheers chaps
Just a little update as I said I would let you all know how I'm attaching the hoof's as in my last post I was undecided.
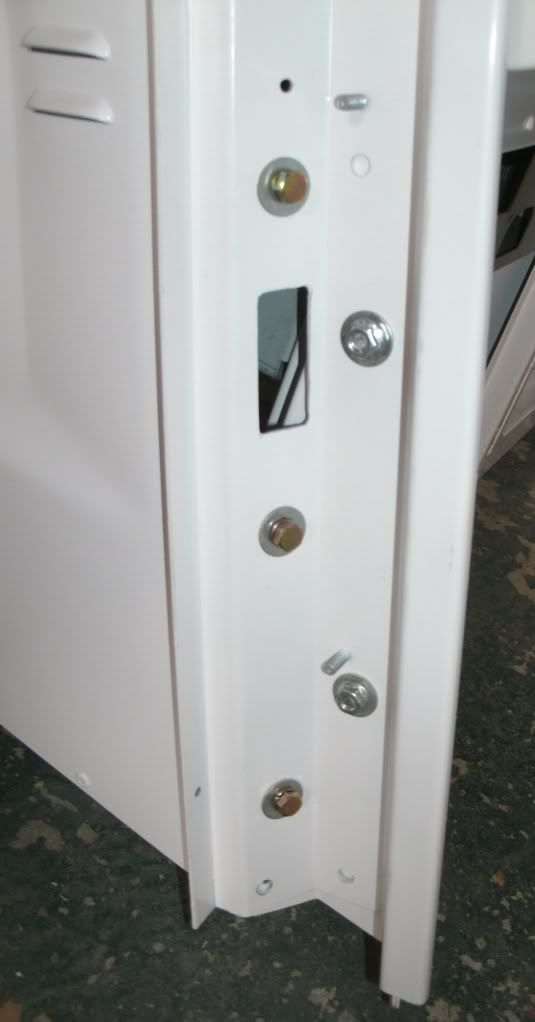
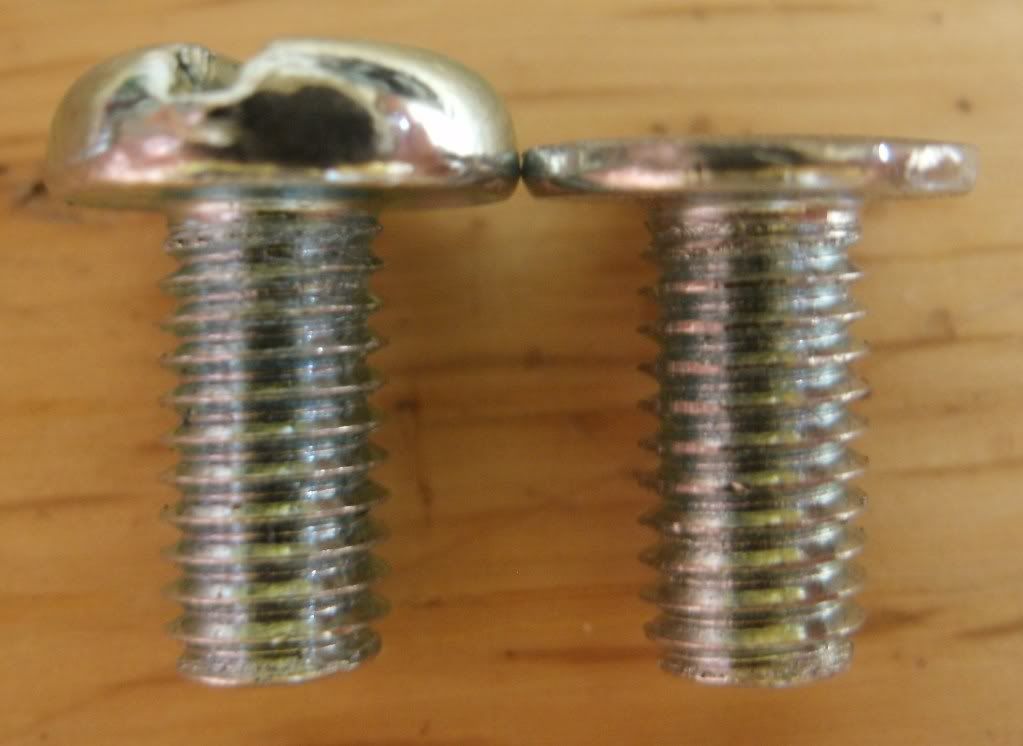
Maybe you can get the bolts you need but I could'nt find exactly what I was looking for as for the leg to sit flush you need a bolt with a very shallow and flat head, so I chopped the bulk off a couple of M4 (er I think) bolt heads and filied them nice and flat.
Comparrison before and after of the bolt head, as you can see I removed approx 3mm of the head
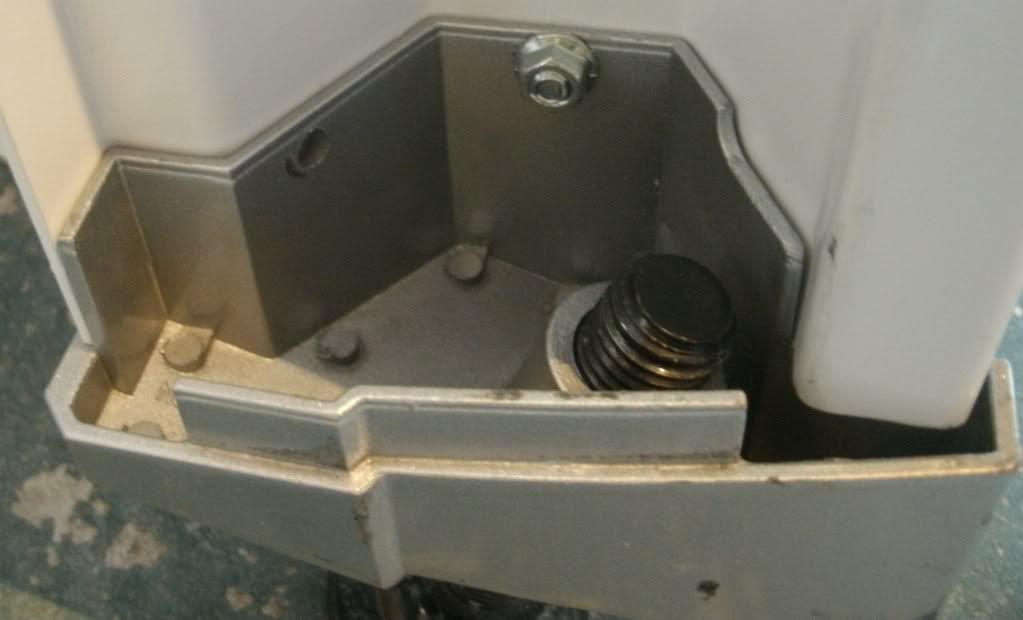
I passed these through the holes in the legs (that i had already drilled out) they just sit in place and it works a treat
And here it is holding the hoof in place (it's fixed with the original nut that came off the cab which made me quite pleased, but god knows why that made me happy) please ignore the hoof as it needs stripping with Nitro mors then I'll fill the gouges and re-spray and lacquer
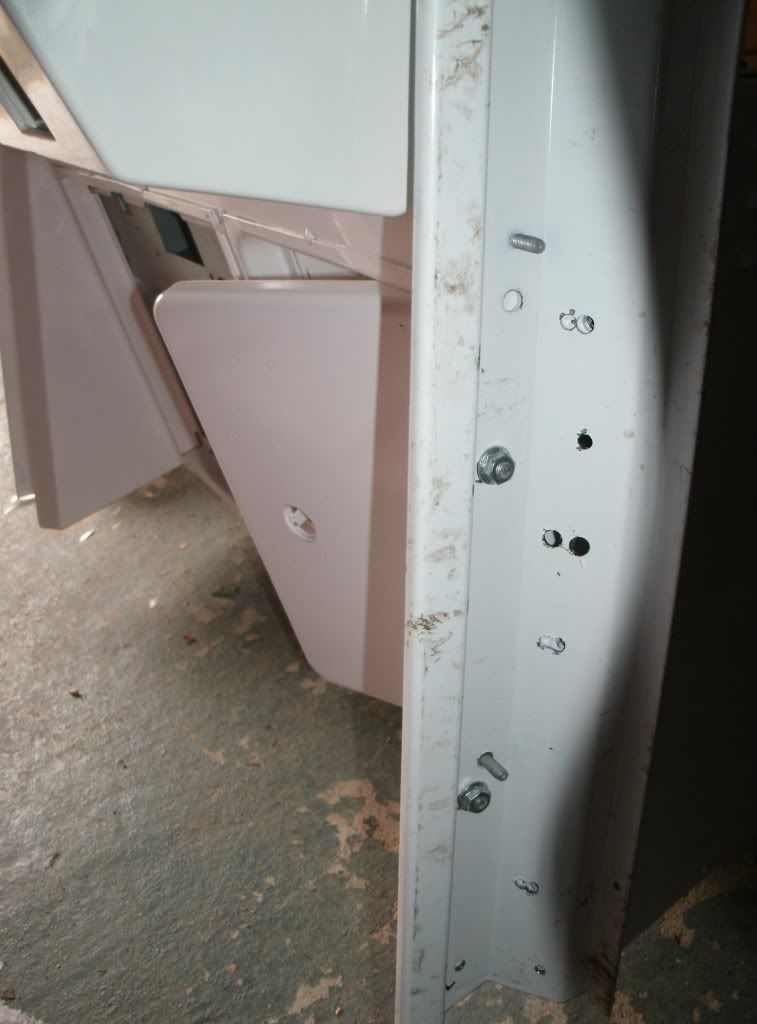
oh and I forgot to show the leg after I had drilled it out, so heres the missing piccys from my last update
Just a little update as I said I would let you all know how I'm attaching the hoof's as in my last post I was undecided.
Maybe you can get the bolts you need but I could'nt find exactly what I was looking for as for the leg to sit flush you need a bolt with a very shallow and flat head, so I chopped the bulk off a couple of M4 (er I think) bolt heads and filied them nice and flat.
Comparrison before and after of the bolt head, as you can see I removed approx 3mm of the head
I passed these through the holes in the legs (that i had already drilled out) they just sit in place and it works a treat
And here it is holding the hoof in place (it's fixed with the original nut that came off the cab which made me quite pleased, but god knows why that made me happy) please ignore the hoof as it needs stripping with Nitro mors then I'll fill the gouges and re-spray and lacquer
oh and I forgot to show the leg after I had drilled it out, so heres the missing piccys from my last update
-
idc
- Ralf Little impersonator
- Posts: 1311
- Joined: October 16th, 2008, 9:17 pm
- Location: Tamworth, Staffordshire
- eBay: iancourt
- Initials: IAN
Re: Sega Naomi restoration work in progress Updated Fri 8/6/
That is **** tidy as **** mate, nice work.Paulie wrote:

-
Spectre
- By Spectre
- Posts: 1694
- Joined: January 22nd, 2009, 5:42 pm
- Location: Suffolk, UK
- eBay: spectre-uk
- Initials: JIM
Re: Sega Naomi restoration work in progress Updated Tues 12/
Very neat, I just butchered mine 
Marquees: http://spectre.myartsonline.com/
-
baddy

- Posts: 387
- Joined: January 28th, 2010, 12:40 am
- Location: Sweden, Stockholm
- eBay: irishfrog89
- Initials: CHI
Re: Sega Naomi restoration work in progress Updated Tues 12/
Same here Used the cheapest power drill ever (6€) and had to file the holes for hours to get them to fit
-
Paulie
- Opens wallet, moths fly out
- Posts: 2599
- Joined: September 28th, 2011, 5:43 pm
- Location: East Ardsley, West Yorks
- eBay: retro-paulie
- Initials: PSG
Re: Sega Naomi restoration work in progress Updated Tues 12/
-
Paulie
- Opens wallet, moths fly out
- Posts: 2599
- Joined: September 28th, 2011, 5:43 pm
- Location: East Ardsley, West Yorks
- eBay: retro-paulie
- Initials: PSG
Re: Sega Naomi restoration work in progress Updated Tues 12/
Just a little update.
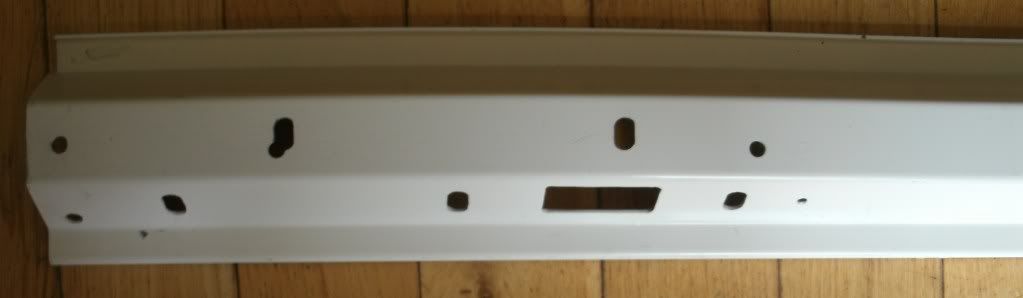
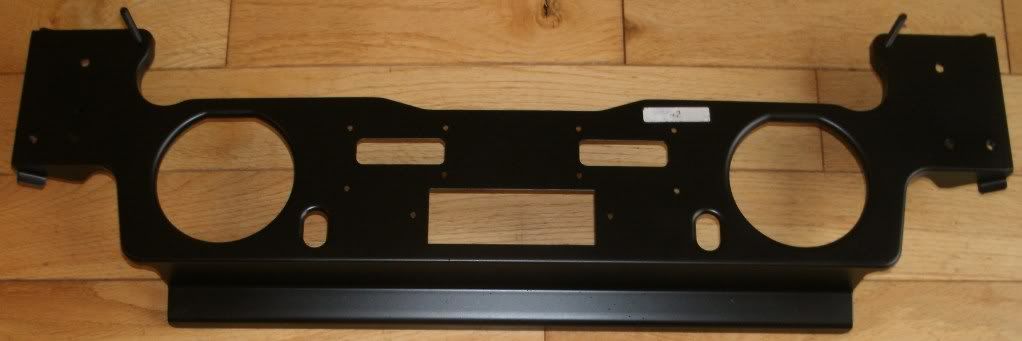
I cleaned, prepped and sprayed the lower monitor support bracket. This was pretty grim, it looked like it had been splashed with jizz although it probably was milkshake or summat rather than manshake I did try to T-cut it but it just removed the paint so I had to spray it but it turned out really nice so it's no big deal.
Before
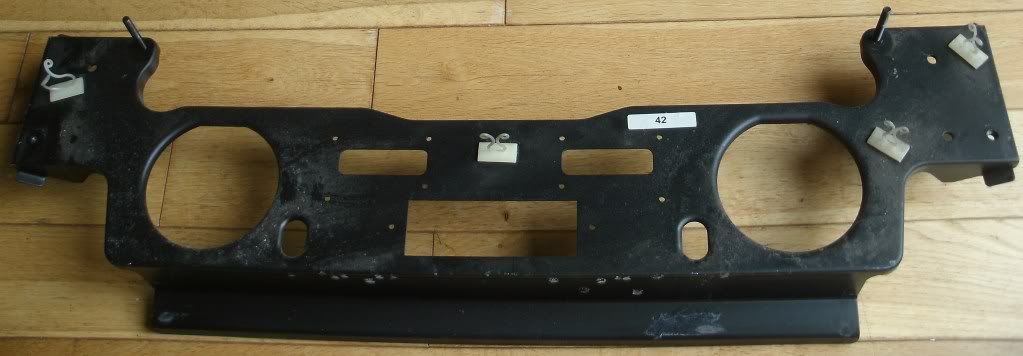
After
I just cleaned the upper bracket as it's a silverish colour, (the same as the monitor frame) and that was ok for that part.
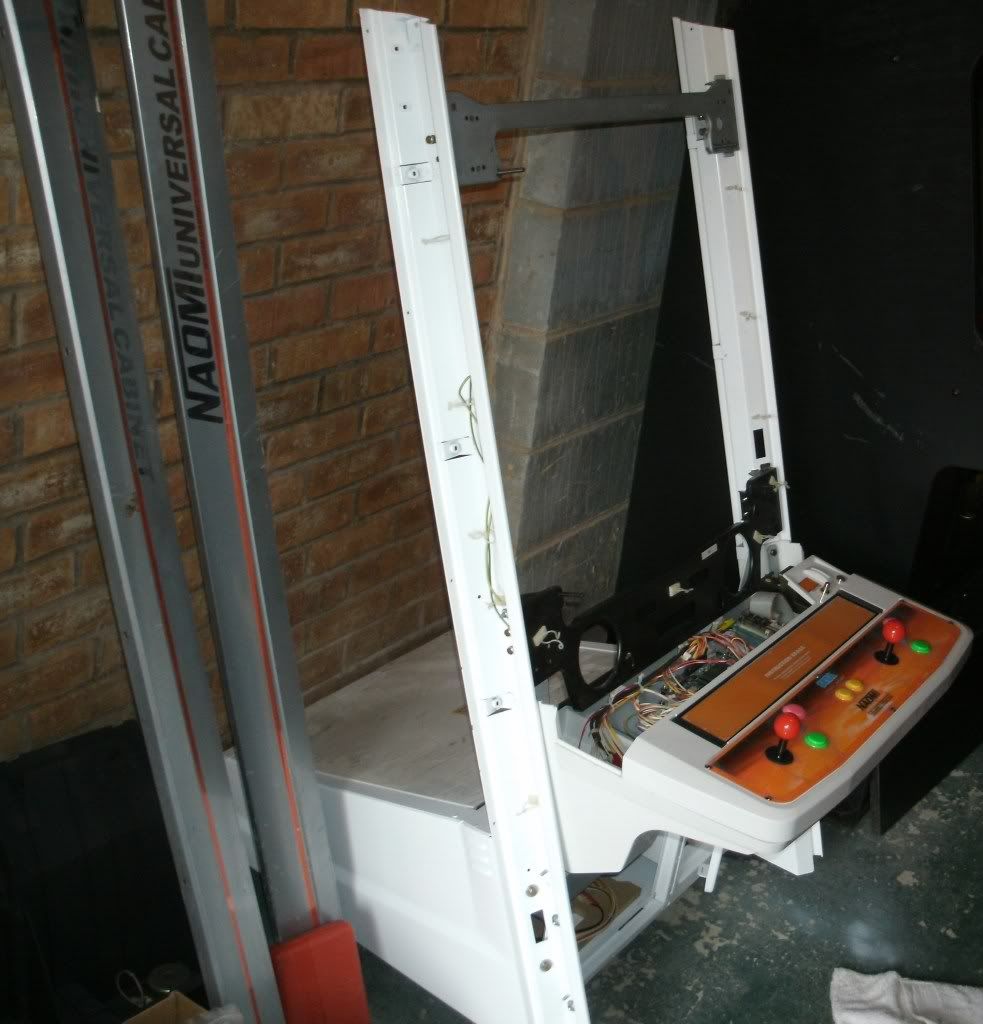
Next I had to get this bad boy
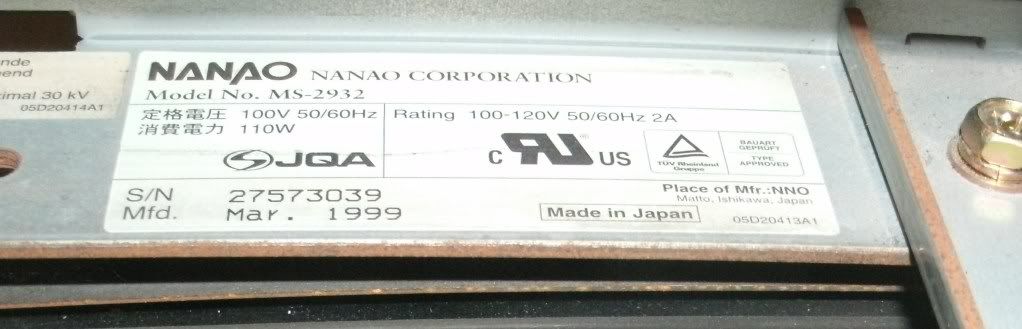
Into here
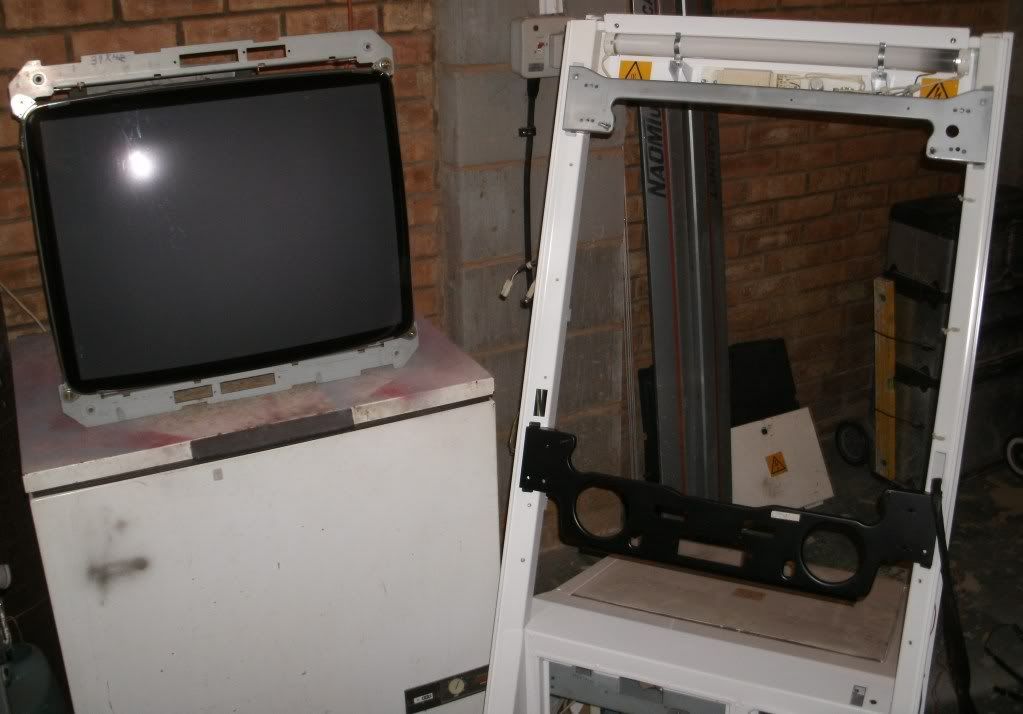
Now I know my good buddy Ralph would have helped me out with this, but I decided this was going to be a solo mission, so I had my weatabix for breakfast and RAAARRRR it's in.
Like I said I wanted to see if I could do this by myself and TBH it's not that bad, don't get me wrong it ain't light and I wouldn't fancy humping it up a flight of stairs but if its stored at the right height and your cab is positioned nice and close then I think an average man should be ok with it.
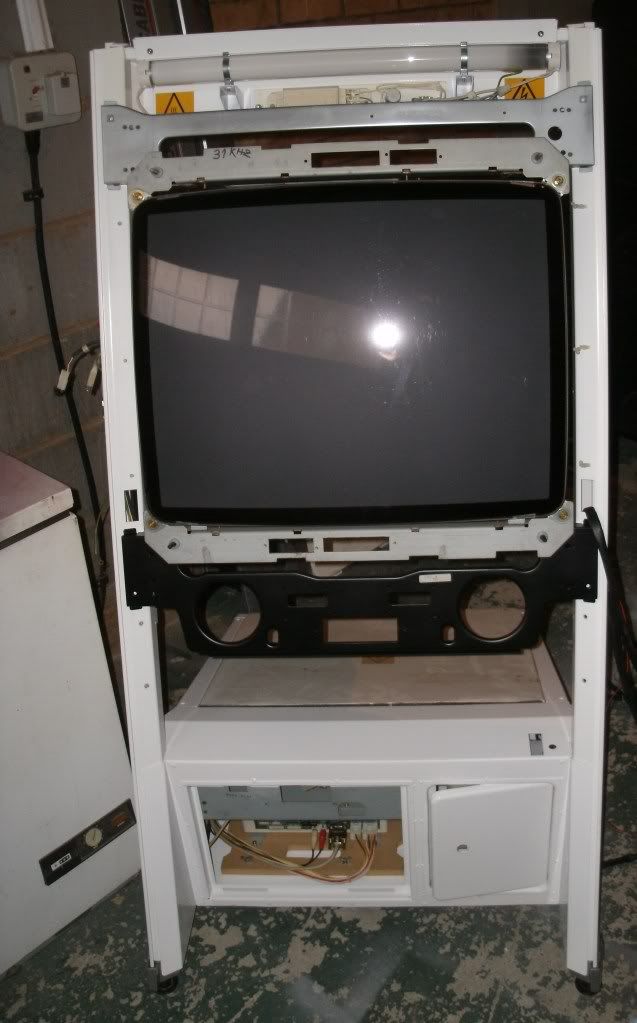
Next I wired everything back up, man theres a lot of wiring in a Naomi.
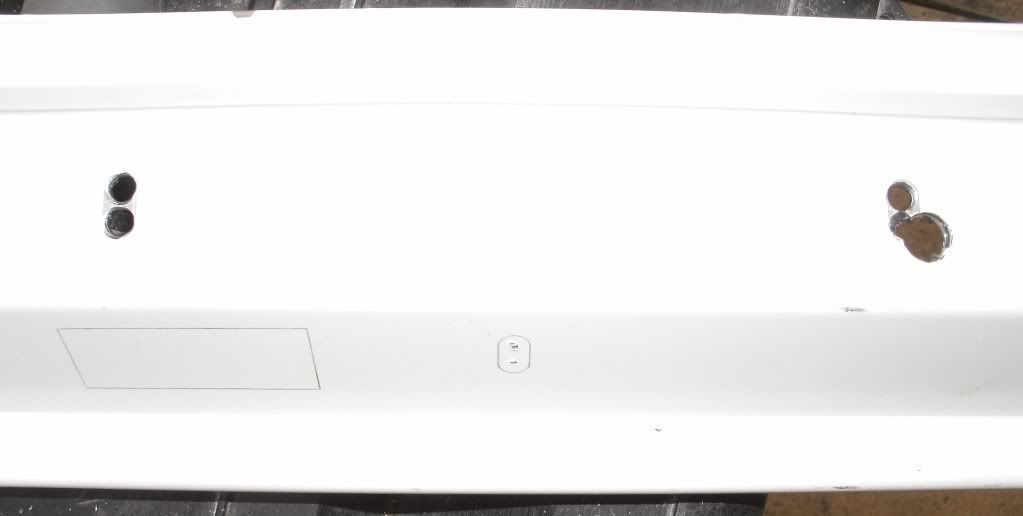
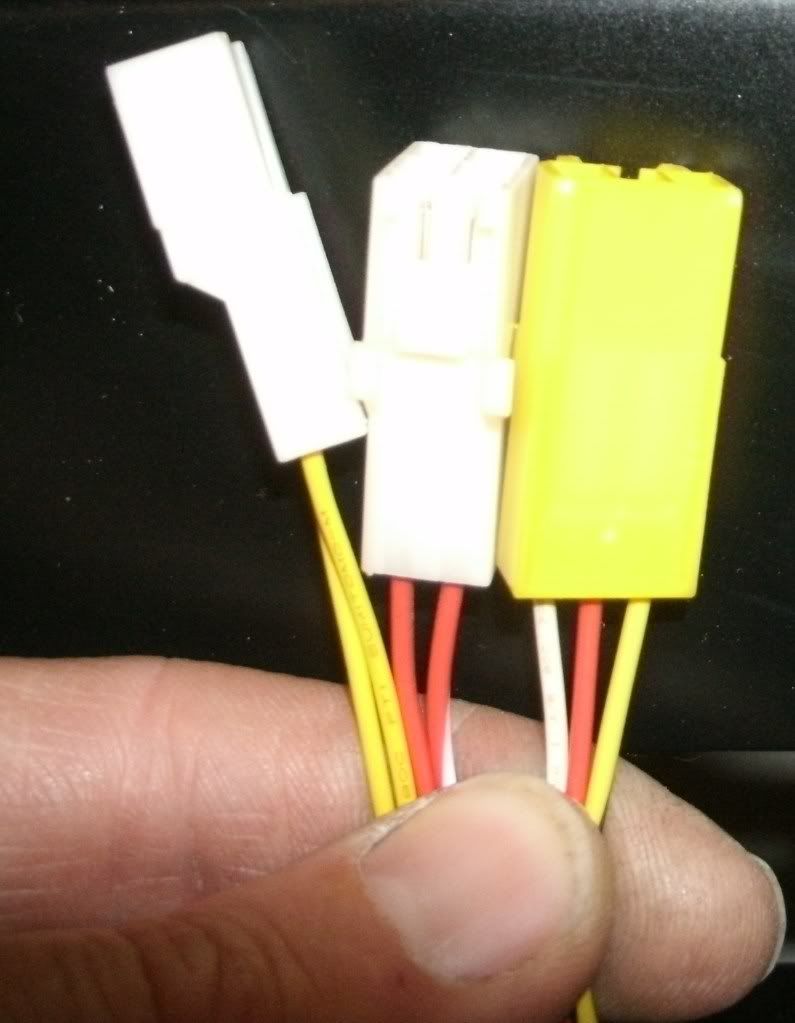
I have 3 connectors in the CP area that don't go anywhere now these were like this when I got the cab so I presume they are unused/ for connecting additional things. I forgot to ask when I stripped the cab down but does anyone know what these are for I can supply more info on this if needed.
I'm off work tomorrow so I hope it's sunny as I want to do a bit of retr0briteing
I cleaned, prepped and sprayed the lower monitor support bracket. This was pretty grim, it looked like it had been splashed with jizz
Before
After
I just cleaned the upper bracket as it's a silverish colour, (the same as the monitor frame) and that was ok for that part.
Next I had to get this bad boy
Into here
Now I know my good buddy Ralph would have helped me out with this, but I decided this was going to be a solo mission, so I had my weatabix for breakfast and RAAARRRR it's in.
Like I said I wanted to see if I could do this by myself and TBH it's not that bad, don't get me wrong it ain't light and I wouldn't fancy humping it up a flight of stairs but if its stored at the right height and your cab is positioned nice and close then I think an average man should be ok with it.
Next I wired everything back up, man theres a lot of wiring in a Naomi.
I have 3 connectors in the CP area that don't go anywhere now these were like this when I got the cab so I presume they are unused/ for connecting additional things. I forgot to ask when I stripped the cab down but does anyone know what these are for I can supply more info on this if needed.
I'm off work tomorrow so I hope it's sunny as I want to do a bit of retr0briteing
-
crunchywasp
- stompin' an' jumpin'
- Posts: 8101
- Joined: February 10th, 2012, 2:51 pm
- Location: Northern Ireland
- eBay: crunchywasp
- Initials: MAK
Re: Sega Naomi restoration work in progress Updated Wed 20/6
Looking fantastic
I love it when this thread's updated
Edit: I checked my NNC CP on the off chance it'd be similar & the unconnected ones I have don't look the same I'm afraid. I've an unconnected white 8 pin connector to the left of the CP where the controls/speakers etc are connected & a white 4 pin connector at the coin mech. I don't know what either of these are for!
Last edited by crunchywasp on June 20th, 2012, 10:46 pm, edited 1 time in total.
-
Paulie
- Opens wallet, moths fly out
- Posts: 2599
- Joined: September 28th, 2011, 5:43 pm
- Location: East Ardsley, West Yorks
- eBay: retro-paulie
- Initials: PSG
Re: Sega Naomi restoration work in progress Updated Wed 20/6
Cheers crunchy
I've got some NOS coming tomorrow from Craig, locks, monitor mask a pair of sticks, an emblem and another CPO
I'll be cleaning the rear monitor cover & speakers, sorting out the hoof's and leg hook and if it's nice a bit of retr0brite on the surround too so there will be another little update soon
I've got some NOS coming tomorrow from Craig, locks, monitor mask a pair of sticks, an emblem and another CPO
I'll be cleaning the rear monitor cover & speakers, sorting out the hoof's and leg hook and if it's nice a bit of retr0brite on the surround too so there will be another little update soon
-
crunchywasp
- stompin' an' jumpin'
- Posts: 8101
- Joined: February 10th, 2012, 2:51 pm
- Location: Northern Ireland
- eBay: crunchywasp
- Initials: MAK