Sega Naomi restoration WIP - Updated Sept 2015
-
johnnygnct
- Posts: 116
- Joined: June 12th, 2009, 4:45 pm
- Location: Portugal
Re: Sega Naomi restoration work in progress Updated Sat 5/5/
Paulie what product did you use to polish the reset and dummy buttons?
-
Paulie

- Opens wallet, moths fly out
- Posts: 2599
- Joined: September 28th, 2011, 5:43 pm
- Location: East Ardsley, West Yorks
- eBay: retro-paulie
- Initials: PSG
Re: Sega Naomi restoration work in progress Updated Sat 5/5/
Stellar stainless steel polish, costs about 3 or 4 quid they sell it in cookware shops and some big supermarkets. There's a picture of the bottle on page 1 or 2 of my thread but typing this on my phone and can't link to it, bloody phones. HTH, Paul 
-
johnnygnct
- Posts: 116
- Joined: June 12th, 2009, 4:45 pm
- Location: Portugal
Re: Sega Naomi restoration work in progress Updated Sat 5/5/
Thank man! I'll try that out!
-
crunchywasp

- stompin' an' jumpin'
- Posts: 8104
- Joined: February 10th, 2012, 2:51 pm
- Location: Northern Ireland
- eBay: crunchywasp
- Initials: MAK
Re: Sega Naomi restoration work in progress Updated Sat 5/5/

-
Paulie
- Opens wallet, moths fly out
- Posts: 2599
- Joined: September 28th, 2011, 5:43 pm
- Location: East Ardsley, West Yorks
- eBay: retro-paulie
- Initials: PSG
Re: Sega Naomi restoration work in progress Updated Sat 5/5/
Thanks mancrunchywasp wrote:Your Naomi's looking excellent, and great write up so far!
I was hoping to do the chop today but I have a ton of stuff to do this afternoon so it will have to wait until my next day off work
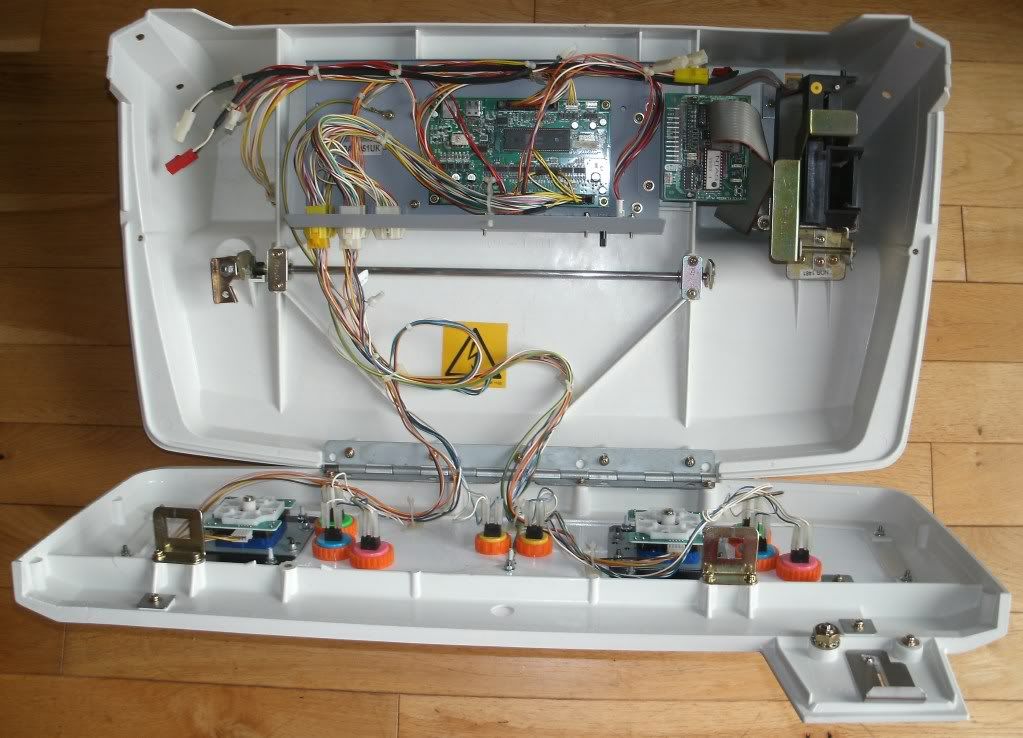
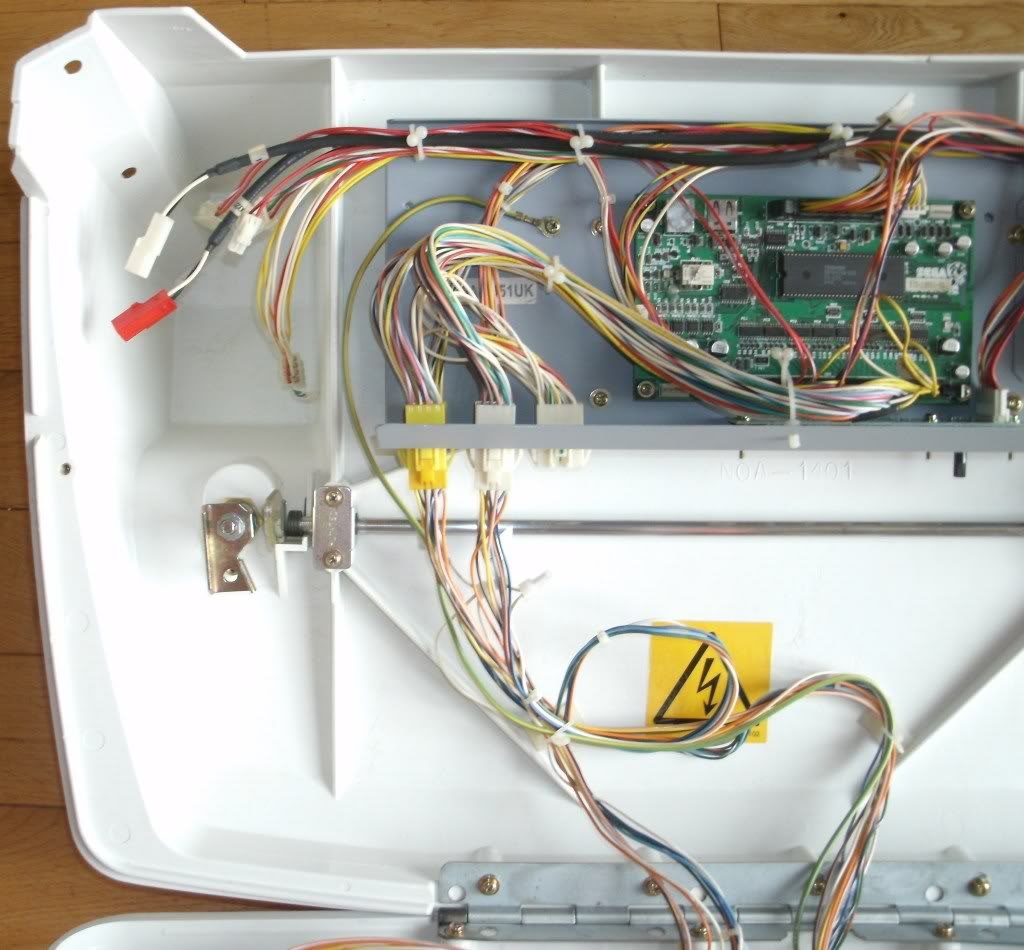
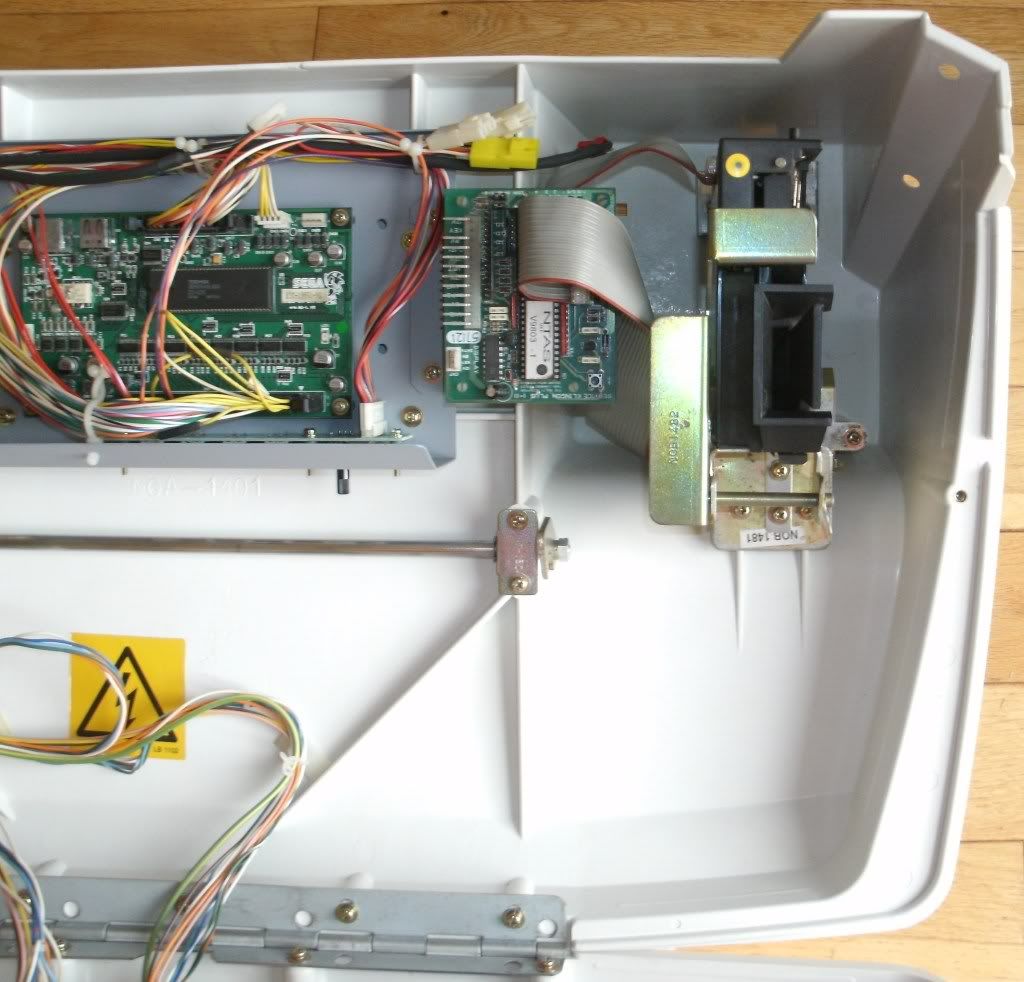
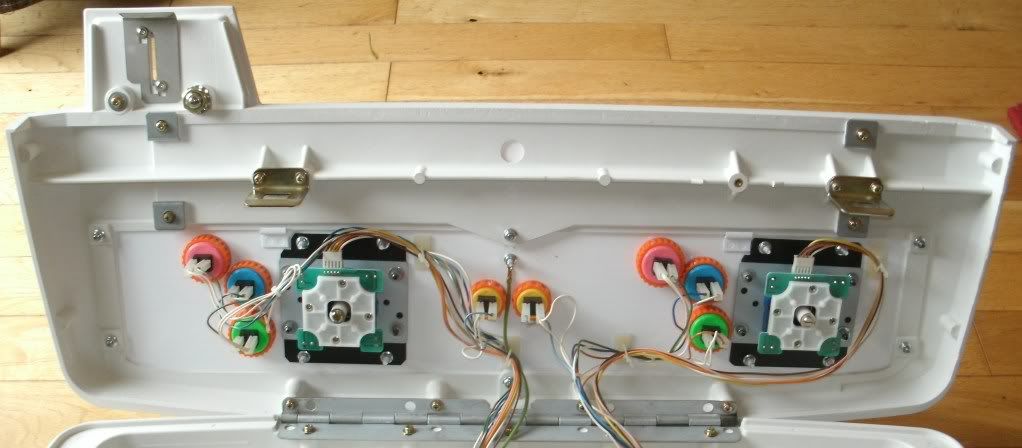
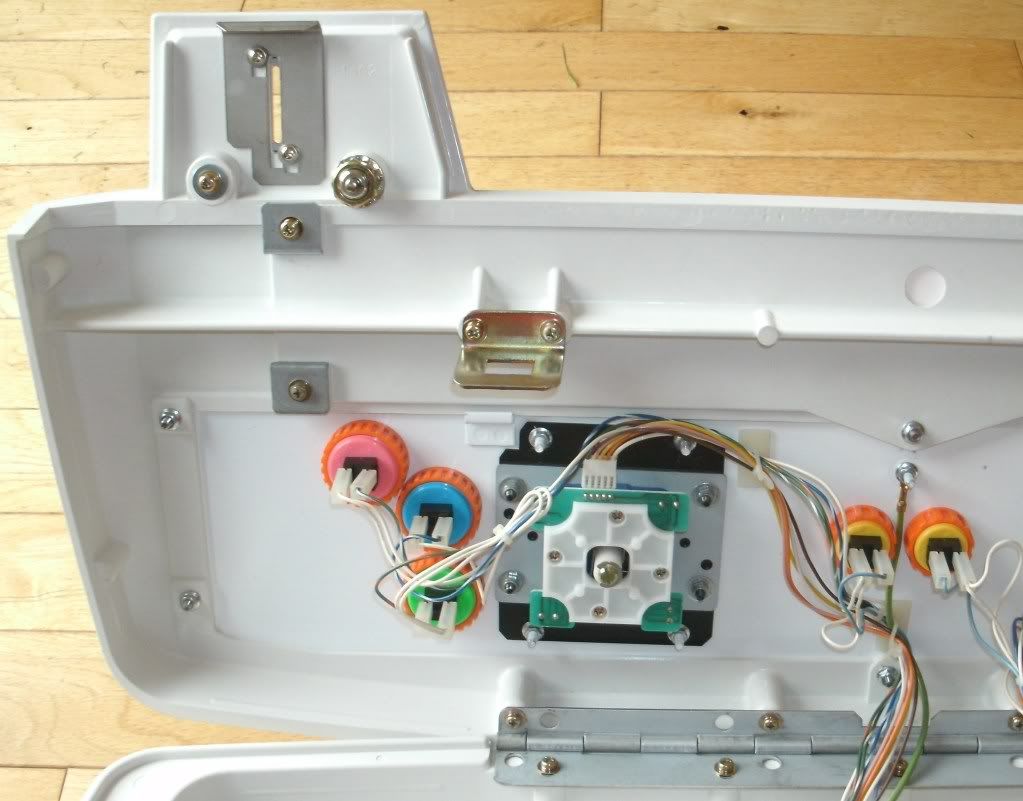
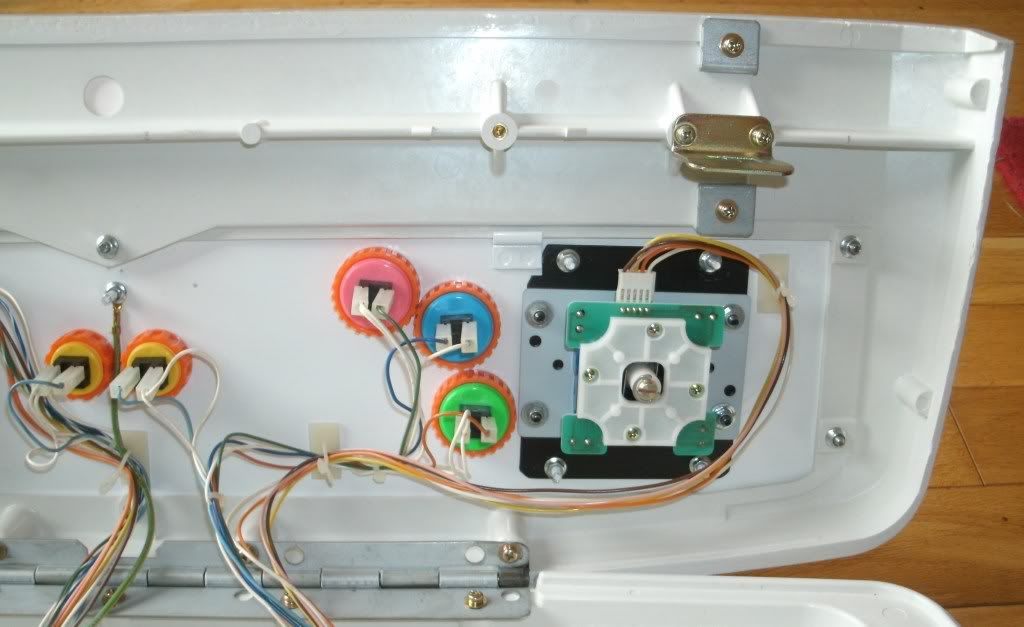
But on a brighter note I finally managed to finish off the bucket.
All the fixings, coin mech and the remaining wiring were cleaned, all the metal work was also polished and then all the bits were put back in their original place. The lock is the original but I don't have a key
Please note there is still an earth cable to attach to the I/O tray (one end is still attached to the main body of the cab)
All cleaned up

-
emphatic

- Breastfeeds when required
- Posts: 5909
- Joined: April 7th, 2009, 4:14 pm
- Location: Alingsås, Sweden
- eBay: jorgen_sjolander
- Initials: JOR
-
crunchywasp
- stompin' an' jumpin'
- Posts: 8104
- Joined: February 10th, 2012, 2:51 pm
- Location: Northern Ireland
- eBay: crunchywasp
- Initials: MAK
-
Korszca
- Assistant Librarian
- Posts: 2135
- Joined: March 2nd, 2010, 2:14 am
- Location:
Re: Sega Naomi restoration work in progress Updated Thur 10/
Damn that is clean.
-
uberpixel

- The Photographer
- Posts: 73
- Joined: January 15th, 2012, 8:40 pm
- Location: Croydon, London
- eBay: cheekyfutch
- Initials: ALN
Re: Sega Naomi restoration work in progress Updated Thur 10/
You sir, are a legend!
-
instant_classic

- Actually Loves Take That
- Posts: 980
- Joined: February 10th, 2009, 9:47 pm
- Location: Wales
- Initials: DAF
Re: Sega Naomi restoration work in progress Updated Thur 10/
You must have sunk some serious hours into this, fair play it is minty fresh
-
Paulie
- Opens wallet, moths fly out
- Posts: 2599
- Joined: September 28th, 2011, 5:43 pm
- Location: East Ardsley, West Yorks
- eBay: retro-paulie
- Initials: PSG
Re: Sega Naomi restoration work in progress Updated Thur 10/
Cheers chaps  I'm chuffed with how it's come up, but yeah I put a lot of time in to it but that's all part of the fun for me.
I was ummin and arein should I keep the orange Naomi look or go with the bling NNC look. When I saw Ralph's NNC I thought yep I'm going give it a NNC makeover but I could'nt find the artwork and had been told from several ppl it would be exspenise if I did find it, well out of my budget anyway. The orange has grown on me and Mrs Paulie likes the orange too so this one will stay in it's Naomi guise. Now I've decided to keep it as a Naomi I've actually found and picked up 2 NOS near complete NNC art sets so hopefully I'll have a crack at doing a pair of NNC stylee cabs at some point in the future.
I was ummin and arein should I keep the orange Naomi look or go with the bling NNC look. When I saw Ralph's NNC I thought yep I'm going give it a NNC makeover but I could'nt find the artwork and had been told from several ppl it would be exspenise if I did find it, well out of my budget anyway. The orange has grown on me and Mrs Paulie likes the orange too so this one will stay in it's Naomi guise. Now I've decided to keep it as a Naomi I've actually found and picked up 2 NOS near complete NNC art sets
-
AeroCityMayor

- Previously alien_mame
- Posts: 2005
- Joined: July 25th, 2009, 1:05 pm
- Location: West Yorks, UK
- eBay: air_fortless
- Initials: ACM
Re: Sega Naomi restoration work in progress Updated Thur 10/
Paulie wrote:... Now I've decided to keep it as a Naomi I've actually found and picked up 2 NOS near complete NNC art sets
Very nice, patient work on the CP upper and lower d00d!
Cheers,
Ralph.

-
Paulie
- Opens wallet, moths fly out
- Posts: 2599
- Joined: September 28th, 2011, 5:43 pm
- Location: East Ardsley, West Yorks
- eBay: retro-paulie
- Initials: PSG
-
Iremfan

- Posts: 31
- Joined: January 20th, 2012, 10:56 pm
- Location: Lancashire
- eBay: Angry-chicken
- Initials: MGH
Re: Sega Naomi restoration work in progress Updated Thur 10/
Flabbergasted to say the least!
You should consider founding a Naomi Rescue Centre and aim for registered charity status This is some seriously amazing cab saving work!
I think its time to strip the CP off my E3 and follow your directions step by step. Keep up the good work!
You should consider founding a Naomi Rescue Centre and aim for registered charity status
I think its time to strip the CP off my E3 and follow your directions step by step. Keep up the good work!
Mike
-------------------------------------------------------------------------------------------------------------
Wanted: An Egret!!!!
-------------------------------------------------------------------------------------------------------------
Wanted: An Egret!!!!
-
Porl

- Please Continue...
- Posts: 230
- Joined: May 14th, 2012, 11:50 am
- Location: Linton, Midlands UK
- eBay: melvisbrevel
- Initials: PTB
Re: Sega Naomi restoration work in progress Updated Thur 10/
Wow indeed!!!  I've never really seen a plastic cab or even a Naomi I don't think. I'm used to seeing woodies. I can't get over the difference between when you got it to now. It looked to me like a bit of a lost cause and a spider-hotel and you've made it look brand-spanking new!!! I love all the before restoration and after photos. It's almost like you've done a quick indiana jones switch and replaced with new parts! haha
Awesome work!!
Porl''
Awesome work!!
Porl''
-------------
http://www.porlzilla.com
Inventory - http://forum.arcadeotaku.com/viewtopic. ... 59#p262859
http://www.porlzilla.com
Inventory - http://forum.arcadeotaku.com/viewtopic. ... 59#p262859
-
Paulie
- Opens wallet, moths fly out
- Posts: 2599
- Joined: September 28th, 2011, 5:43 pm
- Location: East Ardsley, West Yorks
- eBay: retro-paulie
- Initials: PSG
Re: Sega Naomi restoration work in progress Updated Thur 10/
Thanks for the Kind words
I've probably sank a good 40+ hours into it so far but that's been over a period of about a month, I'm sure anyone could get the same results if not better (and probably quicker) if they are as sad as me and spend so much time fiddling around with their cab
I know this update is a bit belated, I still need to write up how I stripped and cleaned the base so I'll try to do that in the next few days
Stripping the rest of the cab
The tools that you will need for dismantling this area are:
Socket (10mm)
Socket (8mm)
Torx bit (T-20)
Torx bit (T-30)
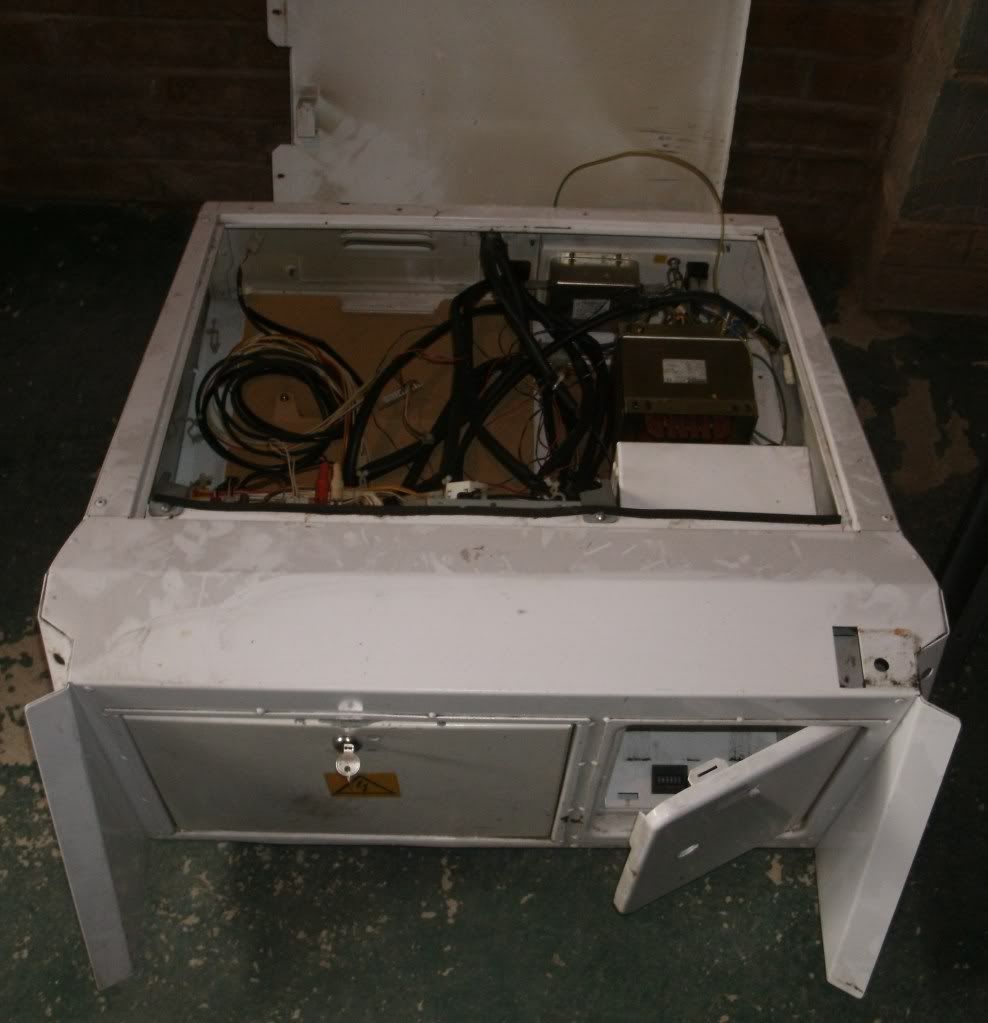
At this point in the project the cab looks like this
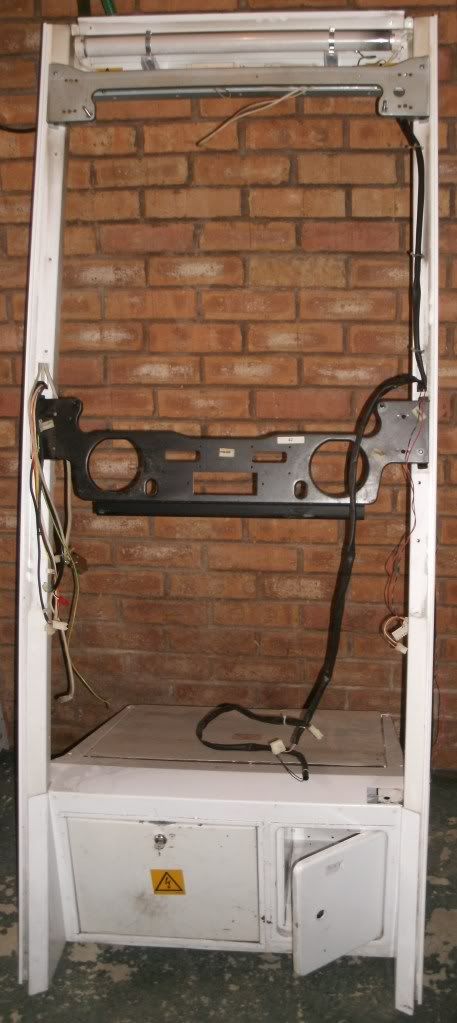
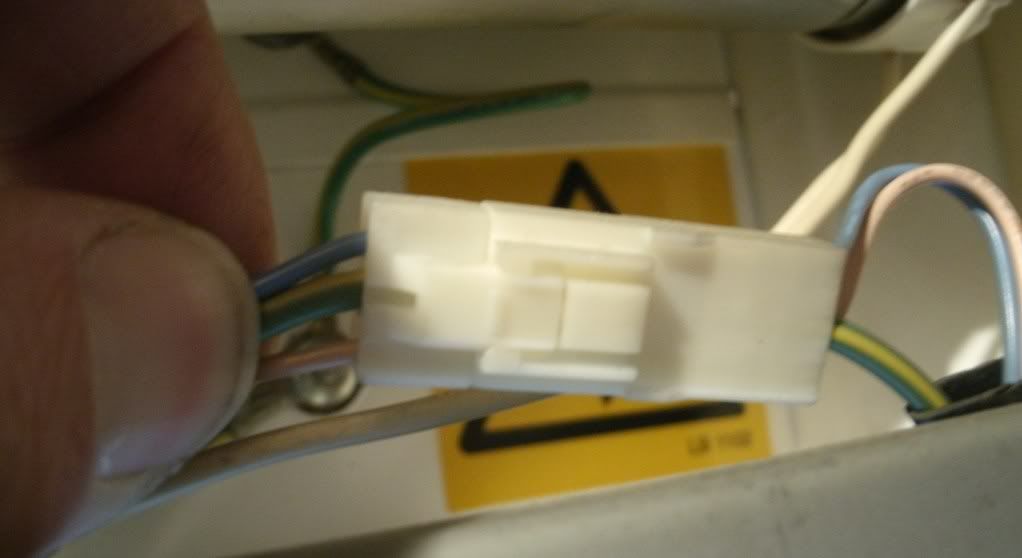
Removing the lighting unit
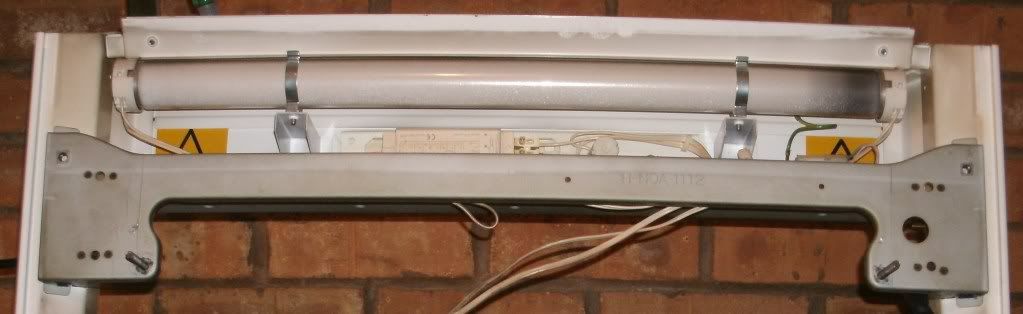
Unplug the cable
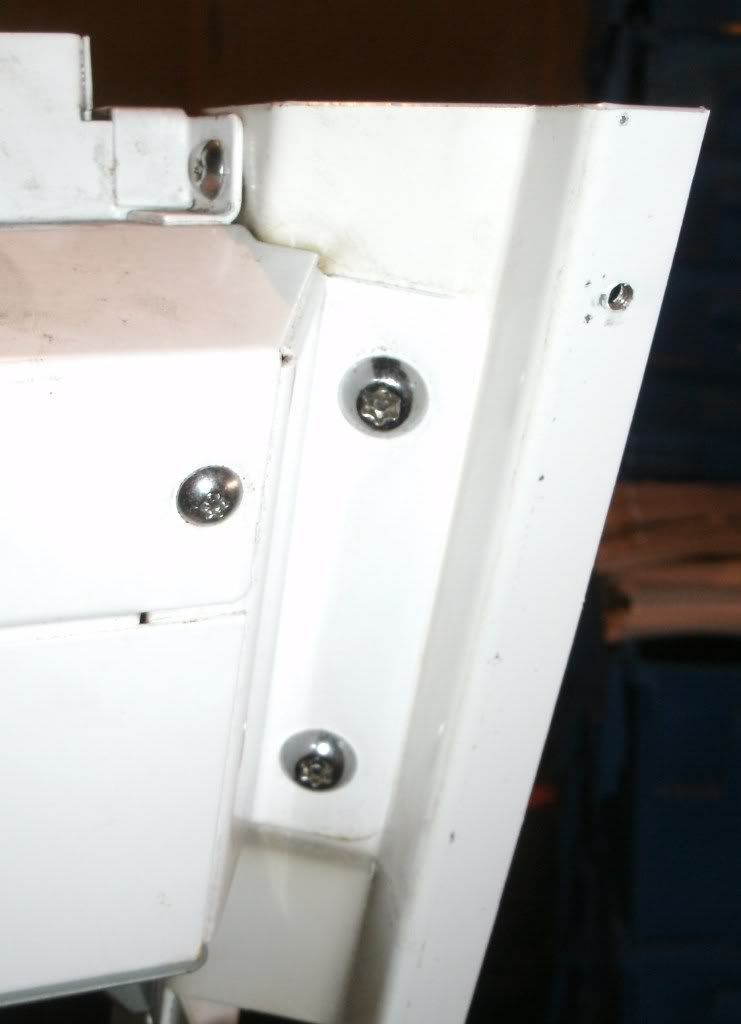
Remove the torx bolt (T-20)
Remove the 2 large torx bolts (T-30) on the back of the leg and the small torx bolt on the top NOT THE ONE ON THE BACK (T-20) do the same on the other side and the lighting unit is free
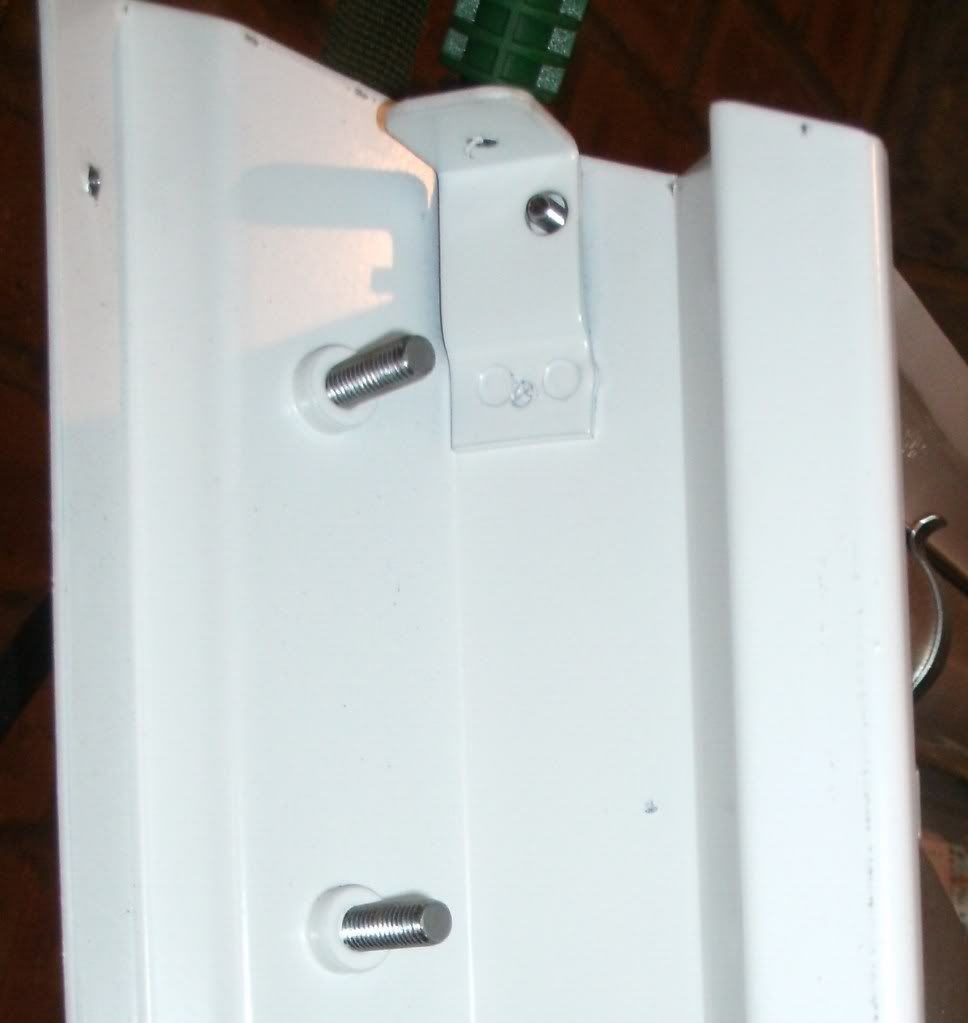
Top monitor bracket
Remove the 2 bolts (10mm) on the leg and do the same on the other side

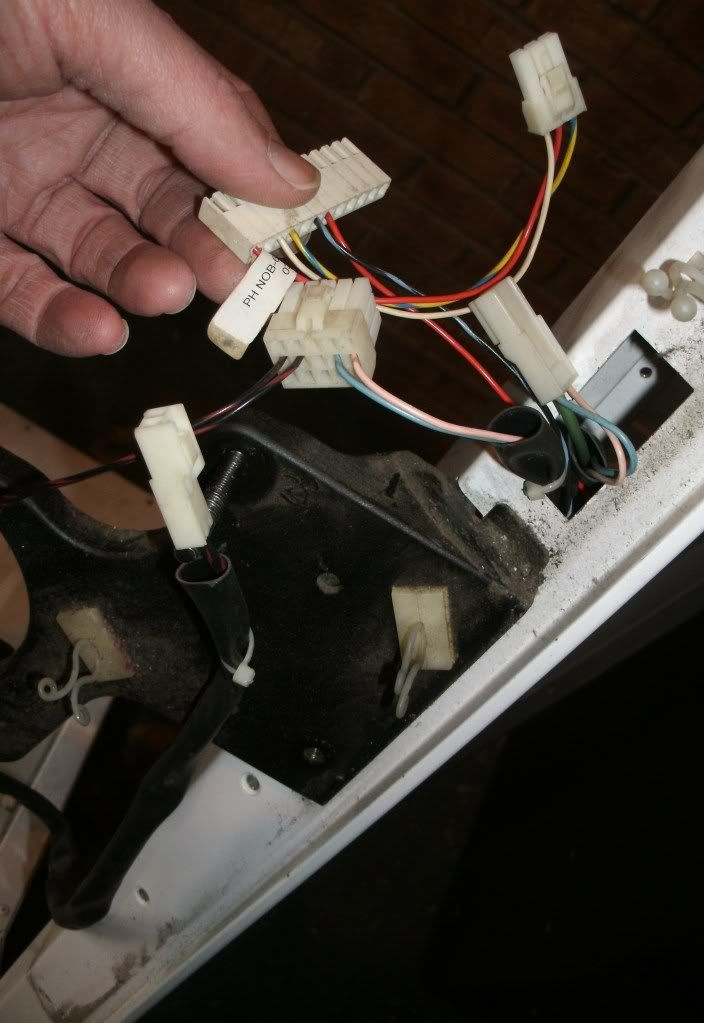
Bottom monitor bracket
Feed all the cables down both sides of the legs
Remove the 2 bolts (10mm) on the leg and do the same on the other side
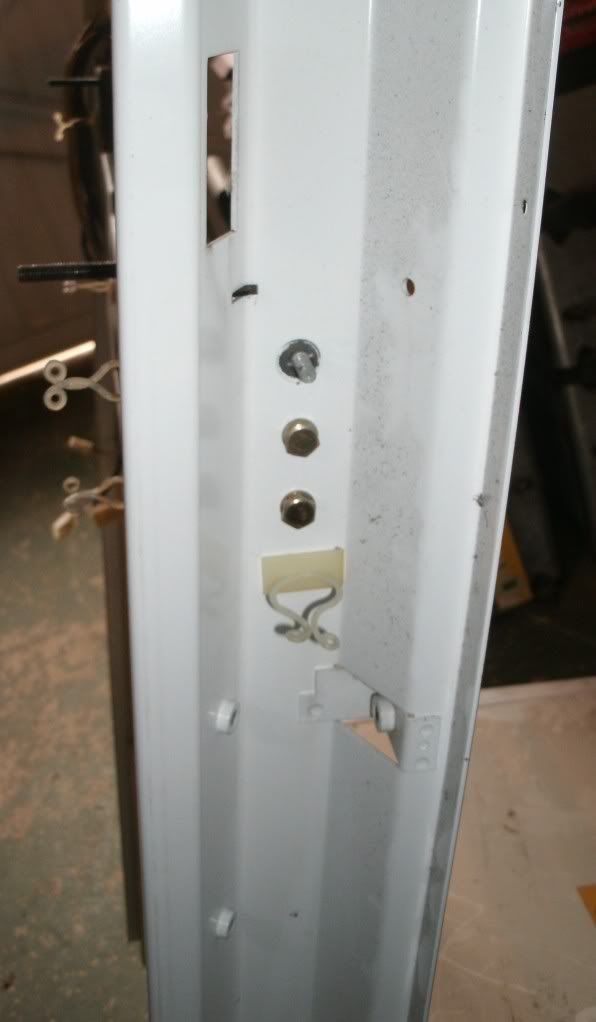
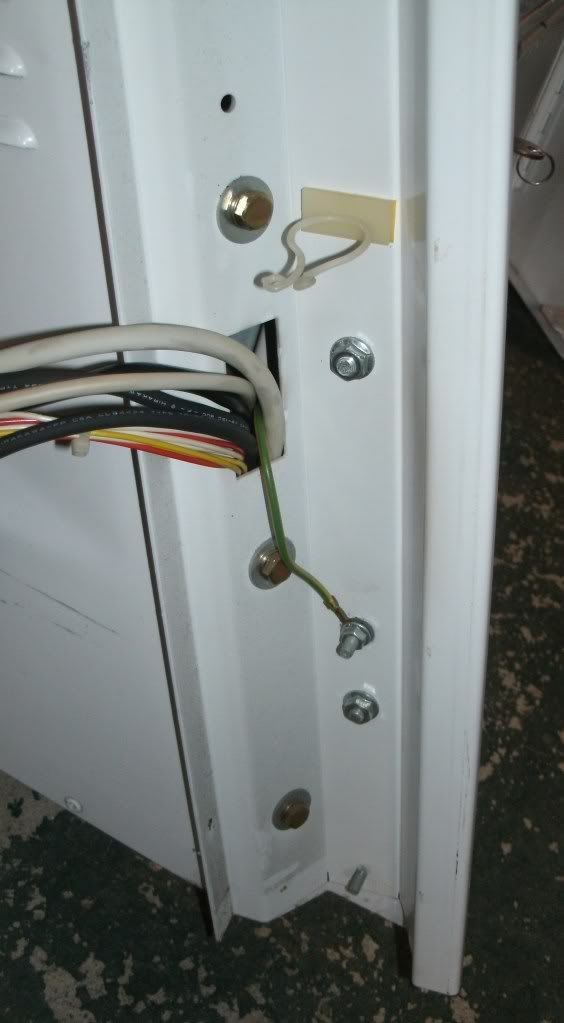
Left leg
Remove the earth cable bolt (8mm)
remove the 3 large bolts (10mm) and the 2 small bolts (8mm)
the leg is now free
Do the same on the right leg
Feed all the cables into the base
and that's it

I've probably sank a good 40+ hours into it so far but that's been over a period of about a month, I'm sure anyone could get the same results if not better (and probably quicker) if they are as sad as me and spend so much time fiddling around with their cab
I know this update is a bit belated, I still need to write up how I stripped and cleaned the base so I'll try to do that in the next few days
Stripping the rest of the cab
The tools that you will need for dismantling this area are:
Socket (10mm)
Socket (8mm)
Torx bit (T-20)
Torx bit (T-30)
At this point in the project the cab looks like this
Removing the lighting unit
Unplug the cable
Remove the torx bolt (T-20)
Remove the 2 large torx bolts (T-30) on the back of the leg and the small torx bolt on the top NOT THE ONE ON THE BACK (T-20) do the same on the other side and the lighting unit is free
Top monitor bracket
Remove the 2 bolts (10mm) on the leg and do the same on the other side
Bottom monitor bracket
Feed all the cables down both sides of the legs
Remove the 2 bolts (10mm) on the leg and do the same on the other side
Left leg
Remove the earth cable bolt (8mm)
remove the 3 large bolts (10mm) and the 2 small bolts (8mm)
the leg is now free
Do the same on the right leg
Feed all the cables into the base
and that's it
Last edited by Paulie on June 22nd, 2012, 11:34 pm, edited 2 times in total.
-
crunchywasp
- stompin' an' jumpin'
- Posts: 8104
- Joined: February 10th, 2012, 2:51 pm
- Location: Northern Ireland
- eBay: crunchywasp
- Initials: MAK
Re: Sega Naomi restoration work in progress Updated Thur 17/
40+ hours well spent  Can't wait to see the finished article
-
baddy

- Posts: 387
- Joined: January 28th, 2010, 12:40 am
- Location: Sweden, Stockholm
- eBay: irishfrog89
- Initials: CHI
Re: Sega Naomi restoration work in progress Updated Thur 17/
In france we call those bolts "Torx Securité (Security)" are they really called "star" in the UK ?
-
andygeezer

- Blue Skies Ahead
- Posts: 2427
- Joined: August 24th, 2008, 12:25 pm
- Location: Cambridge, UK
- Initials: AGS
Re: Sega Naomi restoration work in progress Updated Thur 17/
baddy wrote:In france we call those bolts "Torx Securité (Security)" are they really called "star" in the UK ?
No the correct name is torx
Say hello to my little friend...

-
jase

- Posts: 692
- Joined: September 14th, 2008, 3:18 pm
- Location:
Re: Sega Naomi restoration work in progress Updated Thur 17/
Hey Paulie,
Quick Q, I found some earth cables in the legs not attached to anything. Any chance you could let me know how many earth cables there are in each leg and what they're attached to the other end, that would be awesome.
Cheers matey
Quick Q, I found some earth cables in the legs not attached to anything. Any chance you could let me know how many earth cables there are in each leg and what they're attached to the other end, that would be awesome.
Cheers matey
