Sega Naomi restoration WIP - Updated Sept 2015
-
jase

- Posts: 690
- Joined: September 14th, 2008, 3:18 pm
- Location:
Re: Sega Naomi restoration work in progress Updated Sun 28/4
Thanks for the info Paulie, yeah yours came up a treat! I tried before but mine didn't come up as well, I think I didn't use enough of the old elbow grease. 

-
Paulie

- Opens wallet, moths fly out
- Posts: 2599
- Joined: September 28th, 2011, 5:43 pm
- Location: East Ardsley, West Yorks
- eBay: retro-paulie
- Initials: PSG
Re: Sega Naomi restoration work in progress Updated Sun 28/4
Yeah it takes a while, I would just do 5 mins here and there, otherwise it feels like your arm will drop off. In total I probably spent a good couple of hours at least on those few bits alone. I know it would have only cost a couple of quid to buy replacements but I wanted to keep it 'original' and it's all part of the fun.jase wrote:Thanks for the info Paulie, yeah yours came up a treat! I tried before but mine didn't come up as well, I think I didn't use enough of the old elbow grease.
-
Paulie
- Opens wallet, moths fly out
- Posts: 2599
- Joined: September 28th, 2011, 5:43 pm
- Location: East Ardsley, West Yorks
- eBay: retro-paulie
- Initials: PSG
Re: Sega Naomi restoration work in progress Updated Sun 28/4
I planned to clean the I/O tray and all the wires today but decided to to strip a bit more off the cab as it was nice and warm this evening.
Removing the Hooks, Leg covers and Hoofs.
The tools that you will need for dismantling this area are:
Screwdriver with a Philips CR-VPH1 (#1)
Socket (8mm)
Remove the Leg hook end cap (NOA-1004) there is 1 star bolt (T-20) at the back and 1 Philips screw (#1) on the top.
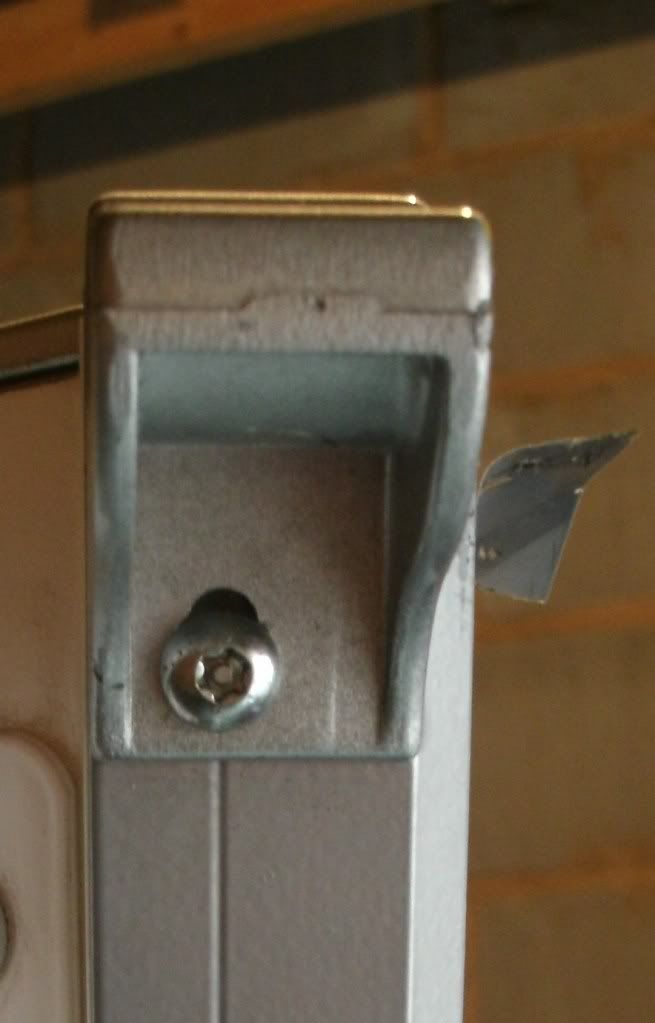
Remove all 5 of the star bolts (T-20) that run down the back of the leg cover.
The leg cover will now pop off.
Remove the leg hoof (NOA-1114) there is 1 Philips screw (#1) and 1 nut (8mm) the hoof is now free.
Now do exactly the same on the other side. I didn't have to this on the other side as mine was missing the RHS hook and hoof, oh and all the fixings too
Removing the Hooks, Leg covers and Hoofs.
The tools that you will need for dismantling this area are:
Screwdriver with a Philips CR-VPH1 (#1)
Socket (8mm)
Remove the Leg hook end cap (NOA-1004) there is 1 star bolt (T-20) at the back and 1 Philips screw (#1) on the top.
Remove all 5 of the star bolts (T-20) that run down the back of the leg cover.
The leg cover will now pop off.
Remove the leg hoof (NOA-1114) there is 1 Philips screw (#1) and 1 nut (8mm) the hoof is now free.
Now do exactly the same on the other side. I didn't have to this on the other side as mine was missing the RHS hook and hoof, oh and all the fixings too
Last edited by Paulie on May 1st, 2012, 1:08 am, edited 1 time in total.
-
Paulie
- Opens wallet, moths fly out
- Posts: 2599
- Joined: September 28th, 2011, 5:43 pm
- Location: East Ardsley, West Yorks
- eBay: retro-paulie
- Initials: PSG
Re: Sega Naomi restoration work in progress Updated Sun 28/4
Removing the coin chute.
The tools that you will need for dismantling this area are:
Socket (10mm)
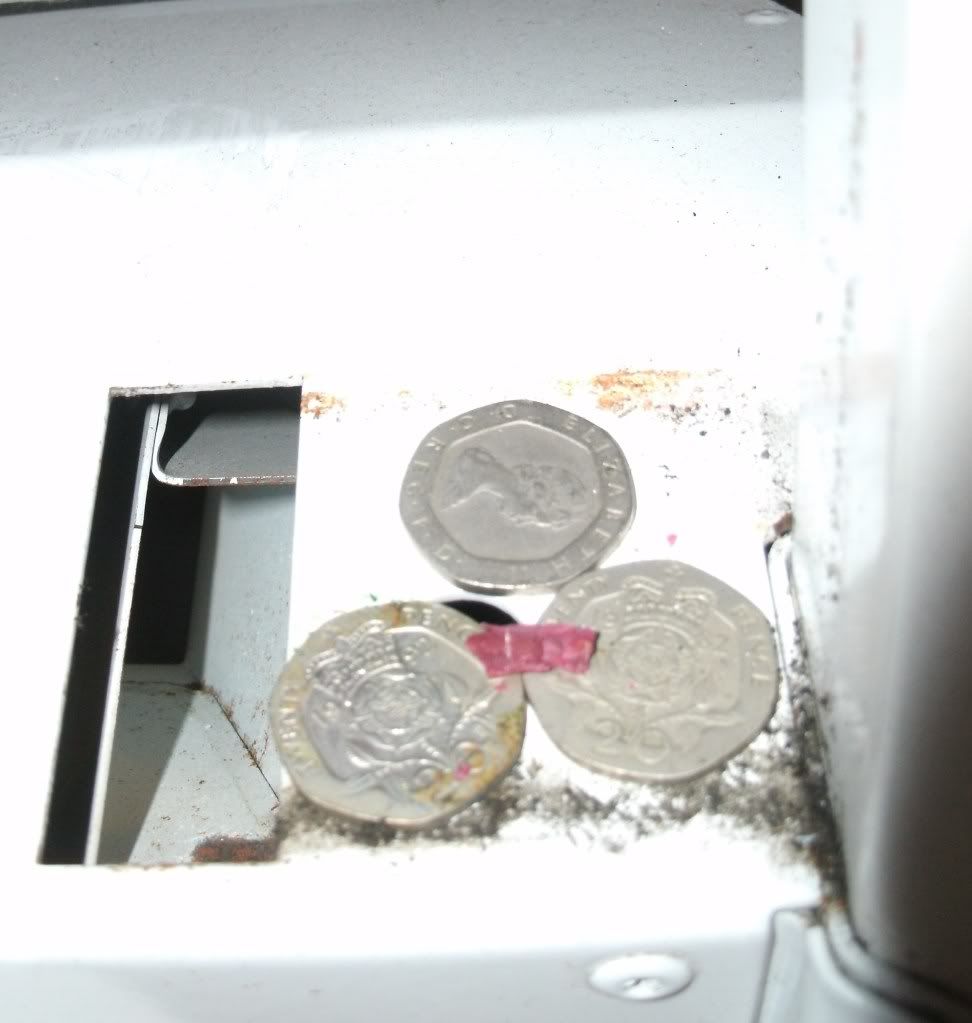
Remove the 2 bolts (10mm) and lift out the chute, I was surprised how over engineered this part is, it weighs an absolute ton, anyway that's it Job done.
After removing the chute I found a little Brucie bonus, Woo-hoo, Rich
Now now the offending lengthening appendage has gone forever and your cab is halfway to becoming vertically challenged.
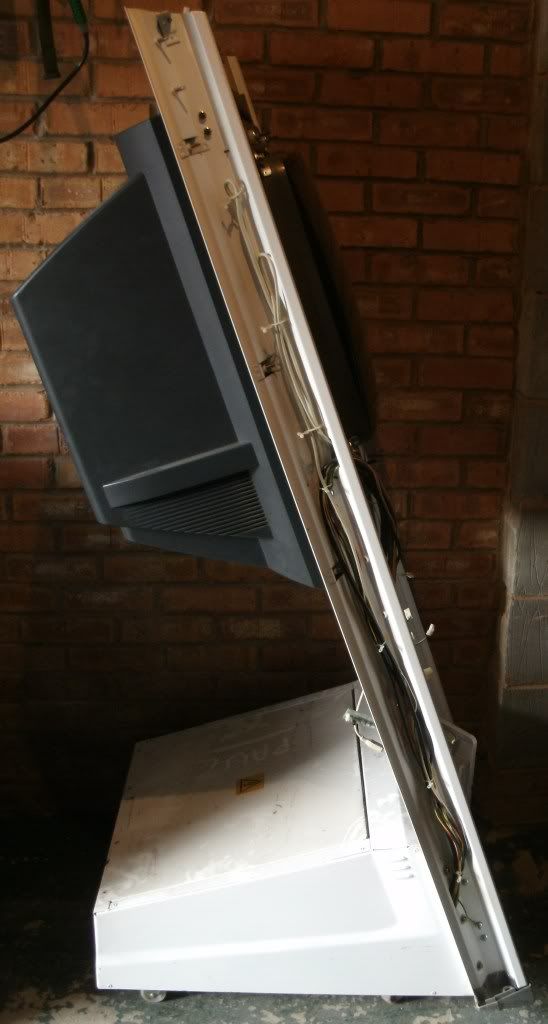
In less than 9 hours time the monitor will be coiming out. Even though I've read all I can and asked a few questions about removing the monitor I was still very nervous about this part (it's my first time). Panic over, phew! I'm getting help from Ralph so I know I'm in safe hands, what a legend
The tools that you will need for dismantling this area are:
Socket (10mm)
Remove the 2 bolts (10mm) and lift out the chute, I was surprised how over engineered this part is, it weighs an absolute ton, anyway that's it Job done.
After removing the chute I found a little Brucie bonus, Woo-hoo, Rich
Now now the offending lengthening appendage has gone forever and your cab is halfway to becoming vertically challenged.
In less than 9 hours time the monitor will be coiming out. Even though I've read all I can and asked a few questions about removing the monitor I was still very nervous about this part (it's my first time). Panic over, phew! I'm getting help from Ralph so I know I'm in safe hands, what a legend
-
idc
- Ralf Little impersonator
- Posts: 1311
- Joined: October 16th, 2008, 9:17 pm
- Location: Tamworth, Staffordshire
- eBay: iancourt
- Initials: IAN
Re: Sega Naomi restoration work in progress Updated Sun 28/4
Hope you've got some Foster's ready.Paulie wrote:I'm getting help from Ralph so I know I'm in safe hands, what a legend
Edit: Post 666!
Last edited by idc on May 1st, 2012, 9:12 pm, edited 1 time in total.

-
Paulie
- Opens wallet, moths fly out
- Posts: 2599
- Joined: September 28th, 2011, 5:43 pm
- Location: East Ardsley, West Yorks
- eBay: retro-paulie
- Initials: PSG
Re: Sega Naomi restoration work in progress Updated Sun 28/4
I sure did, got a couple of funny looks buying a box of Fosters at 7:30am this morning thoidc wrote:Hope you've got some Foster's ready.Paulie wrote:I'm getting help from Ralph so I know I'm in safe hands, what a legend
-
Paulie
- Opens wallet, moths fly out
- Posts: 2599
- Joined: September 28th, 2011, 5:43 pm
- Location: East Ardsley, West Yorks
- eBay: retro-paulie
- Initials: PSG
Re: Sega Naomi restoration work in progress Updated Sun 28/4
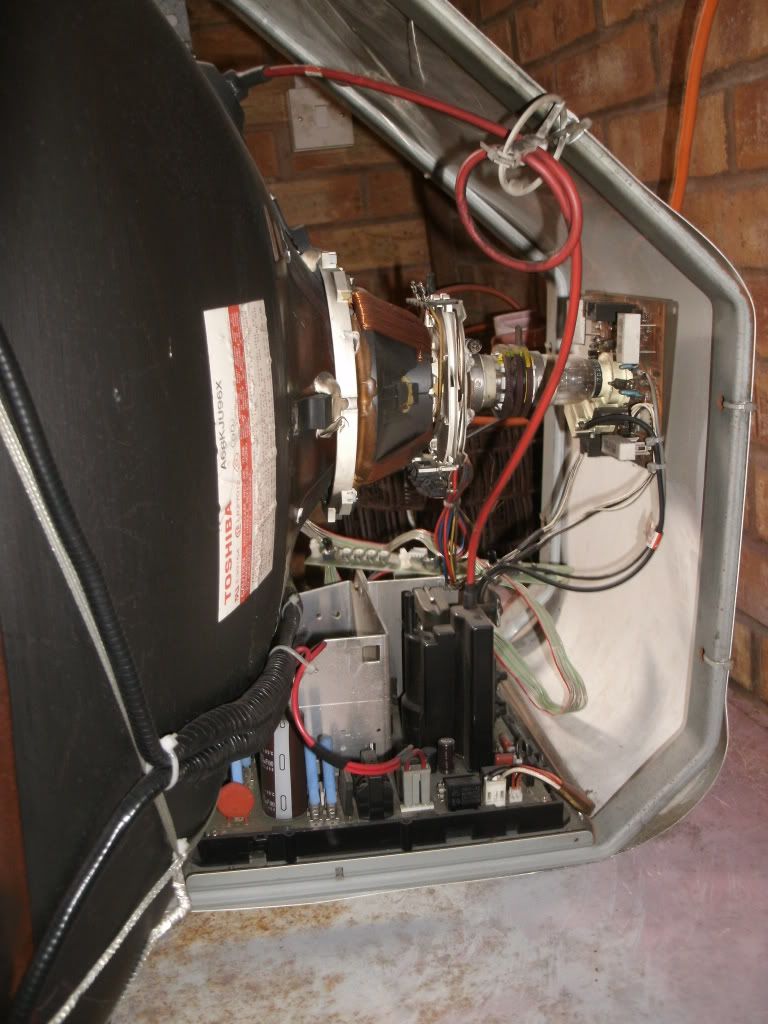
Removing the monitor.
First off a big thank you to everyone you replied to my question last night and an extra special thank you to Ralph, he was an absolute diamond and came over to my place this morning and removed the monitor with me. It's all of the people like Rossco, Ralph, Richy, Franco and all the other chaps that are willing to share there time, knowledge and left over parts that make this such a great hobby to be involved in
The tools that you will need for dismantling this area are:
Spanner (10mm) my sockets were too short as it's a pretty long thread
Socket (10mm)
Socket (8mm)
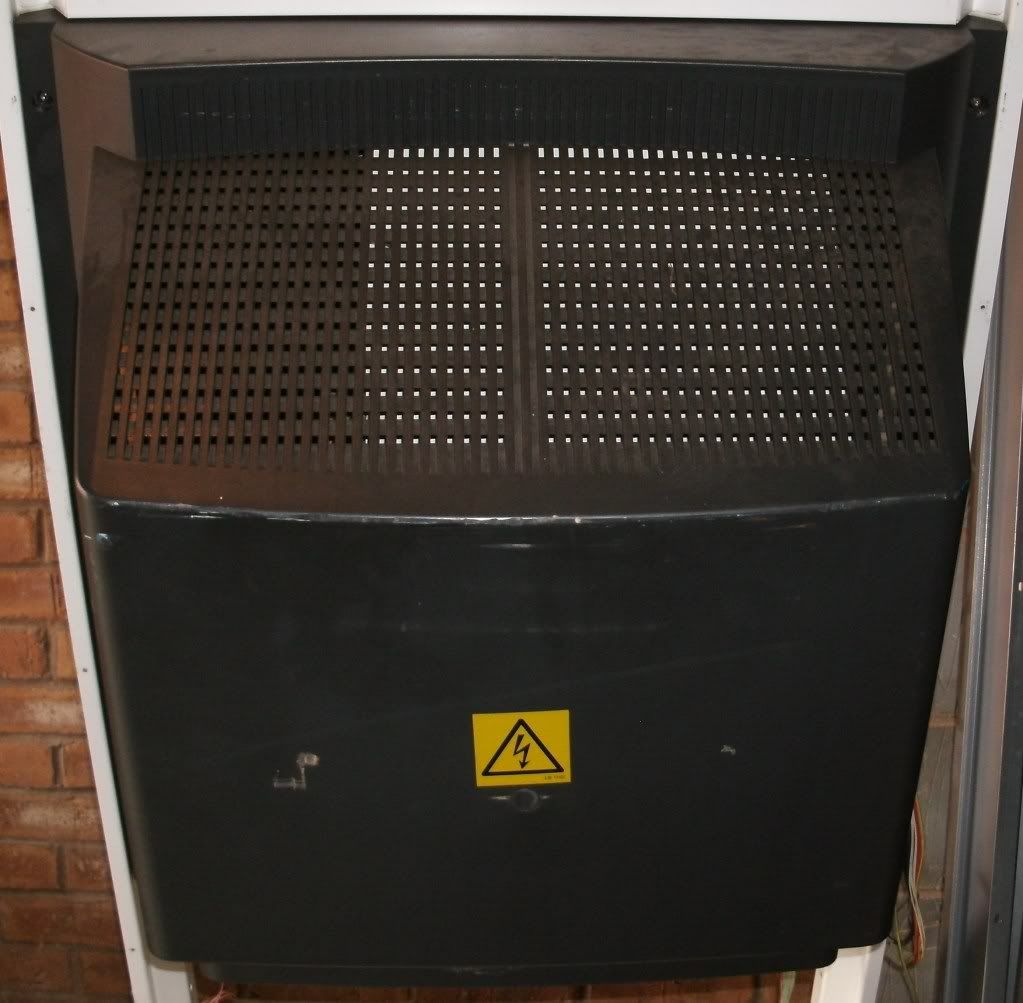
Remove the rear cover. There a 6 star bolts (T30) the cover should now just pull off. Mine was wedged and we couldn't free it, we actually thought it had a rogue screw holding it on so we took this part off after the monitor was removed.
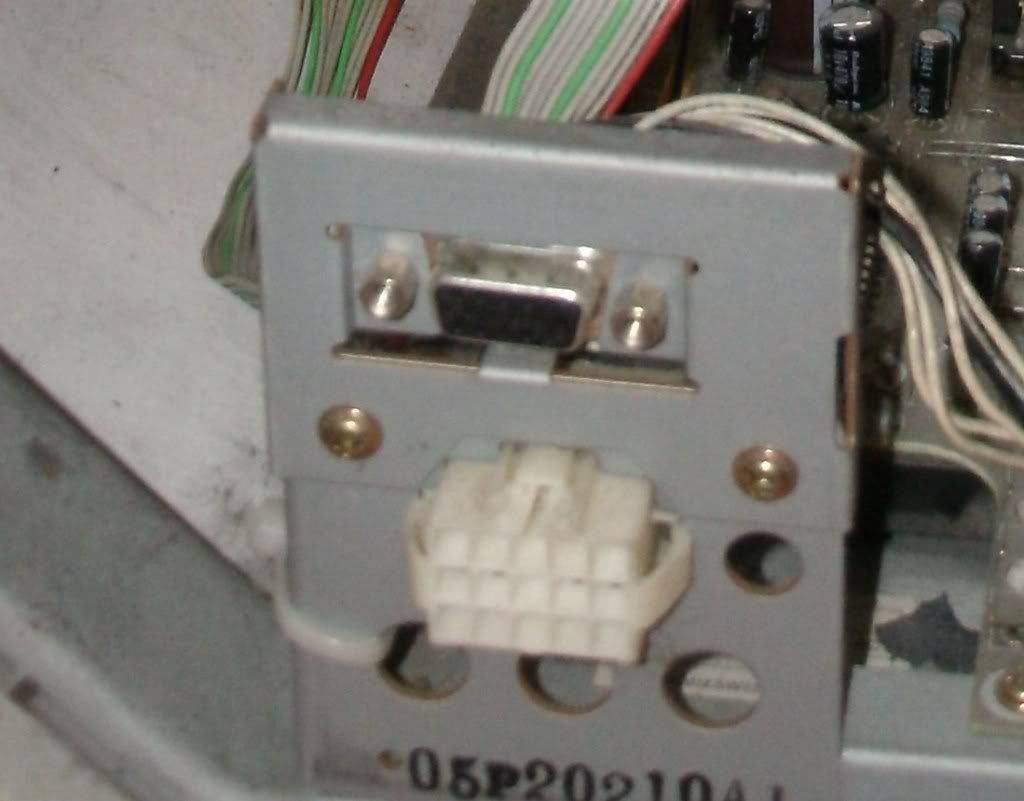
Unplug the VGA cable
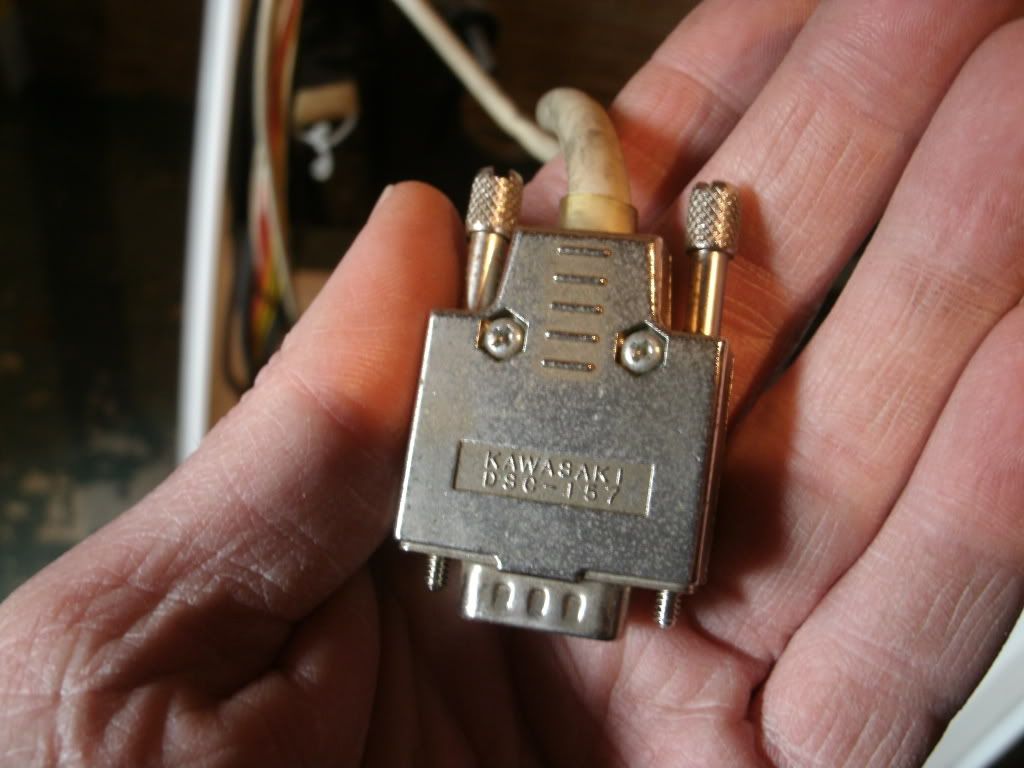
Unplug the other cable
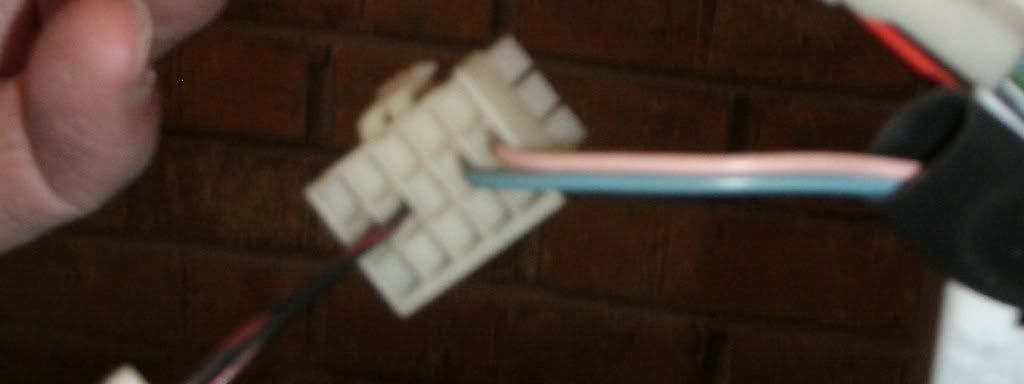
Both the VGA cable and the other cable are located on the lower left hand side of the monitor cage.
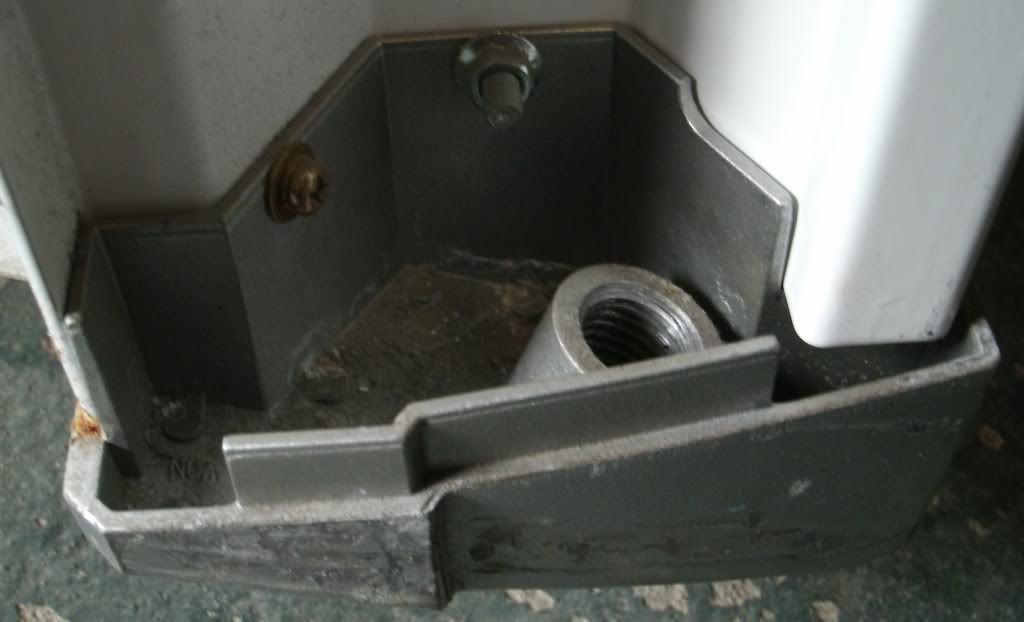
There is also a short earth wire which is bolted onto the right hand side leg (socket 8mm) and feeds through to the monitor area. After the monitor came out I realised that it hadn't been attached to anything so god knows where the other end should have be attached, I'll investigate this further when I come to reassembly.
Feed the remote board through the braces and rest it in the frame
Now make sure all of the wires are disconnected and free of the monitor REMEMBER I'm only a beginner and I got help from someone much more knowledgeable than me. This thread is just documenting how I did it and NOT how you should do it. You may or may not have other bits that I didn't have so check thoroughly before you attempt to remove your monitor

Remove the 4 nuts (spanner 10mm), washers and plastic bushes
Now lift it out and put it somewhere safe (The monitor is in a frame so there was no need to discharge it). Ralph pulled the monitor out for me and I checked that there was nothing still attached, I know I got the good end of the deal there (remember we still had the rear cover on so it was not easy to see if everything was free before it was pulled).
Now the monitor was out we could just pull the rear cover off as it turns out it had just been wedged by a strip of metal that hadn't been fully screwed in place.
The Mayor of Aero City had a good look at the monitor for screen burn and it got his thumbs up

I stripped the rest of the cab this afternoon so expect some pictures and a little write up shortly.
First off a big thank you to everyone you replied to my question last night and an extra special thank you to Ralph, he was an absolute diamond and came over to my place this morning and removed the monitor with me. It's all of the people like Rossco, Ralph, Richy, Franco and all the other chaps that are willing to share there time, knowledge and left over parts that make this such a great hobby to be involved in
The tools that you will need for dismantling this area are:
Spanner (10mm) my sockets were too short as it's a pretty long thread
Socket (10mm)
Socket (8mm)
Remove the rear cover. There a 6 star bolts (T30) the cover should now just pull off. Mine was wedged and we couldn't free it, we actually thought it had a rogue screw holding it on so we took this part off after the monitor was removed.
Unplug the VGA cable
Unplug the other cable
Both the VGA cable and the other cable are located on the lower left hand side of the monitor cage.
There is also a short earth wire which is bolted onto the right hand side leg (socket 8mm) and feeds through to the monitor area. After the monitor came out I realised that it hadn't been attached to anything so god knows where the other end should have be attached, I'll investigate this further when I come to reassembly.
Feed the remote board through the braces and rest it in the frame
Now make sure all of the wires are disconnected and free of the monitor REMEMBER I'm only a beginner and I got help from someone much more knowledgeable than me. This thread is just documenting how I did it and NOT how you should do it. You may or may not have other bits that I didn't have so check thoroughly before you attempt to remove your monitor
Remove the 4 nuts (spanner 10mm), washers and plastic bushes
Now lift it out and put it somewhere safe (The monitor is in a frame so there was no need to discharge it). Ralph pulled the monitor out for me and I checked that there was nothing still attached, I know I got the good end of the deal there
Now the monitor was out we could just pull the rear cover off as it turns out it had just been wedged by a strip of metal that hadn't been fully screwed in place.
The Mayor of Aero City had a good look at the monitor for screen burn and it got his thumbs up
I stripped the rest of the cab this afternoon so expect some pictures and a little write up shortly.
-
Rossyra

- Supermod
- Posts: 7902
- Joined: February 12th, 2009, 1:24 am
- Location: UK
Re: Sega Naomi restoration work in progress Updated Tues 1/5
MS-2932 is a great VGA screen, bonus that is has no burn too

-
AeroCityMayor

- Previously alien_mame
- Posts: 2005
- Joined: July 25th, 2009, 1:05 pm
- Location: West Yorks, UK
- eBay: air_fortless
- Initials: ACM
Re: Sega Naomi restoration work in progress Updated Tues 1/5
I didn't look closely enough to determine the model but the tube certainly is a beauty - there a hint of a shadow middle top and a very slight shadow middle bottom but I REALLY had to look for them and I couldn't make out quite what the text said either - if it was text.Rossyra wrote:MS-2932 is a great VGA screen, bonus that is has no burn too
This is a 9.5/10 for no screen burn.
Nice to meet up again Paul and your Combo AV is very nice - I've not seen the "wide" version before. Can't wait to see some more innards. SG pr0n FTW
Oh, and the Foster's are now nicely chilled and just like 'r' lass, going down a treat
Sorry!
Cheers,
Ralph.

-
Paulie
- Opens wallet, moths fly out
- Posts: 2599
- Joined: September 28th, 2011, 5:43 pm
- Location: East Ardsley, West Yorks
- eBay: retro-paulie
- Initials: PSG
Re: Sega Naomi restoration work in progress Updated Tues 1/5
I'm very happy with the monitor 
Yeah it was great to meet up again and thank you so much for the help, it's given me the confidence to be able to put it back it by myself and not cack myself at the thought of doing it
Some Combo AV p0rn esp for you http://forum.arcadeotaku.com/viewtopic. ... 50#p259350"
You deserved em mate, enjoy. I hope your good lady doesn't read this filth
Thanks again
P
-
instant_classic

- Actually Loves Take That
- Posts: 980
- Joined: February 10th, 2009, 9:47 pm
- Location: Wales
- Initials: DAF
Re: Sega Naomi restoration work in progress Updated Tues 1/5
Fair play Paulie, this Naomi is starting to look like a real beaut You have put some serious effort into it.
-
Paulie
- Opens wallet, moths fly out
- Posts: 2599
- Joined: September 28th, 2011, 5:43 pm
- Location: East Ardsley, West Yorks
- eBay: retro-paulie
- Initials: PSG
Re: Sega Naomi restoration work in progress Updated Fri 4/5/
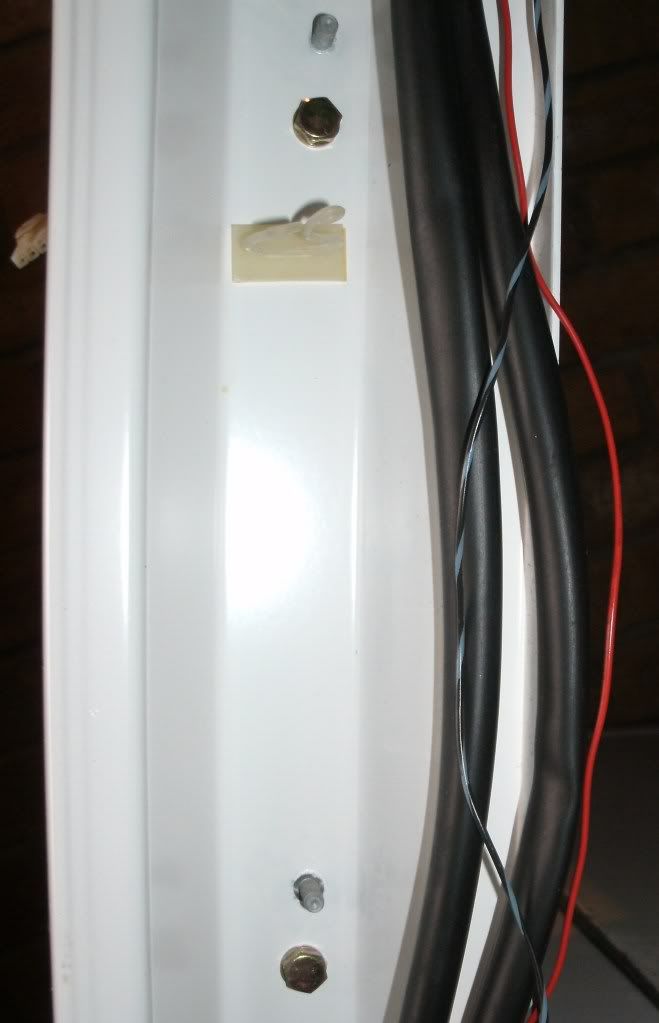
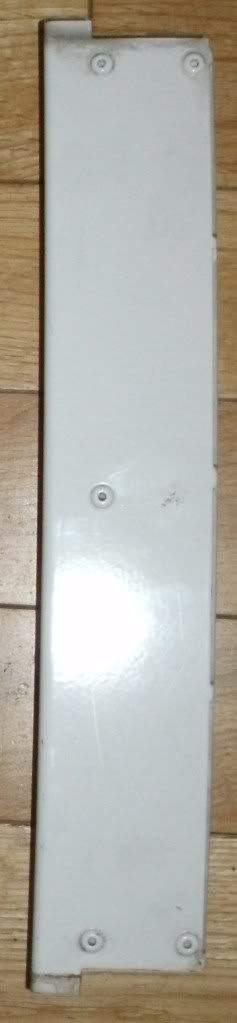
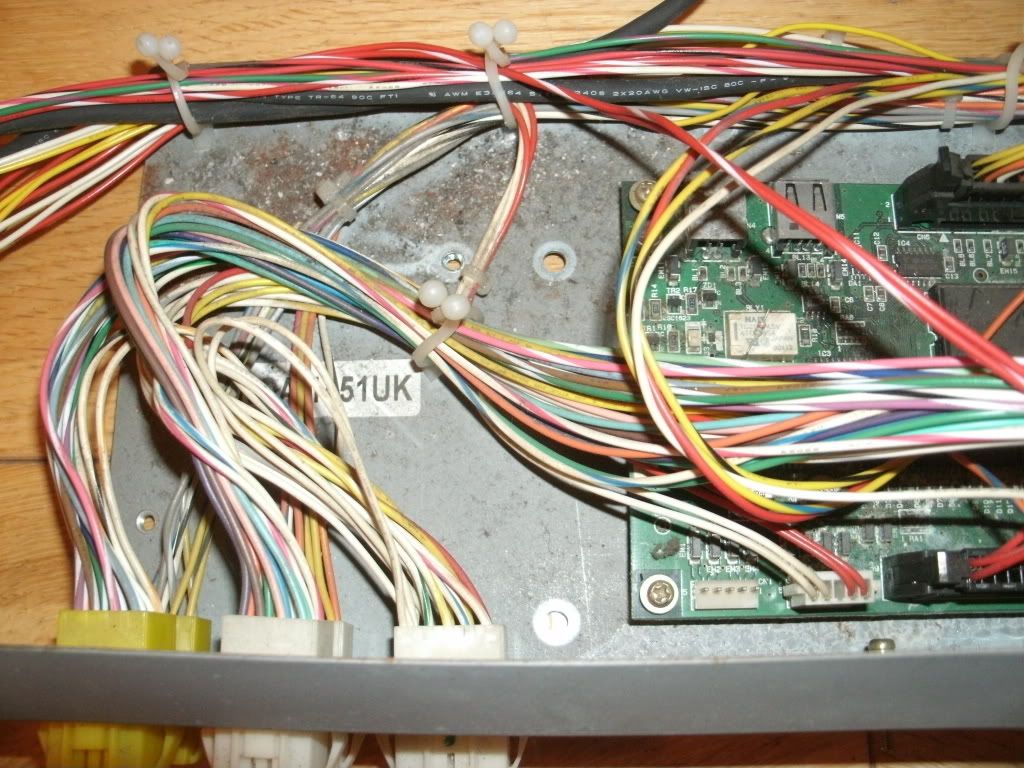
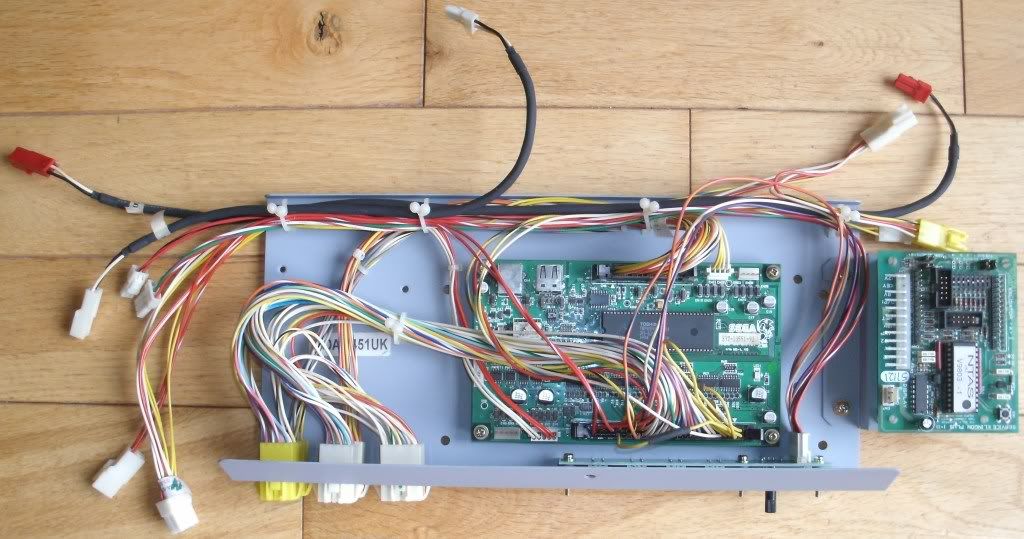
Now a dead simple job, strip, clean, spray and resembled the I/O tray and all the gubbins.
The tools that you will need for dismantling this area are:
Screwdriver with a Philips CR-VPH2 (#2)
1. Take a few photographs so you know where everything lives.
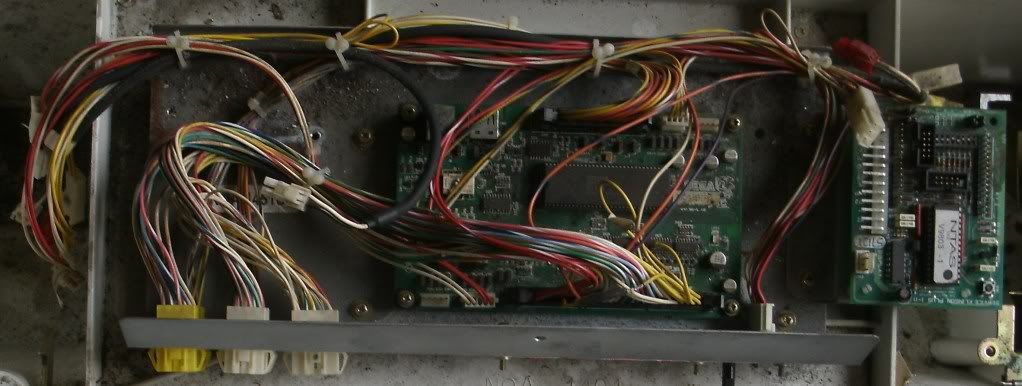
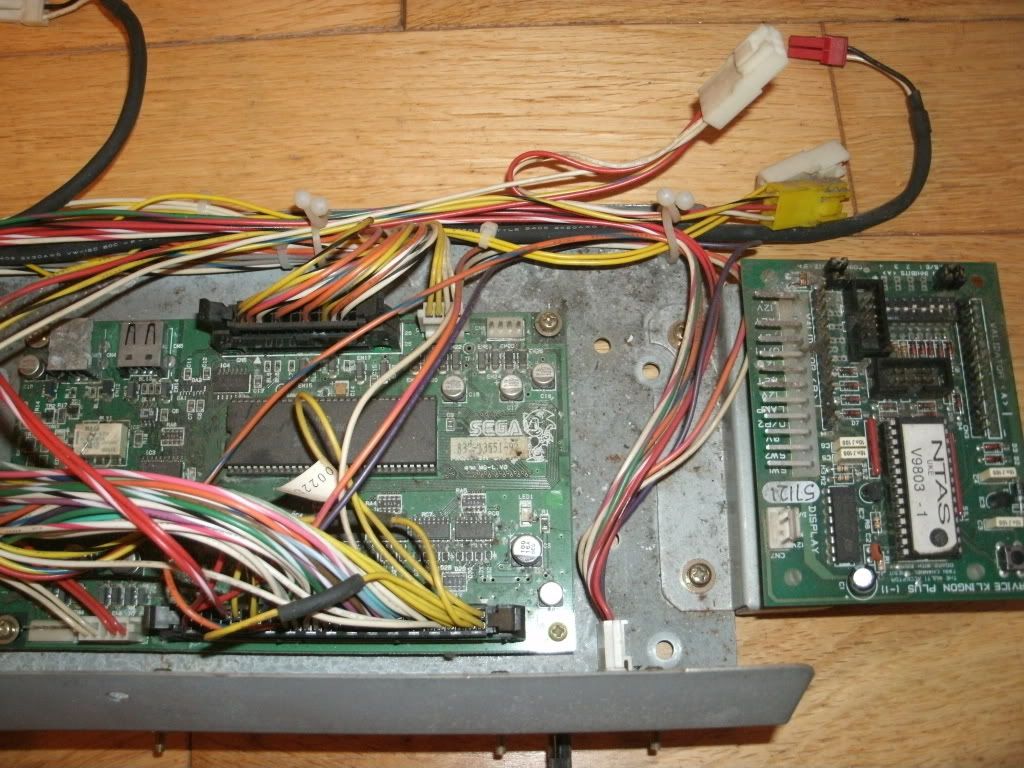
2. Strip everything off the I/O tray NOA-1451. Everything either pops out by squeezing tabs or unscrews (Philips #2 bit).
Remove the 2 screws that hold the credit board mounting plate
Pop off the credit board
Remove the 4 screws that hold the I/O pcb
Remove the 3 screws that hold the service pcb
Now remove the wiring it looks like a lot but it's not that much really.
Analogue wiring harness NOA-60021
Digital JVS loom (This seems to be labelled as NOA-60022 on pretty much every site I've found) but mine is labelled NOA-60023 so dunno
Right Speaker NOA-60024
Left speaker NOA-60025
Remove the 5 cable tidy clips
3. Give everything a very good yet very careful clean.
4. Rub down the tray with a fine grade of wet and dry, de-grease, leave to dry, mask off the stickers then apply a couple of coats of primer (It was originally galvanised and not painted so primer is the nearest I can get to the original finish at home)
5. Reassemble using your photographs for reference.
Before

After
Job's a good un.
The tools that you will need for dismantling this area are:
Screwdriver with a Philips CR-VPH2 (#2)
1. Take a few photographs so you know where everything lives.
2. Strip everything off the I/O tray NOA-1451. Everything either pops out by squeezing tabs or unscrews (Philips #2 bit).
Remove the 2 screws that hold the credit board mounting plate
Pop off the credit board
Remove the 4 screws that hold the I/O pcb
Remove the 3 screws that hold the service pcb
Now remove the wiring it looks like a lot but it's not that much really.
Analogue wiring harness NOA-60021
Digital JVS loom (This seems to be labelled as NOA-60022 on pretty much every site I've found) but mine is labelled NOA-60023 so dunno
Right Speaker NOA-60024
Left speaker NOA-60025
Remove the 5 cable tidy clips
3. Give everything a very good yet very careful clean.
4. Rub down the tray with a fine grade of wet and dry, de-grease, leave to dry, mask off the stickers then apply a couple of coats of primer (It was originally galvanised and not painted so primer is the nearest I can get to the original finish at home)
5. Reassemble using your photographs for reference.
Before
After
Job's a good un.
-
emphatic

- Breastfeeds when required
- Posts: 5907
- Joined: April 7th, 2009, 4:14 pm
- Location: Alingsås, Sweden
- eBay: jorgen_sjolander
- Initials: JOR
-
AeroCityMayor
- Previously alien_mame
- Posts: 2005
- Joined: July 25th, 2009, 1:05 pm
- Location: West Yorks, UK
- eBay: air_fortless
- Initials: ACM
Re: Sega Naomi restoration work in progress Updated Fri 4/5/
I can't see the "Take a pair of scissors and cut..."
Very nice job mate.
Cheers,
Ralph.
Very nice job mate.
Cheers,
Ralph.
-
Paulie
- Opens wallet, moths fly out
- Posts: 2599
- Joined: September 28th, 2011, 5:43 pm
- Location: East Ardsley, West Yorks
- eBay: retro-paulie
- Initials: PSG
-
supergoose

- Please Continue...
- Posts: 737
- Joined: September 12th, 2010, 10:38 pm
- Location: Raccoon City, Germany
Re: Sega Naomi restoration work in progress Updated Fri 4/5/
good job. some of those parts look like new again and the writeup is worthy of beeing linked to the wiki.
Wanted: SNK Candy 18 spares. Mainly looking for a marquee holder & the "video games" sign.
-
Paulie
- Opens wallet, moths fly out
- Posts: 2599
- Joined: September 28th, 2011, 5:43 pm
- Location: East Ardsley, West Yorks
- eBay: retro-paulie
- Initials: PSG
Re: Sega Naomi restoration work in progress Updated Fri 4/5/
Thanks mate
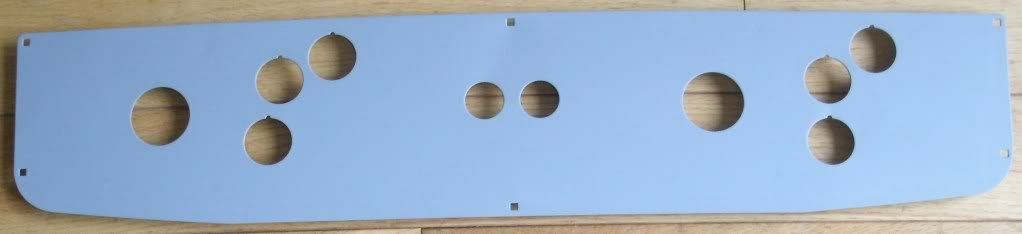
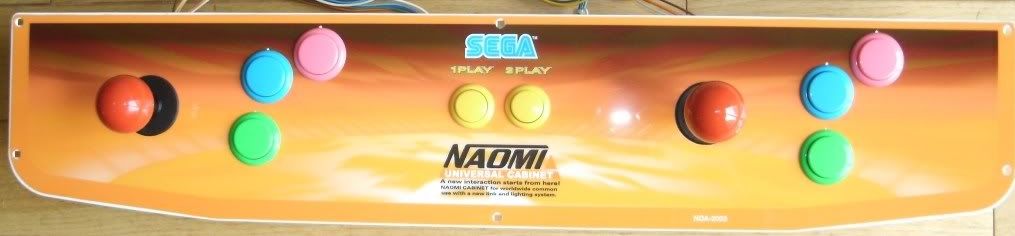
Control panel is now back to stock
I removed all the paint and rust from the mounting plates (wet & dry), degreased, primed (2 coats) and painted them (2 coats).
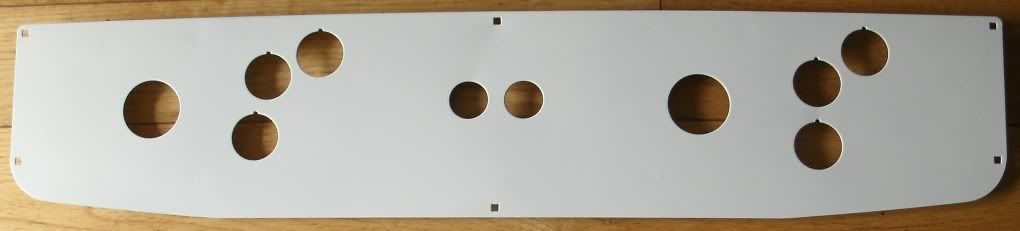
Then I did exactly the same with the control panel except it had 3 coats of paint, remember white does not always have a strong opacity and when spraying you are looking for very thin even coats, so build up the layers, never try to cut corners and apply 1 thick coat a it will always look a mess.
Primed
Painted
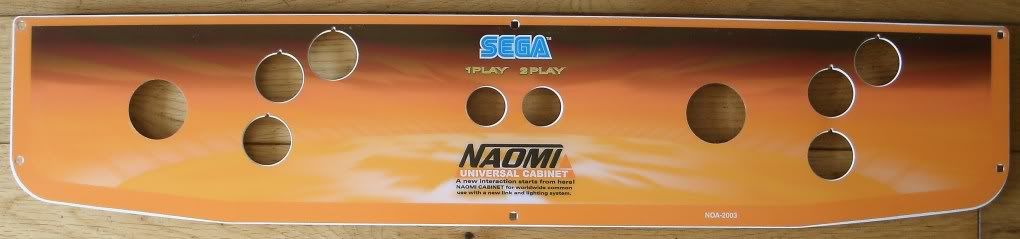
Then I applied the new overlay (NOA2003) that I got from Craig (giz10p). Really simple but you need to ensure that you have the placement correct as there will be a couple of mm of white 'frame' from the control panel. I taped it in place then removed part of the backing and nice and smoothly applied it whilst removing the rest of the backing.
New overlay applied, the protective film is still present (I've just noticed in the photo it looks like the overlay is hanging off of the RHS of the CP. It's not, it's been applied perfectly, I must have just taken the photograph at a slightly off angle.
I popped in the new Sanwa buttons that I got from Gremlin Solutions Green, Blue, Pink and yellow for P1&P2. I used the screw in type (OBSN-30 & OBSN-24) as I like those, but it originally came with the push fit type (OBSF-30 & OBSF-24). I then put the mounting plates back. Fixed my new Seimitsu LS 56 01 sticks (again from Craig) if any one is after these then see Craig as he has the on offer at the moment for about a tenner + VAT which is by far the cheapest place I could find them. I cleaned the P1 loom (PH 600-7154-006 *note this is the REV0 #) & the P2 loom (PH 600-7154-007 *note this is the REV0 #) popped them back and finally reattached the cable tidy loops.
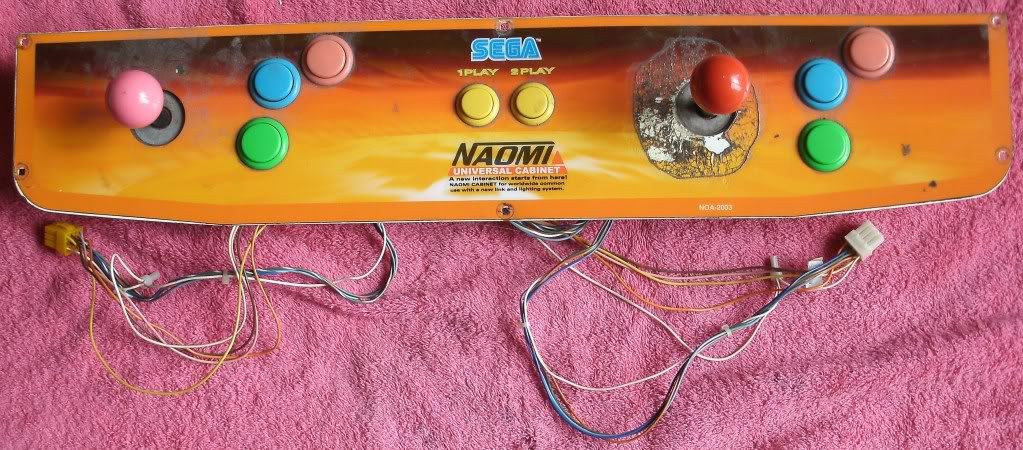
Before, Yuk!
After
Then I cleaned & polished all the other bits:
Coin slot bracket
Locking hooks x2
Reject button
Dummy button
Instruction cover glass (I removed the black 'frame' and resprayed it back on this was a bit of a pain as there was some bleeding which I tidied up with the edge of a craft blade)
Instruction cover brackets x2
Instruction cover rear brackets x4
Hinge
Control panel
Nut for the earthing cable
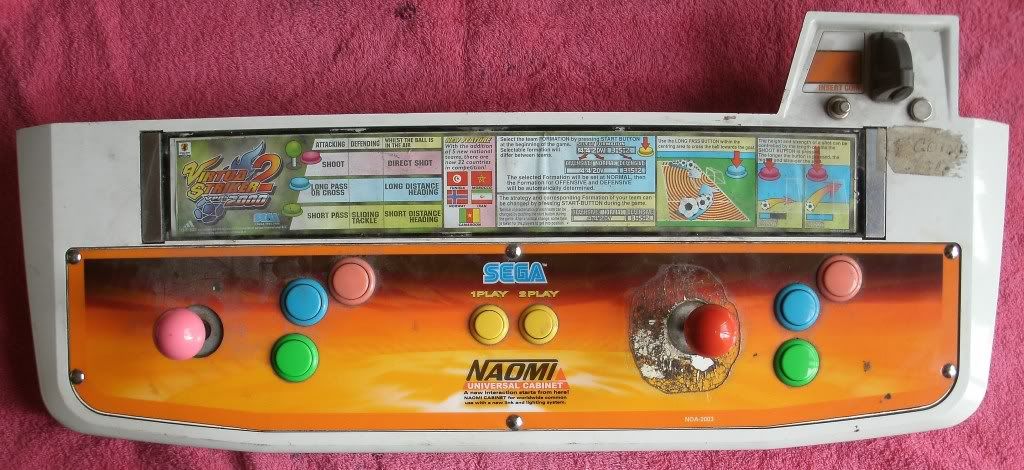
Then I resembled all of the original bits, I also put in a new Japanese stylee coin slot, Cheers Rosco BTW the 'mint nose' type I had originally was fixed in place by 2 self tapping screws and the new one has metal threads, screws from PCB feet are a perfect fit. I also added a brand new paper instruction strip, again this came from Craig.
Before
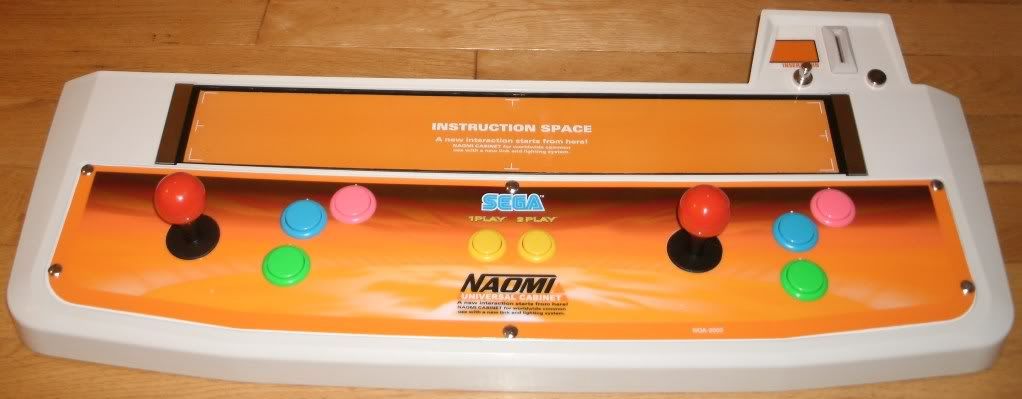
After
I would like to do a couple more control panels, a 2L12B a 1L6B and maybe a nice1L5B for when I hook my Atomiswave up, but they are things that will probably happen a bit later down the line.
Control panel is now back to stock
I removed all the paint and rust from the mounting plates (wet & dry), degreased, primed (2 coats) and painted them (2 coats).
Then I did exactly the same with the control panel except it had 3 coats of paint, remember white does not always have a strong opacity and when spraying you are looking for very thin even coats, so build up the layers, never try to cut corners and apply 1 thick coat a it will always look a mess.
Primed
Painted
Then I applied the new overlay (NOA2003) that I got from Craig (giz10p). Really simple but you need to ensure that you have the placement correct as there will be a couple of mm of white 'frame' from the control panel. I taped it in place then removed part of the backing and nice and smoothly applied it whilst removing the rest of the backing.
New overlay applied, the protective film is still present (I've just noticed in the photo it looks like the overlay is hanging off of the RHS of the CP. It's not, it's been applied perfectly, I must have just taken the photograph at a slightly off angle.
I popped in the new Sanwa buttons that I got from Gremlin Solutions Green, Blue, Pink and yellow for P1&P2. I used the screw in type (OBSN-30 & OBSN-24) as I like those, but it originally came with the push fit type (OBSF-30 & OBSF-24). I then put the mounting plates back. Fixed my new Seimitsu LS 56 01 sticks (again from Craig) if any one is after these then see Craig as he has the on offer at the moment for about a tenner + VAT which is by far the cheapest place I could find them. I cleaned the P1 loom (PH 600-7154-006 *note this is the REV0 #) & the P2 loom (PH 600-7154-007 *note this is the REV0 #) popped them back and finally reattached the cable tidy loops.
Before, Yuk!
After
Then I cleaned & polished all the other bits:
Coin slot bracket
Locking hooks x2
Reject button
Dummy button
Instruction cover glass (I removed the black 'frame' and resprayed it back on this was a bit of a pain as there was some bleeding which I tidied up with the edge of a craft blade)
Instruction cover brackets x2
Instruction cover rear brackets x4
Hinge
Control panel
Nut for the earthing cable
Then I resembled all of the original bits, I also put in a new Japanese stylee coin slot, Cheers Rosco
Before
After
I would like to do a couple more control panels, a 2L12B a 1L6B and maybe a nice1L5B for when I hook my Atomiswave up, but they are things that will probably happen a bit later down the line.
-
emphatic
- Breastfeeds when required
- Posts: 5907
- Joined: April 7th, 2009, 4:14 pm
- Location: Alingsås, Sweden
- eBay: jorgen_sjolander
- Initials: JOR
Re: Sega Naomi restoration work in progress Updated Sat 5/5/
You're a friggin' artist! 
My games: http://www.emphatic.se
-
denson

- Please Continue...
- Posts: 517
- Joined: February 22nd, 2012, 10:36 am
- Location: Norwich, Norfolk
- eBay: chubba100
Re: Sega Naomi restoration work in progress Updated Sat 5/5/
Wow! That looks factory fresh! I can't wait to see what you do with the rest of the cab...especially the leg covers.. They're a pain once they're peeling..
-
Paulie
- Opens wallet, moths fly out
- Posts: 2599
- Joined: September 28th, 2011, 5:43 pm
- Location: East Ardsley, West Yorks
- eBay: retro-paulie
- Initials: PSG
Re: Sega Naomi restoration work in progress Updated Sat 5/5/
Cheers buddy, thats very kind of you to say soemphatic wrote:You're a friggin' artist!
I spent a bit longer messing with the CP than I had originally anticipated but I've really enjoyed working on this part of the cab and I think it's turned out nicely so it was time well spent.
Thanks mandenson wrote:Wow! That looks factory fresh! I can't wait to see what you do with the rest of the cab...especially the leg covers.. They're a pain once they're peeling..
I haven't really thought what I will do with the leg covers as that will be the last job I do on the cab. There is some peeling and some scrapes, marks etc so they will most likely need stripping as I think the paint is possibly past repair but we shall see.