Keeps up the good work!
Sega Naomi restoration WIP - Updated Sept 2015
-
denson

- Please Continue...
- Posts: 517
- Joined: February 22nd, 2012, 10:36 am
- Location: Norwich, Norfolk
- eBay: chubba100
Re: Sega Naomi restoration (work in progress) Updated 17/4/1
Wow! Excellent work all round!  I did my first Naomi last year, but unfortunatly someone had screwed something to the front of the cp upper....so I had no choice but to spray it...not overly pleased with the finish I got (yours looks WAY better) so I might have to try again this year! (or take it to a car repair shop!)
Keeps up the good work!
Keeps up the good work!
-
Paulie

- Opens wallet, moths fly out
- Posts: 2599
- Joined: September 28th, 2011, 5:43 pm
- Location: East Ardsley, West Yorks
- eBay: retro-paulie
- Initials: PSG
Re: Sega Naomi restoration (work in progress) Updated 17/4/1
Thanks mate.
Thats a shame, TBH I think it would be very difficult to paint the plastics and get acceptable results, if it were mine I would wait until someone is breaking a cab and try to nab that part, the great thing about Naomi cabs is there seems to be parts for sale all of the time and if you are just after one part it should'nt be too expensive.
Thats a shame, TBH I think it would be very difficult to paint the plastics and get acceptable results, if it were mine I would wait until someone is breaking a cab and try to nab that part, the great thing about Naomi cabs is there seems to be parts for sale all of the time and if you are just after one part it should'nt be too expensive.
-
denson
- Please Continue...
- Posts: 517
- Joined: February 22nd, 2012, 10:36 am
- Location: Norwich, Norfolk
- eBay: chubba100
Re: Sega Naomi restoration (work in progress) Updated 17/4/1
I know, I should have another fairly soon...but that's for my next project  when are you painting the cp?
-
Paulie
- Opens wallet, moths fly out
- Posts: 2599
- Joined: September 28th, 2011, 5:43 pm
- Location: East Ardsley, West Yorks
- eBay: retro-paulie
- Initials: PSG
Re: Sega Naomi restoration (work in progress) Updated 17/4/1
Nice one 
I won't be painting anything other than the white metal parts (depending on how they look when cleaned and polished). Retrobrite would probably be the way to go for yellowed plastics although I have not tried it, the results seem to be very impressive or I'll just source a replacment part. If you are interested then you could check out my other resto thread to see how I repaired a badly damaged plastic part without having to paint it
I won't be painting anything other than the white metal parts (depending on how they look when cleaned and polished). Retrobrite would probably be the way to go for yellowed plastics although I have not tried it, the results seem to be very impressive or I'll just source a replacment part. If you are interested then you could check out my other resto thread to see how I repaired a badly damaged plastic part without having to paint it
-
Paulie
- Opens wallet, moths fly out
- Posts: 2599
- Joined: September 28th, 2011, 5:43 pm
- Location: East Ardsley, West Yorks
- eBay: retro-paulie
- Initials: PSG
Re: Sega Naomi restoration (work in progress) Updated 17/4/1
I haven't yet picked up the primer, paint, control panel overlay, buttons or sticks so we will come back to the CP at a later date.
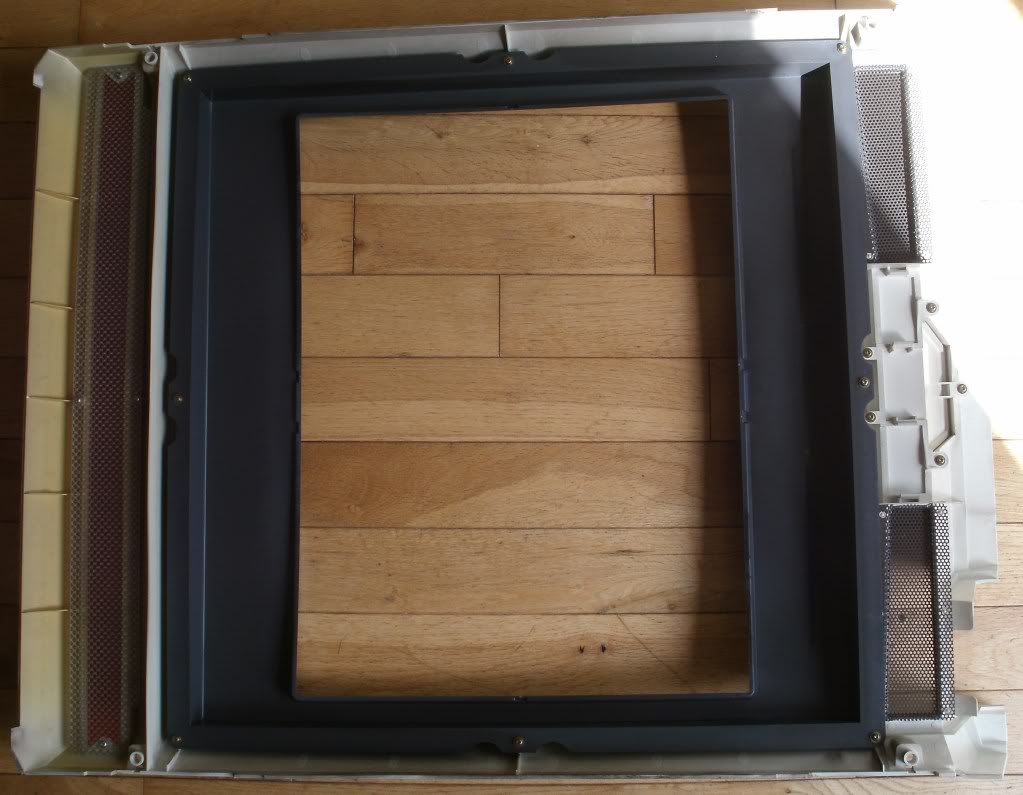
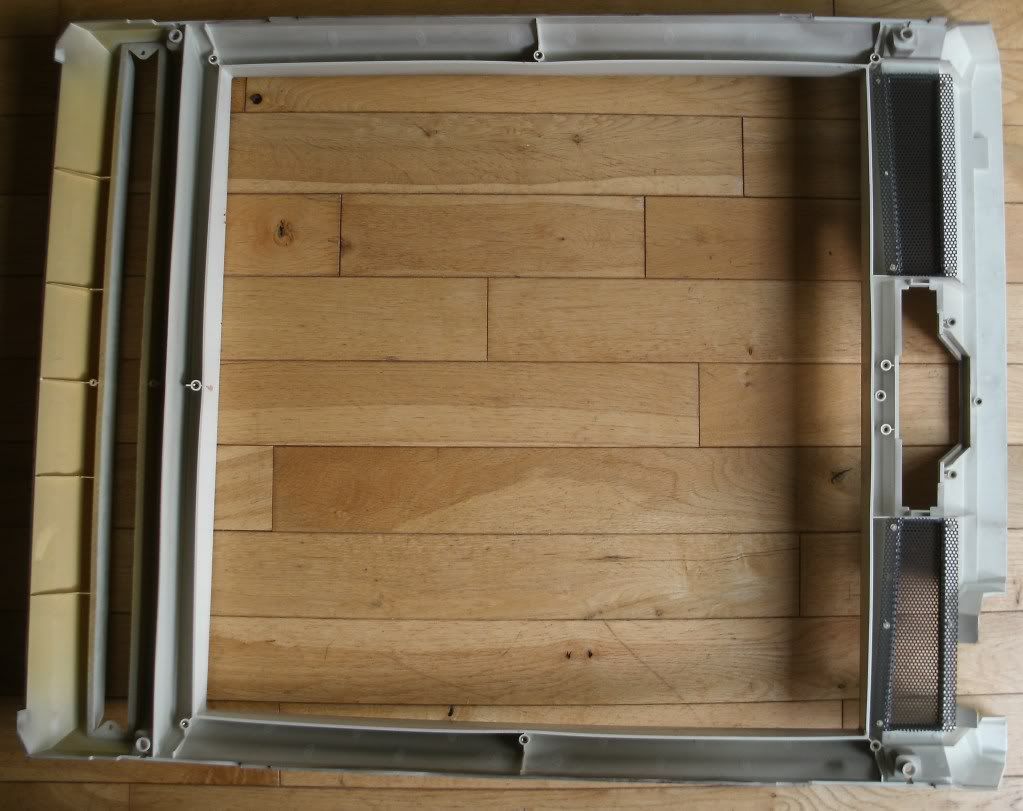
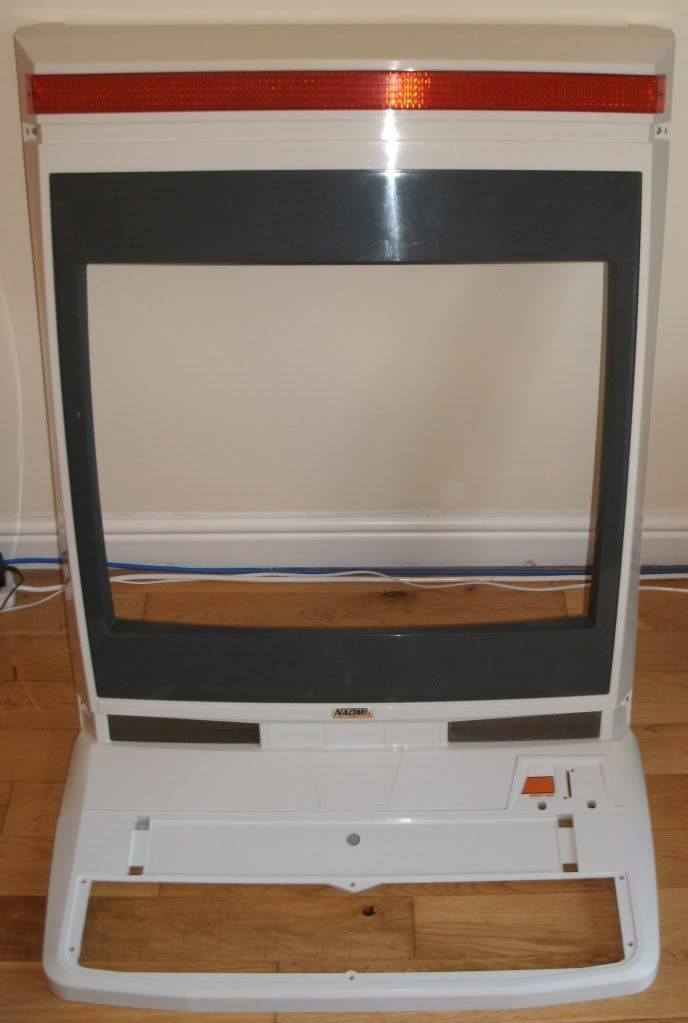
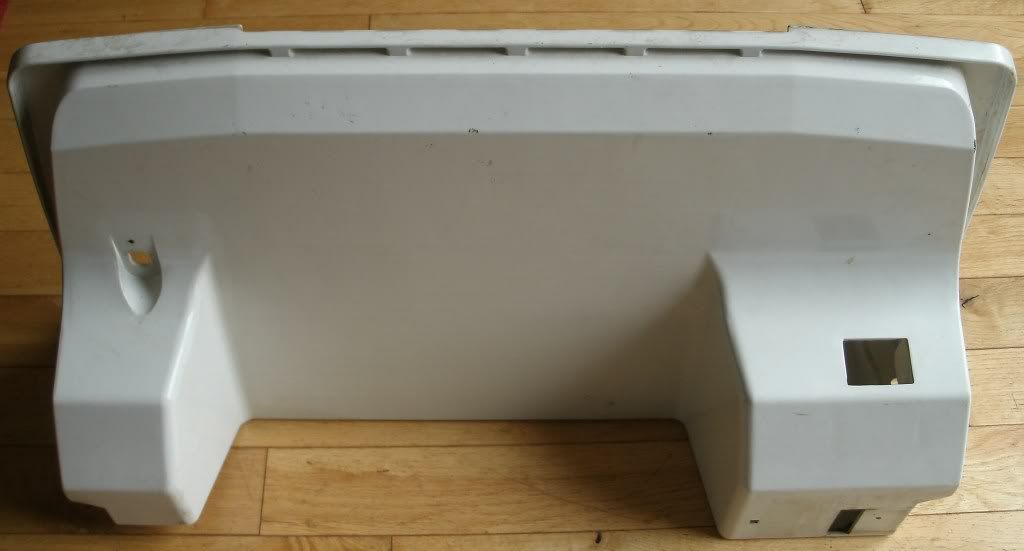
Now to remove and dismantle the monitor surround plastic
Overall Naomi cabs feel well built and very solid, verging on over engineered but this area stands out as the weak link, it really is quite flimsy and it's such a large piece too, so handle this area with care. It is very common for this area to be yellowed, scratched, have the remains of move stickers have some cracking and worst of all be covered in fag burns. It would have been much better if it was thick plastic like what the control panel upper and lower areas are made from.
The tools that you will need for dismantling this area are:
Screwdriver with a few interchangeable heads (Pozi heads 1 & 2, Star security bit T30)
Firstly remove the 2 screws (pozi head) that hold the monitor surround plastic to the control panel base.
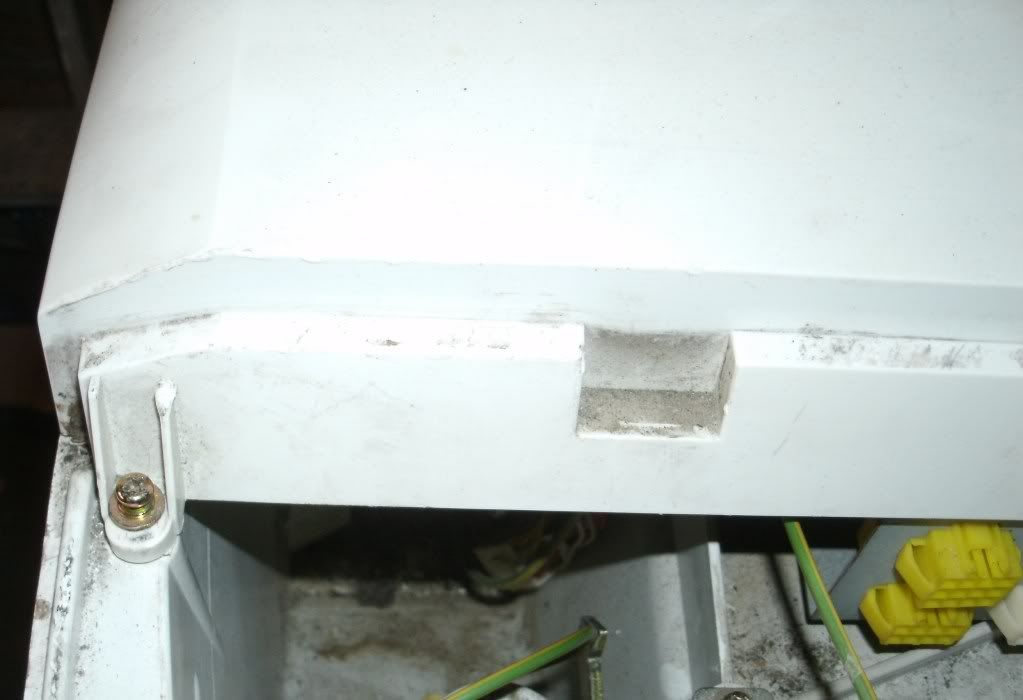
Next remove the 4 screen caps (NOA-1006) these can be slid out once you have pressed the little tab that snap them in place. Just be careful as the tabs seem pretty fragile.
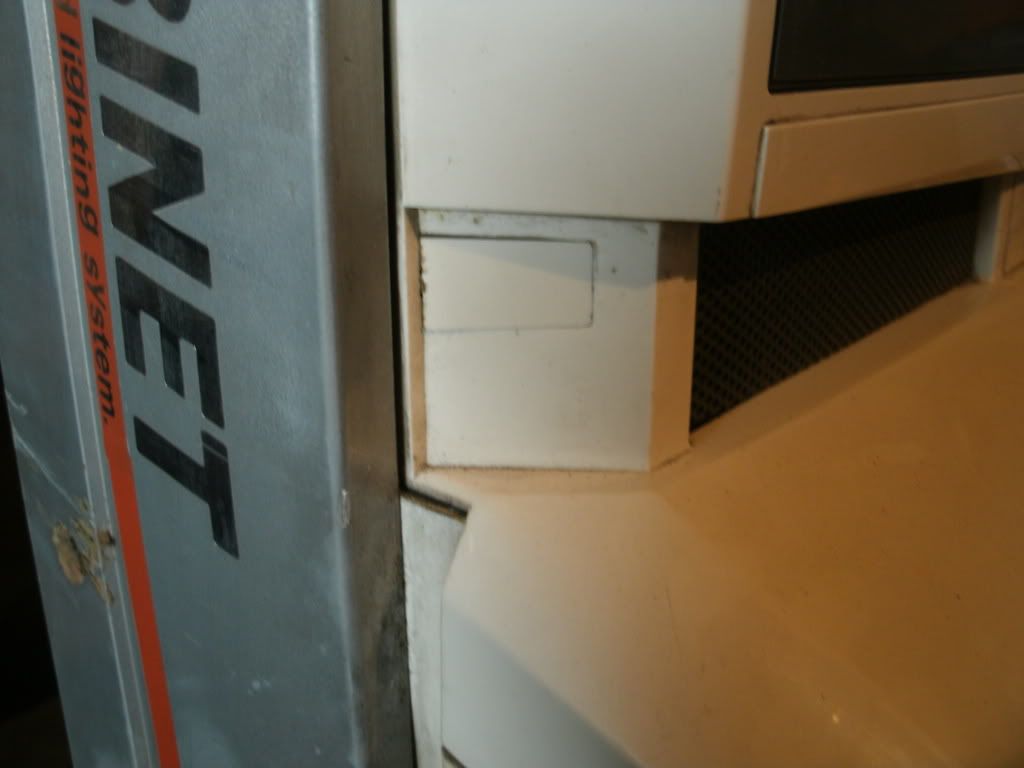
Now remove the 4 chrome star security screws (star security T30 bit)
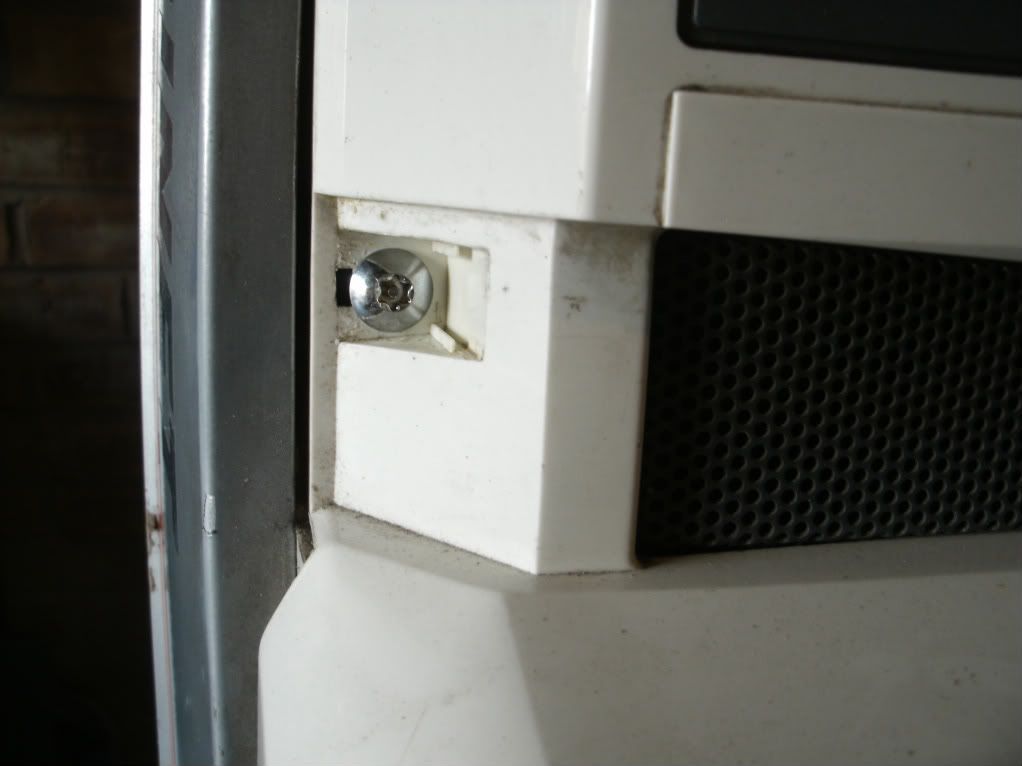
The plastic will now be free.
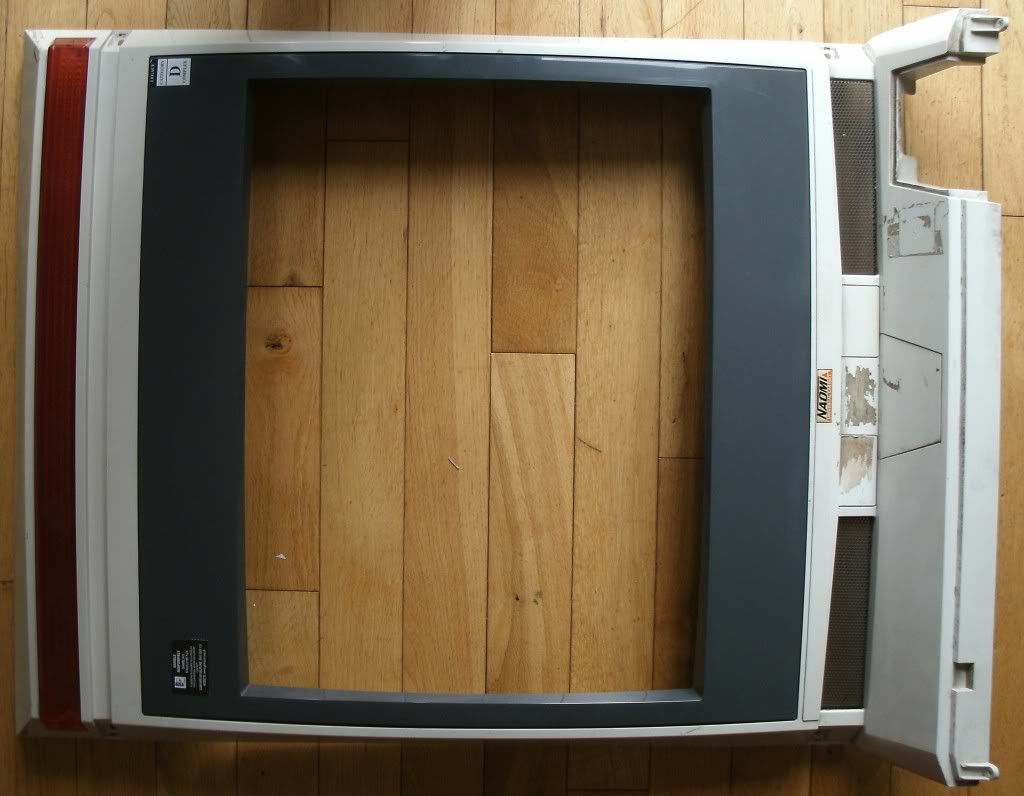
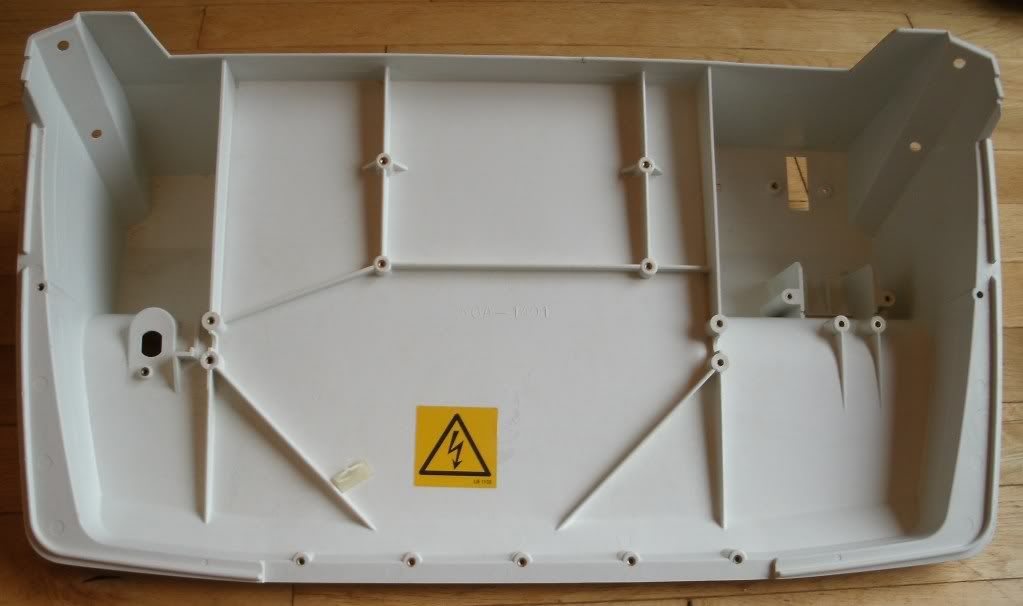
Now to strip it down
First of all remove both of the VMU lids (NOA-1506) just squeeze the tabs
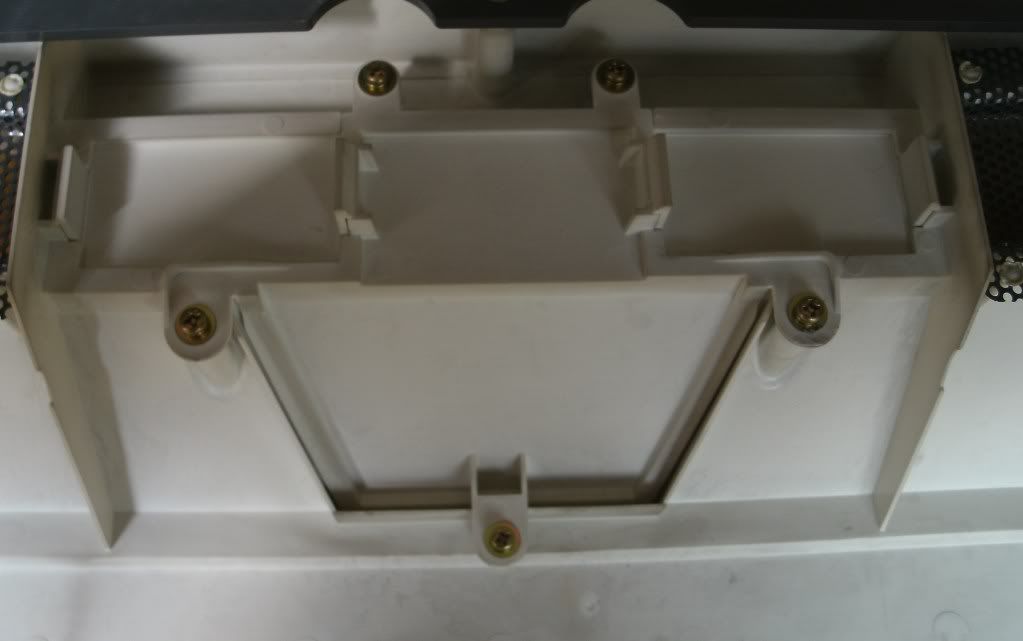
Secondly remove the GCS Lid (NOA-1505) it's held in place by 5 screws (pozi)
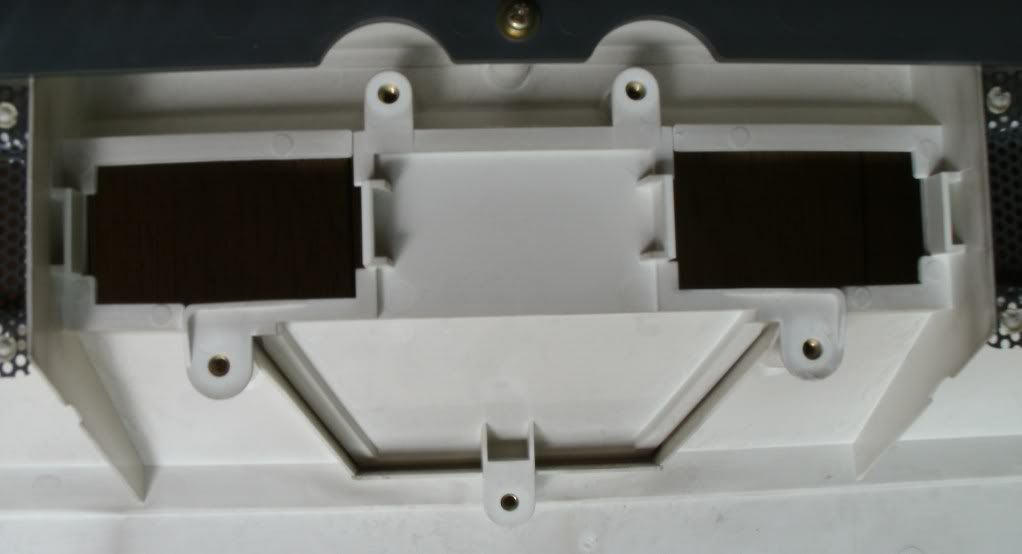
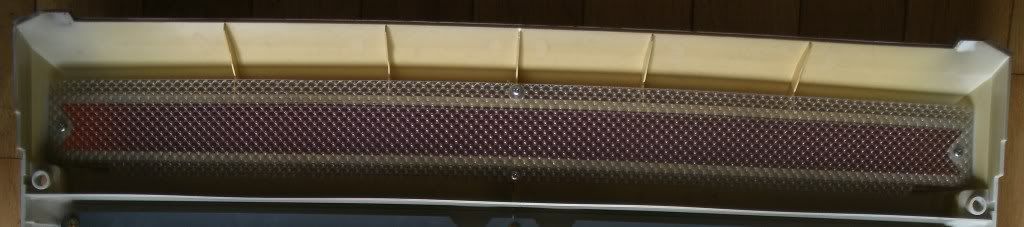
Now remove the perspex knightrider light strip and the refracting perspex sheet, they are held in place 4 screws (pozi)
Finally remove the monitor mask/bezel this is held in place by 6 screws (pozi)

FACTOID
There are 3 different monitor masks/bezels so if you are replacing yours make sure if you get the correct one.
(NOA-1502-01) for use with Nanao MS-2932 monitors, Will also fit: Nanao MS8-29 & / MS9-29.
(NOA-1502-02) for use with Sanwa 29E31S monitors. Will also fit: Nanao MS-2930 / MS-2931 / MS-2934.
(NOA-1502-03) for use with true flat monitors.
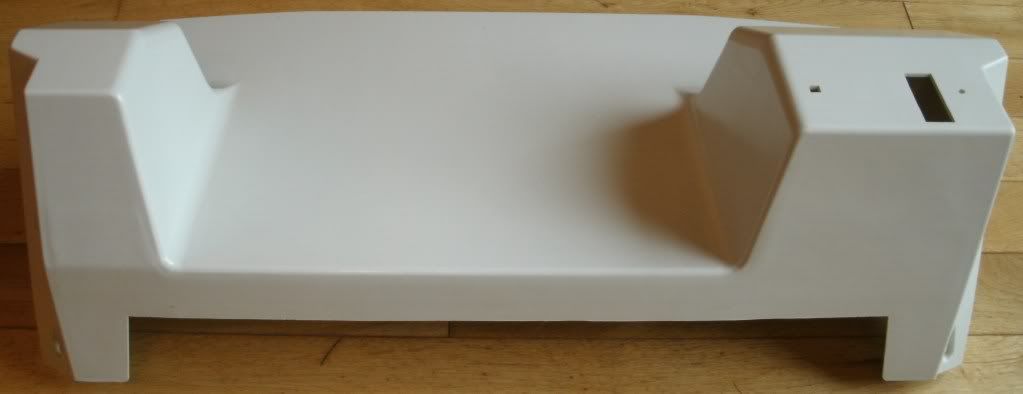
Now to get on with cleaning it I did pretty much the same as I had done with the CP upper.
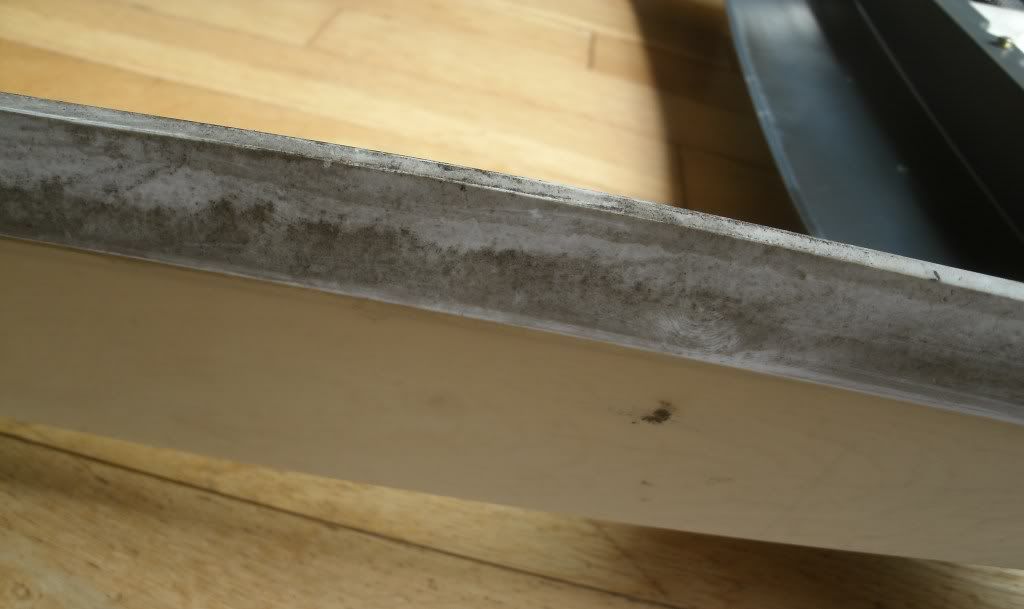
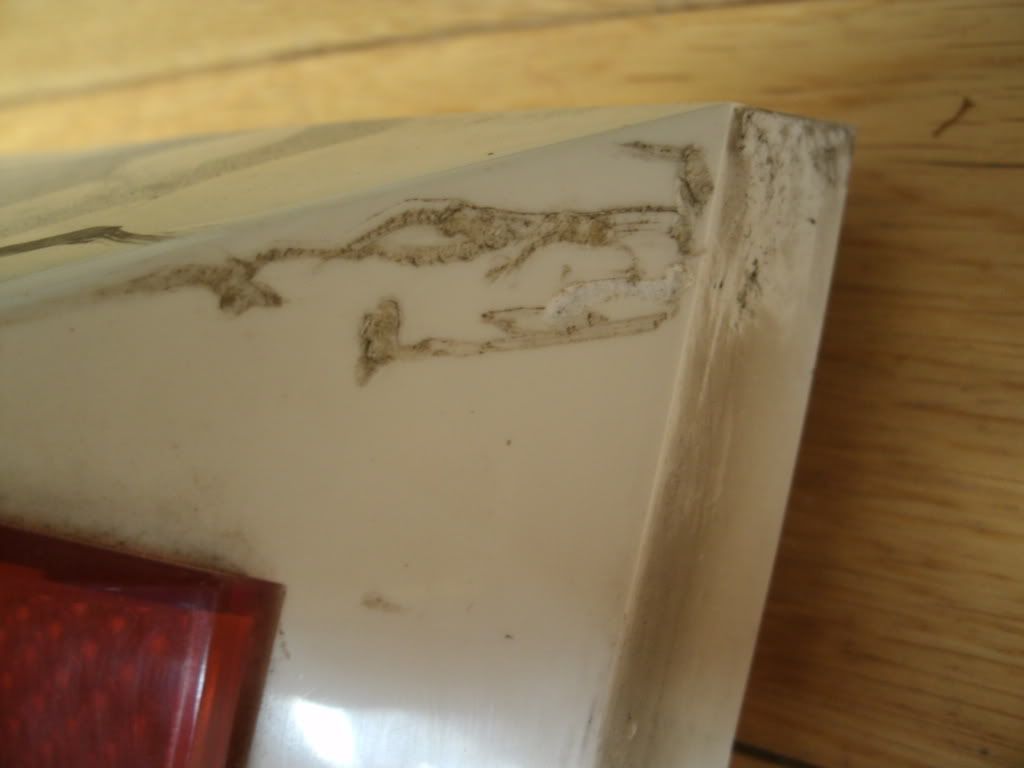
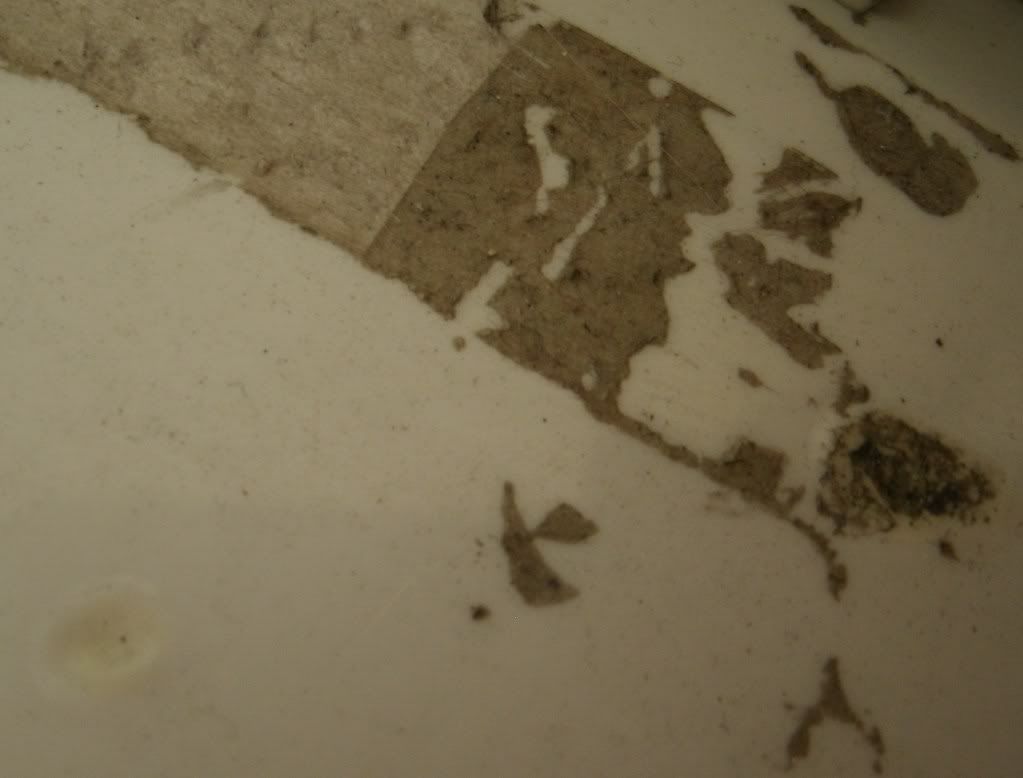

I removed the sticker residue with lighter fluid.
I washed it with warm soapy water. I used an old toothbrush to get into all the nooks and crannies and a kitchen sponge for the flat areas.
I used 1200 grit wet and dry to try to remove the fag burns these were far too deep for polish to touch, this worked out quite nicely. I also used the same grit to remove some very bad scratches/gouges too. How well this will work out for you totally depends on how bad the burns/scratches/gouges are. You will almost always be able to improve the look of burns and gouges as they are usually a bit like a moon crater (a mound with a hole in the centre) even if you only remove the mound you will still be left with a hole but it's still a big improvement. Depending on the hole you may be able to work it out with a fine grit and then polish it up.
Then I polished with T-cut.
I quickly polished the whole area with stainless steel cleaner. At this point I had spent a good 4 1/2 - 5 hours on this area and TBH I had, had enough of cleaning and polishing for one day so I will give this a more thorough going over with the stainless steel cleaner and with Novus 3>2>1 at some point next week.
These are finished (washed, T-cut, Polished, Novus 3>2.1)
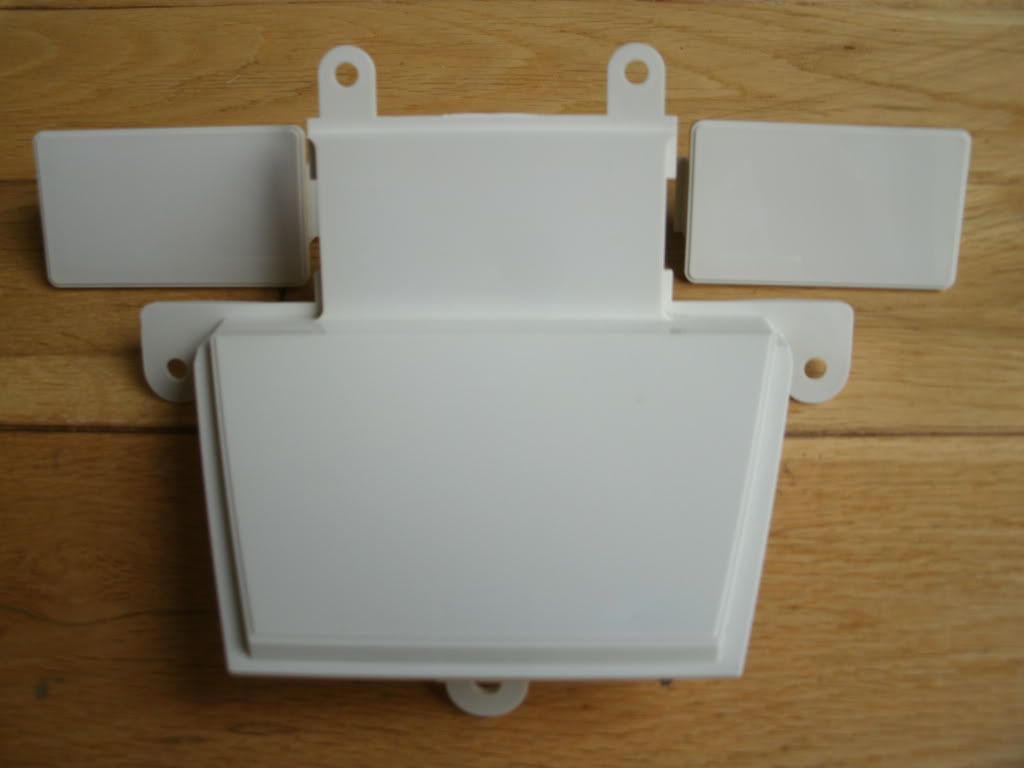
In this Photograph it still requires polishing properly with stainless steel cleaner then Novus 3>2>1. I put it all back together as I was worried about breaking it as it's even more flimsy when the bezel has been removed.
Now to remove and dismantle the monitor surround plastic
Overall Naomi cabs feel well built and very solid, verging on over engineered but this area stands out as the weak link, it really is quite flimsy and it's such a large piece too, so handle this area with care. It is very common for this area to be yellowed, scratched, have the remains of move stickers have some cracking and worst of all be covered in fag burns. It would have been much better if it was thick plastic like what the control panel upper and lower areas are made from.
The tools that you will need for dismantling this area are:
Screwdriver with a few interchangeable heads (Pozi heads 1 & 2, Star security bit T30)
Firstly remove the 2 screws (pozi head) that hold the monitor surround plastic to the control panel base.
Next remove the 4 screen caps (NOA-1006) these can be slid out once you have pressed the little tab that snap them in place. Just be careful as the tabs seem pretty fragile.
Now remove the 4 chrome star security screws (star security T30 bit)
The plastic will now be free.
Now to strip it down
First of all remove both of the VMU lids (NOA-1506) just squeeze the tabs
Secondly remove the GCS Lid (NOA-1505) it's held in place by 5 screws (pozi)
Now remove the perspex knightrider light strip and the refracting perspex sheet, they are held in place 4 screws (pozi)
Finally remove the monitor mask/bezel this is held in place by 6 screws (pozi)
FACTOID
There are 3 different monitor masks/bezels so if you are replacing yours make sure if you get the correct one.
(NOA-1502-01) for use with Nanao MS-2932 monitors, Will also fit: Nanao MS8-29 & / MS9-29.
(NOA-1502-02) for use with Sanwa 29E31S monitors. Will also fit: Nanao MS-2930 / MS-2931 / MS-2934.
(NOA-1502-03) for use with true flat monitors.
Now to get on with cleaning it I did pretty much the same as I had done with the CP upper.
I removed the sticker residue with lighter fluid.
I washed it with warm soapy water. I used an old toothbrush to get into all the nooks and crannies and a kitchen sponge for the flat areas.
I used 1200 grit wet and dry to try to remove the fag burns these were far too deep for polish to touch, this worked out quite nicely. I also used the same grit to remove some very bad scratches/gouges too. How well this will work out for you totally depends on how bad the burns/scratches/gouges are. You will almost always be able to improve the look of burns and gouges as they are usually a bit like a moon crater (a mound with a hole in the centre) even if you only remove the mound you will still be left with a hole but it's still a big improvement. Depending on the hole you may be able to work it out with a fine grit and then polish it up.
Then I polished with T-cut.
I quickly polished the whole area with stainless steel cleaner. At this point I had spent a good 4 1/2 - 5 hours on this area and TBH I had, had enough of cleaning and polishing for one day so I will give this a more thorough going over with the stainless steel cleaner and with Novus 3>2>1 at some point next week.
These are finished (washed, T-cut, Polished, Novus 3>2.1)
In this Photograph it still requires polishing properly with stainless steel cleaner then Novus 3>2>1. I put it all back together as I was worried about breaking it as it's even more flimsy when the bezel has been removed.
Last edited by Paulie on April 23rd, 2012, 9:54 pm, edited 1 time in total.
-
neogeomvs

- Posts: 357
- Joined: June 22nd, 2011, 11:12 pm
- Location: Kent
- eBay: neo-geo-mvs
Re: Sega Naomi restoration work in progress Updated Sun 22/4
Excellent progress so far Paulie! Looking forward to the next update 
-
IDCHAPPY

- c***3
- Posts: 2609
- Joined: May 3rd, 2010, 7:25 pm
- Location: Edinburgh
- eBay: Arcadedreams2013
- Initials: IDC
Re: Sega Naomi restoration work in progress Updated Sun 22/4
I'll give you a tenner and you can come round and do my E2 
Give me a like on Facebook at:
https://www.facebook.com/pages/Arcadedr ... ef=tn_tnmn
https://www.facebook.com/pages/Arcadedr ... ef=tn_tnmn
-
neogeomvs
- Posts: 357
- Joined: June 22nd, 2011, 11:12 pm
- Location: Kent
- eBay: neo-geo-mvs
Re: Sega Naomi restoration work in progress Updated Sun 22/4
IDCHAPPY wrote:I'll give you a tenner and you can come round and do my E2
-
emphatic

- Breastfeeds when required
- Posts: 5907
- Joined: April 7th, 2009, 4:14 pm
- Location: Alingsås, Sweden
- eBay: jorgen_sjolander
- Initials: JOR
Re: Sega Naomi restoration work in progress Updated Sun 22/4
My games: http://www.emphatic.se
-
Paulie
- Opens wallet, moths fly out
- Posts: 2599
- Joined: September 28th, 2011, 5:43 pm
- Location: East Ardsley, West Yorks
- eBay: retro-paulie
- Initials: PSG
Re: Sega Naomi restoration work in progress Updated Sun 22/4
Go on give her a polish you know she deserves itIDCHAPPY wrote:I'll give you a tenner and you can come round and do my E2
Thanks mateemphatic wrote:Man, you got cleaning skills!
TBH I'm sure anyone could get the same if not better results if they have the time and patience to sink into a cab.
I think it all boils down to how much you enjoy doing something. Whilst messing with the SC19-4 I found I get as almost as much pleasure from fiddling about with a cab as I do playing the games. I find it really satisfying to look back at the photographs of the parts before I worked on them and how they look after a bit of spit and polish. I'm learning how my cab goes together, what goes where and what does what so hopefully by the end of it I'll have a little bit more knowledge and a better understanding of how things work. Plus it's nice if other people enjoy looking at how the progress is going and you never know maybe someone who wouldn't touch a shabby cab may change their mind after seeing a thread like this and have a go themselves.
-
spikehead

- Please Continue...
- Posts: 28
- Joined: October 4th, 2010, 11:48 am
- Location: Germany
- eBay: neles72
Re: Sega Naomi restoration work in progress Updated Sun 22/4
I´m following this with great interest as a similarily battered Naomi arrived yesterday.
I don´t want to hijack this but is anyone selling repro control panel overlays/ stickers?
I don´t want to hijack this but is anyone selling repro control panel overlays/ stickers?
-
kevin2me

- Posts: 87
- Joined: May 1st, 2011, 4:48 pm
- Location: Cork, Ireland
- eBay: kevin2me2
Re: Sega Naomi restoration work in progress Updated Sun 22/4
Me too, Following but havent had time to read all the great detail, even breaking down how to open monitor over
just brilliant man, Ill be using this as a Guide during the weeks ahead... I battered Naomi too,
Finally have it working with monitor out of it on a Table.
Mine unfortunately got a lot Rust on Base, might take it to buddy that resprays cars.
But gotta clean it down like you have first. This thread and u myself are awesome!!!
For repo CP Overlays I got mine off giz10p.co.uk, he great deal with.
but Sprectre on here as new thread for repro Cp overlays, check it out, he top bloke too...
Kev
11 Cabs Arcade Room: 1 Vewlix, 2 AWSDs, 2 NNC, 1 Astro, 1 Naomi gun cab, 1 Taito Cocktail, Initial D/Outrun2SP and Sega Rally Twin.
-
Paulie
- Opens wallet, moths fly out
- Posts: 2599
- Joined: September 28th, 2011, 5:43 pm
- Location: East Ardsley, West Yorks
- eBay: retro-paulie
- Initials: PSG
Re: Sega Naomi restoration work in progress Updated Sun 22/4
Like Kev I ordered a CPO from Craig (giz10p) https://www.giz10p.co.uk" a couple of days ago he has original art, overlays and parts etc, he's a really nice bloke too. Andy Geezers site also has original art, CPO's, parts etc http://www.tms-designs.com/theshed" also as Kev said Spectre has started and IC thread for repro CPO's so those 3 chaps would be my first port of call BTW all 3 are well respected & trusted sellers. Theres always the sales threads and of course ebay, you could always start a WTB thread on here as well, I've always been offered what I've wanted on the ocassions that I've posted an ad.spikehead wrote:I´m following this with great interest as a similarily battered Naomi arrived yesterday.
I don´t want to hijack this but is anyone selling repro control panel overlays/ stickers?
I'll be using it too when she goes back together otherwise i'll probably end up with a load of left over wires and screwskevin2me wrote:Ill be using this as a Guide during the weeks ahead...
-
Paulie
- Opens wallet, moths fly out
- Posts: 2599
- Joined: September 28th, 2011, 5:43 pm
- Location: East Ardsley, West Yorks
- eBay: retro-paulie
- Initials: PSG
Re: Sega Naomi restoration work in progress Updated Sun 22/4
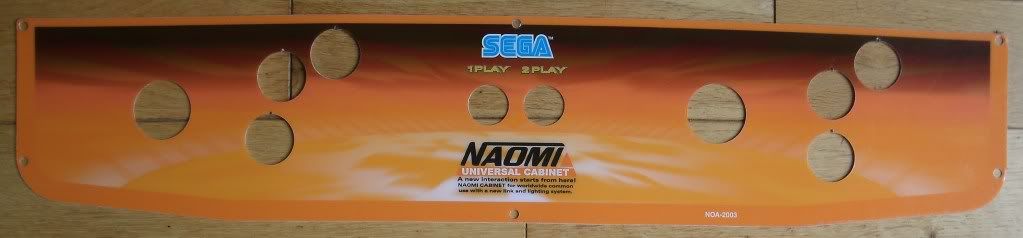
A new control panel overlay (NOA-2003) arrived from Craig (Giz10p) on Friday I highly recommended Craig to anyone who has'nt bought from him before. I'll pick up a couple more CP's when I see them for a good price as I want a HOT-2005 2L12B and I would like to try and have a crack at making a couple of custom 1P panels.
-
Paulie
- Opens wallet, moths fly out
- Posts: 2599
- Joined: September 28th, 2011, 5:43 pm
- Location: East Ardsley, West Yorks
- eBay: retro-paulie
- Initials: PSG
Re: Sega Naomi restoration work in progress Updated Sun 22/4
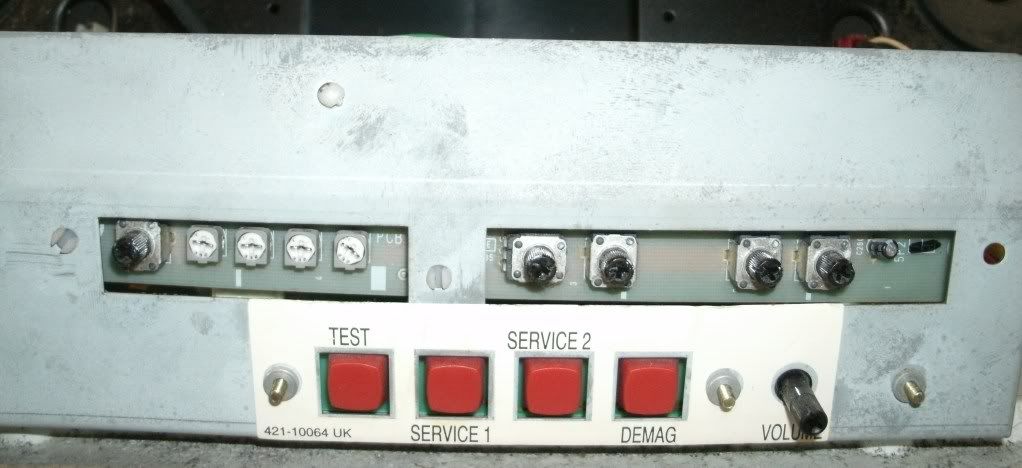
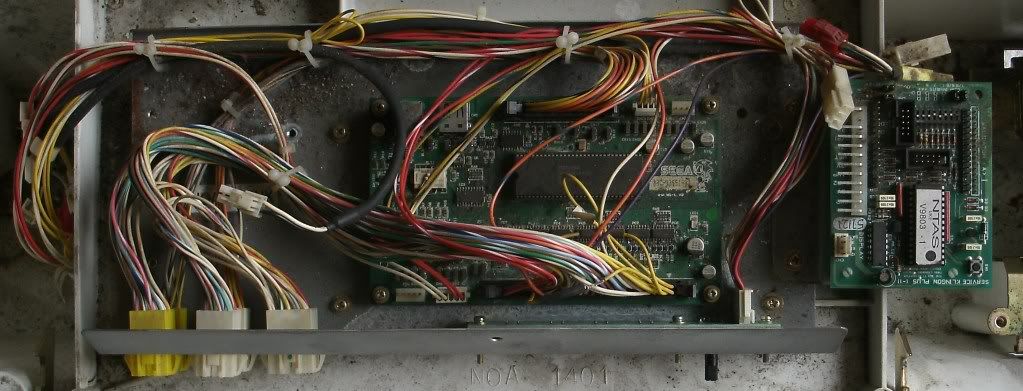
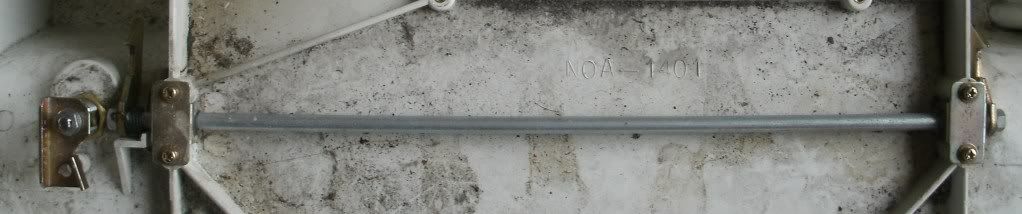
In this part I'll dismantle and clean the lower control panel (NOA-1401) and remove all the guts.
The tools that you will need for dismantling this area are:
Screwdriver with a few interchangeable heads (CR-VPH2)
Socket 10mm
Adjustable spanner or the correct size spanner for the nuts on the lock
You can do these in any order but this is how I did it.
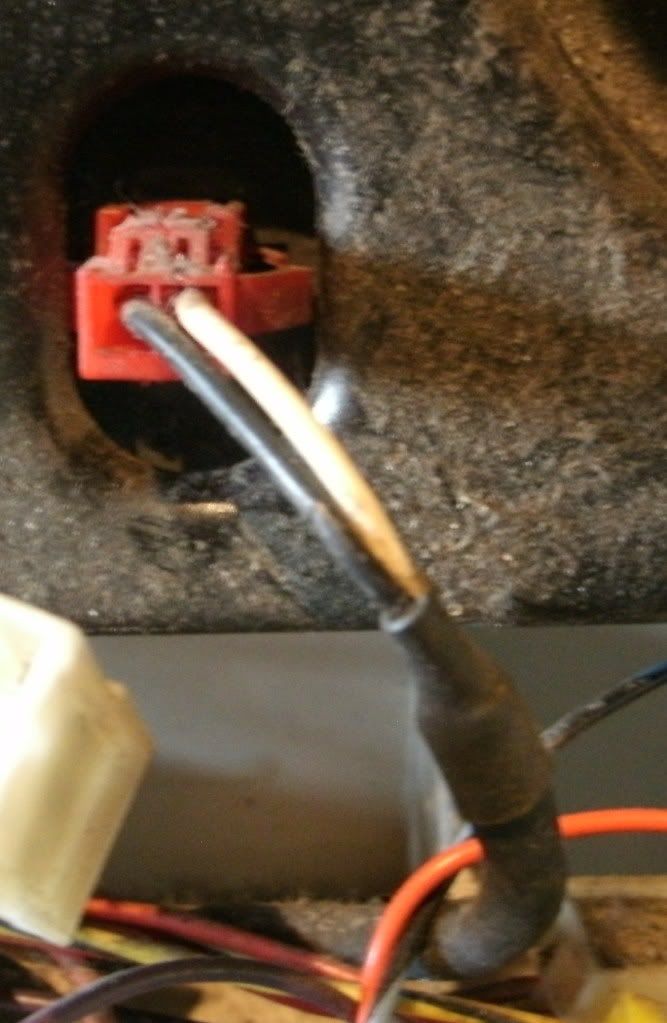
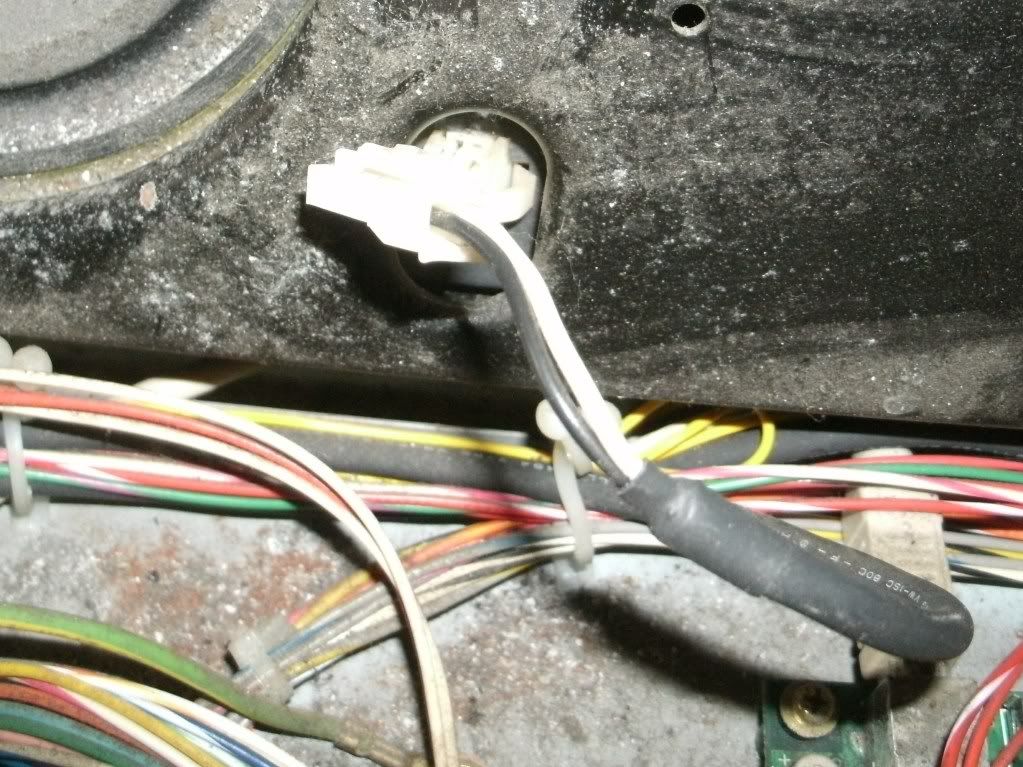
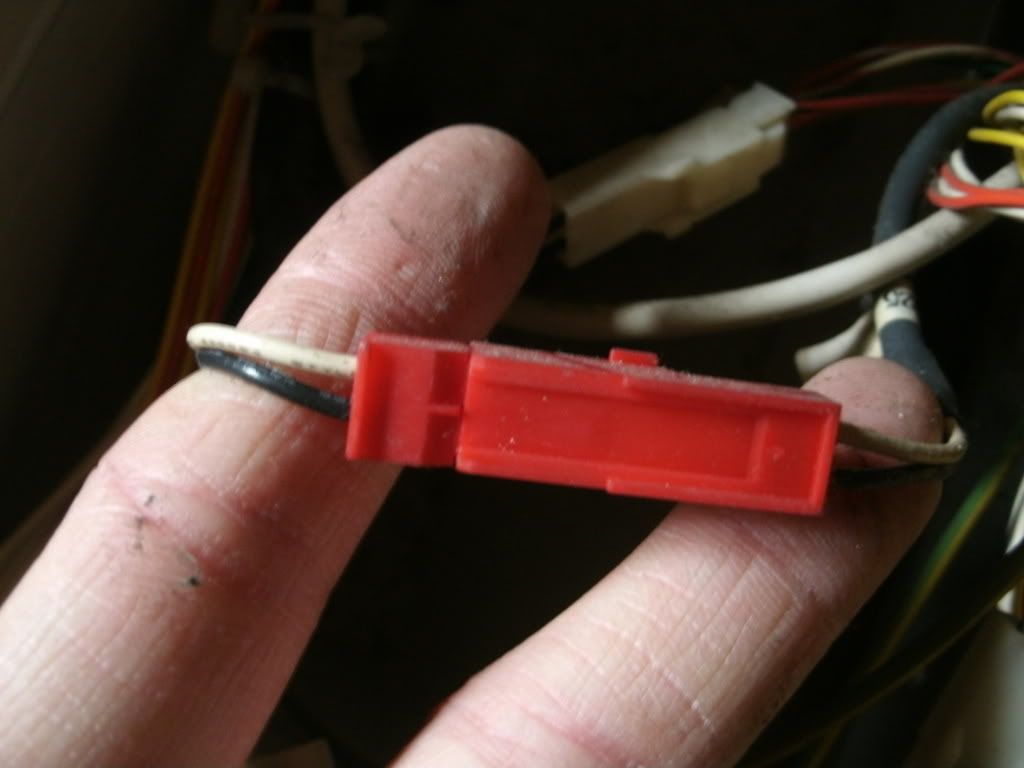
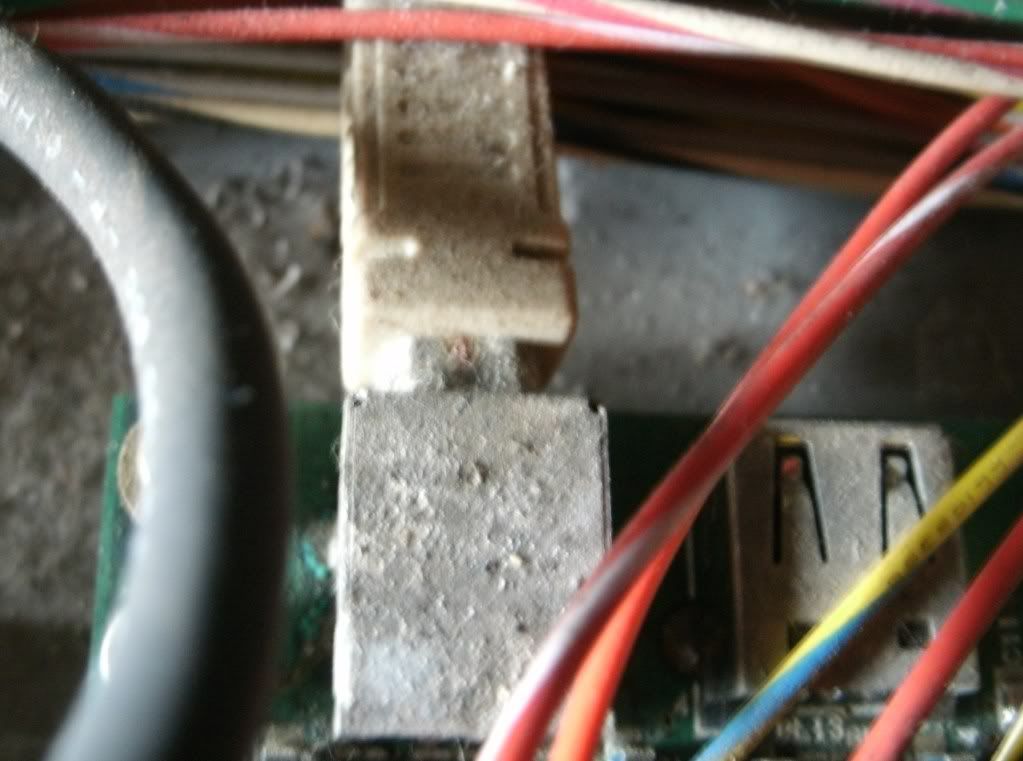
If anyone can help me identify the functions of the cables & the part numbers I would be most grateful
1. Detach the credit board cable connector.
2. Detach the credit board / coin mech loom connector.
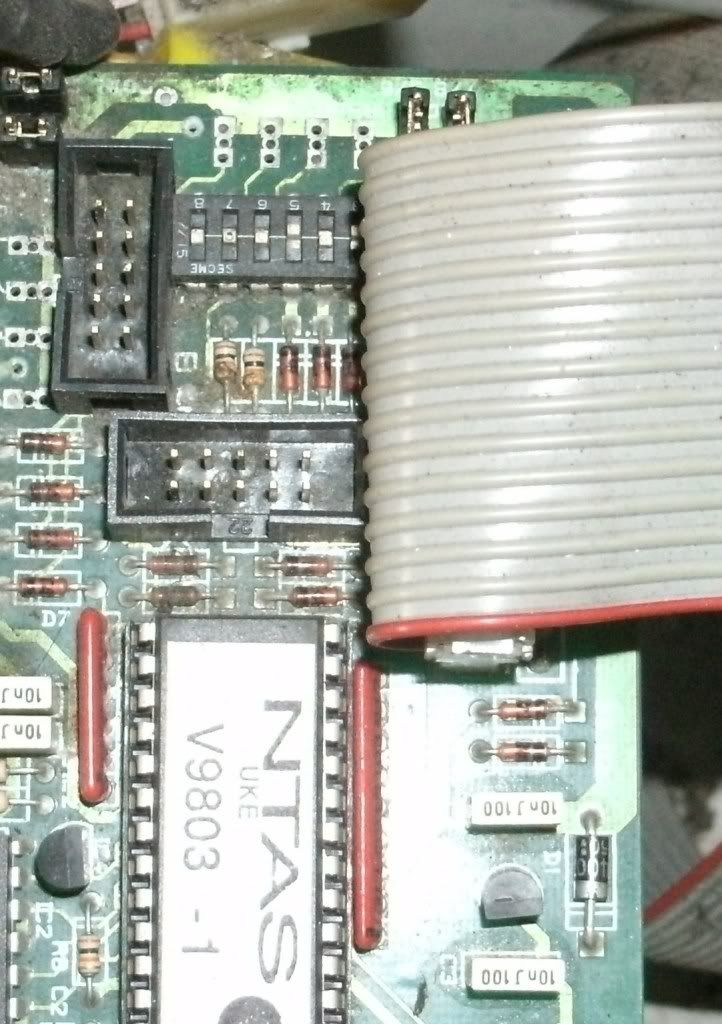
3. Detach the ??? cable connector.
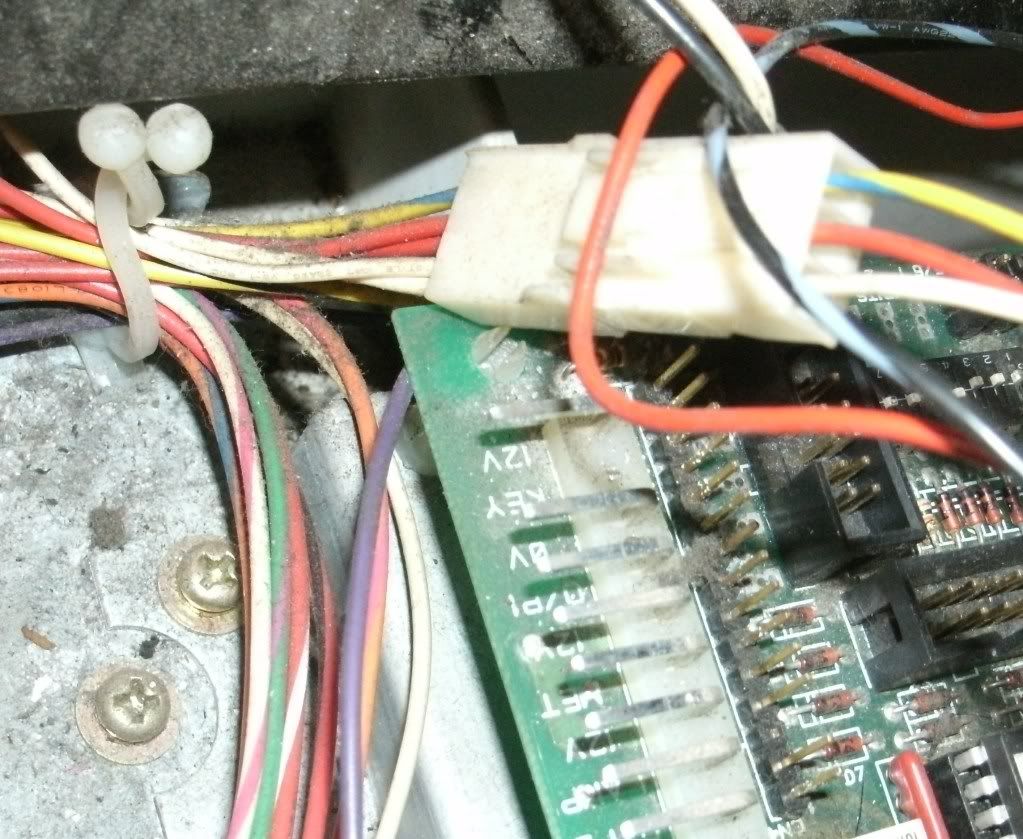
4. Detach the right speaker (NOA-60024) cable connector.
5. Detach the left speaker (NOA-60025) cable connector.
6. Detach the 3 plastic spacers just squeeze the tabs and this will release the monitor adjustment board. BTW I'm missing one of the spacer thinngys.
7. Detach the JVSI/O power cable (NOA-60023) cable connector.

8. Detach the other end of the right speaker (NOA-60024) cable connector.
9. Detach the other end of the left speaker (NOA-60025) cable connector.
10. Detach ??? (goes to the monitor test /service board) cable connector.

11. Detach ??? (again goes to the monitor test /service board) cable connector.

12. Detach the JVS serial cable (600-7141-250)
13. Unscrew the 2 earth wires (the one that attaches to the back of the control panel will now be totally free)
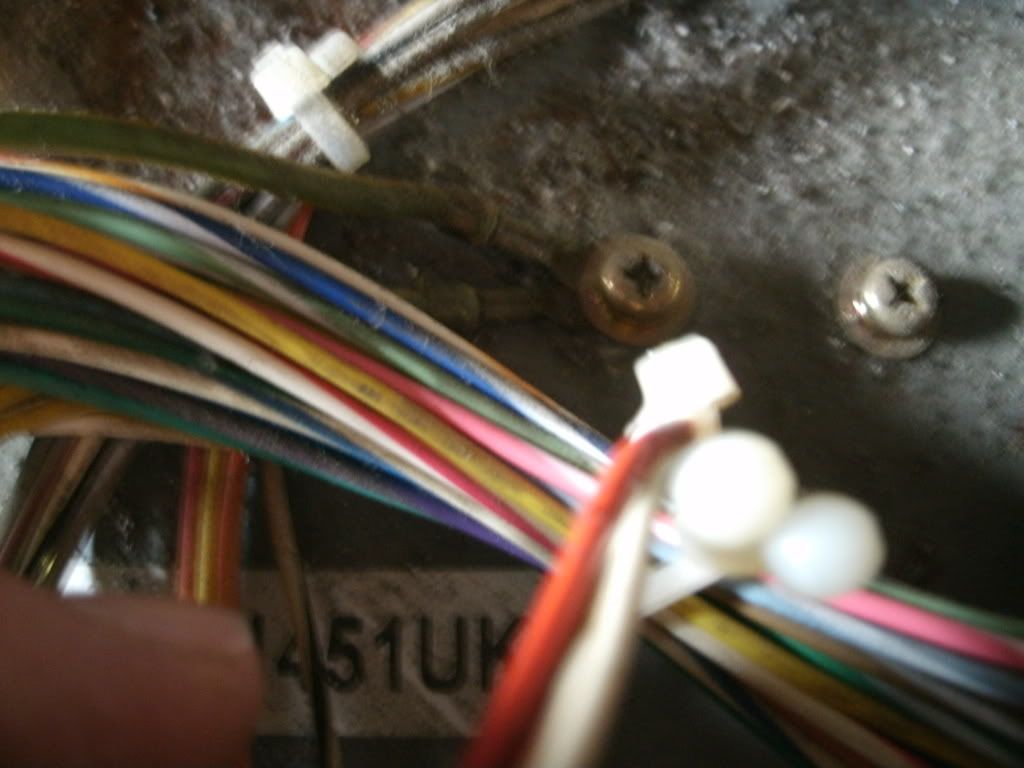
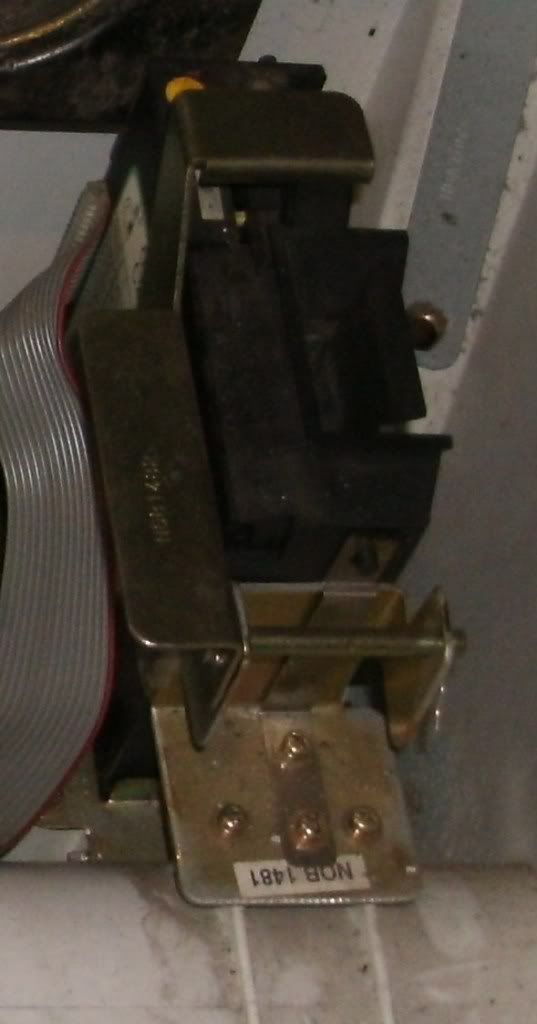
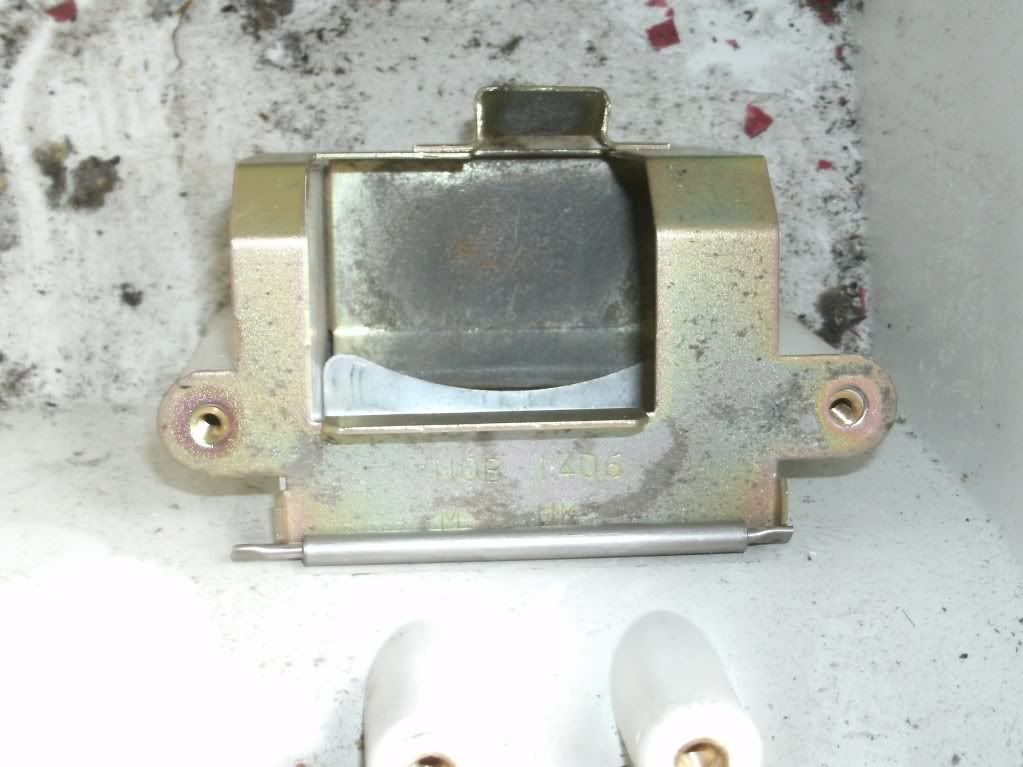
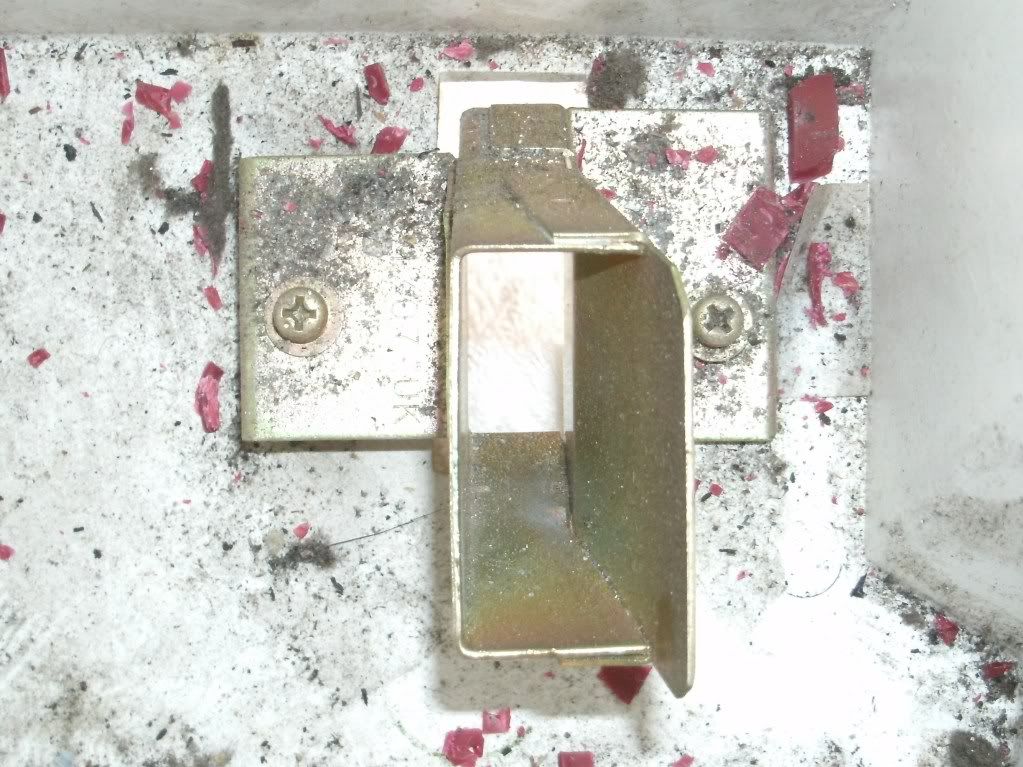
14. Remove the 4 screws that attach the coin mech fixing plate (NOB1481), The coin flap HNOA-1405) & lower coin mech fixing plate (NOB 1406) will now also be free.
15. Remove the 2 screws that attach the coin chute
16. Remove the 4 srews that attach the I/O tray (NOA-1451) with all the cables still attached.
17. Remove the 4 screws that hold the locking bar in place.
18. Remove the lock, unscrew the top nut then remove the larger shaft nut.
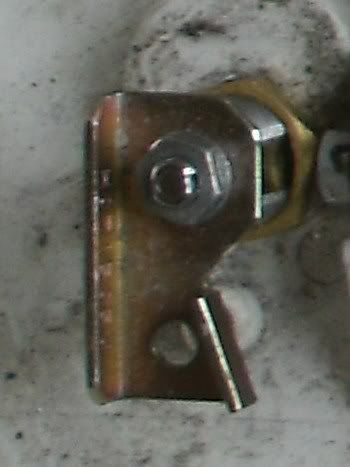
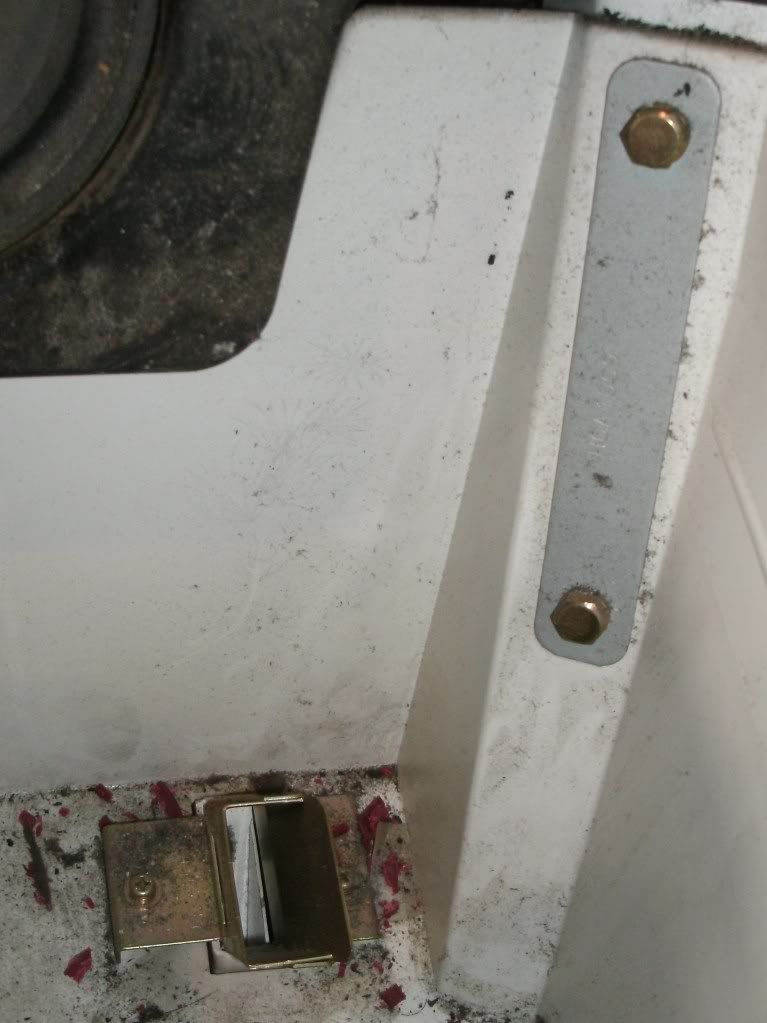
19. Remove the 2 bolts & fixing plate (NOA 1009) from both the right and left hand sides.
20. The lower control panel is now free, if you gently push it up and then pull towards you it will separate from the cabinet frame.
So this it what it looks like before cleaning and polishing

I did exactly the same as I have done with the other plastic parts, Wash>Wet and dry for a couple of chips>T-cut>Stainless steel polish>Novus3>Novus2>Novus1. This time though I washed it with the shower head in the bath as the weather was terrible today and Mrs P was out so no chance of getting into trouble.
After cleaning and polishing

My next job is to carefully clean all the gubbins that I have removed from this part.
The tools that you will need for dismantling this area are:
Screwdriver with a few interchangeable heads (CR-VPH2)
Socket 10mm
Adjustable spanner or the correct size spanner for the nuts on the lock
You can do these in any order but this is how I did it.
If anyone can help me identify the functions of the cables & the part numbers I would be most grateful
1. Detach the credit board cable connector.
2. Detach the credit board / coin mech loom connector.
3. Detach the ??? cable connector.
4. Detach the right speaker (NOA-60024) cable connector.
5. Detach the left speaker (NOA-60025) cable connector.
6. Detach the 3 plastic spacers just squeeze the tabs and this will release the monitor adjustment board. BTW I'm missing one of the spacer thinngys.
7. Detach the JVSI/O power cable (NOA-60023) cable connector.
8. Detach the other end of the right speaker (NOA-60024) cable connector.
9. Detach the other end of the left speaker (NOA-60025) cable connector.
10. Detach ??? (goes to the monitor test /service board) cable connector.
11. Detach ??? (again goes to the monitor test /service board) cable connector.
12. Detach the JVS serial cable (600-7141-250)
13. Unscrew the 2 earth wires (the one that attaches to the back of the control panel will now be totally free)
14. Remove the 4 screws that attach the coin mech fixing plate (NOB1481), The coin flap HNOA-1405) & lower coin mech fixing plate (NOB 1406) will now also be free.
15. Remove the 2 screws that attach the coin chute
16. Remove the 4 srews that attach the I/O tray (NOA-1451) with all the cables still attached.
17. Remove the 4 screws that hold the locking bar in place.
18. Remove the lock, unscrew the top nut then remove the larger shaft nut.
19. Remove the 2 bolts & fixing plate (NOA 1009) from both the right and left hand sides.
20. The lower control panel is now free, if you gently push it up and then pull towards you it will separate from the cabinet frame.
So this it what it looks like before cleaning and polishing
I did exactly the same as I have done with the other plastic parts, Wash>Wet and dry for a couple of chips>T-cut>Stainless steel polish>Novus3>Novus2>Novus1. This time though I washed it with the shower head in the bath as the weather was terrible today and Mrs P was out so no chance of getting into trouble.
After cleaning and polishing
My next job is to carefully clean all the gubbins that I have removed from this part.
-
ikaruga007

- Posts: 315
- Joined: May 12th, 2010, 2:01 pm
- Location: Stockholm, Sweden
- eBay: dex511
- Initials: PJN
Re: Sega Naomi restoration work in progress Updated Sun 28/4
Looks great Paulie Just went through the same with my New Net City. Although it wasn't as dirty as yours, it''s really satsifying when it turns out to be in great shape underneath.
And thanks for taking the time to take all these images.
And thanks for taking the time to take all these images.
-
jase

- Posts: 690
- Joined: September 14th, 2008, 3:18 pm
- Location:
Re: Sega Naomi restoration work in progress Updated Sun 28/4
Awesome thread Paulie, I'll be referring to this when I take my Naomi apart next week as i've got to shift it to another room.
This may be a bit of a daft Q but i've got some of that stainless steel cleaner, what method do you use to clean up old rusty bolts to make them all shiny? Do you use the cleaner with a scouring pad? Do you leave the bolts to soak?
This may be a bit of a daft Q but i've got some of that stainless steel cleaner, what method do you use to clean up old rusty bolts to make them all shiny? Do you use the cleaner with a scouring pad? Do you leave the bolts to soak?

-
whitecomet

- Posts: 226
- Joined: March 24th, 2009, 2:29 pm
- Location: Gloucestershire
- Initials: DNA
Re: Sega Naomi restoration (work in progress) Updated 17/4/1
What did you use to clean it down for primer??Paulie wrote:Not very exciting but as promised a photograph of the rear of the control pannel now ready for the primer.
btw overall great read and advice... need to start mine now
-
Paulie
- Opens wallet, moths fly out
- Posts: 2599
- Joined: September 28th, 2011, 5:43 pm
- Location: East Ardsley, West Yorks
- eBay: retro-paulie
- Initials: PSG
Re: Sega Naomi restoration work in progress Updated Sun 28/4
Not daft at alljase wrote:Awesome thread Paulie, I'll be referring to this when I take my Naomi apart next week as i've got to shift it to another room.
This may be a bit of a daft Q but i've got some of that stainless steel cleaner, what method do you use to clean up old rusty bolts to make them all shiny? Do you use the cleaner with a scouring pad? Do you leave the bolts to soak?
I laid a soft cloth flat on my bench.
With my thumb and fore finger I held the cloth tought.
Squeezed out a bit of the stainless steel cleaner on the cloth.
Then hold the bolt shaft with your thumb and fore finger in your other hand and rub the bolt like mad whilst turning the head slowly.
It worked out really nicely for me but you have to rub hard and for quite some time, just keep your cloth tought, you could maybe try a dremel and a little polishing mop type thinngy but I like to do things by hand as you can apply a lot more pressure.
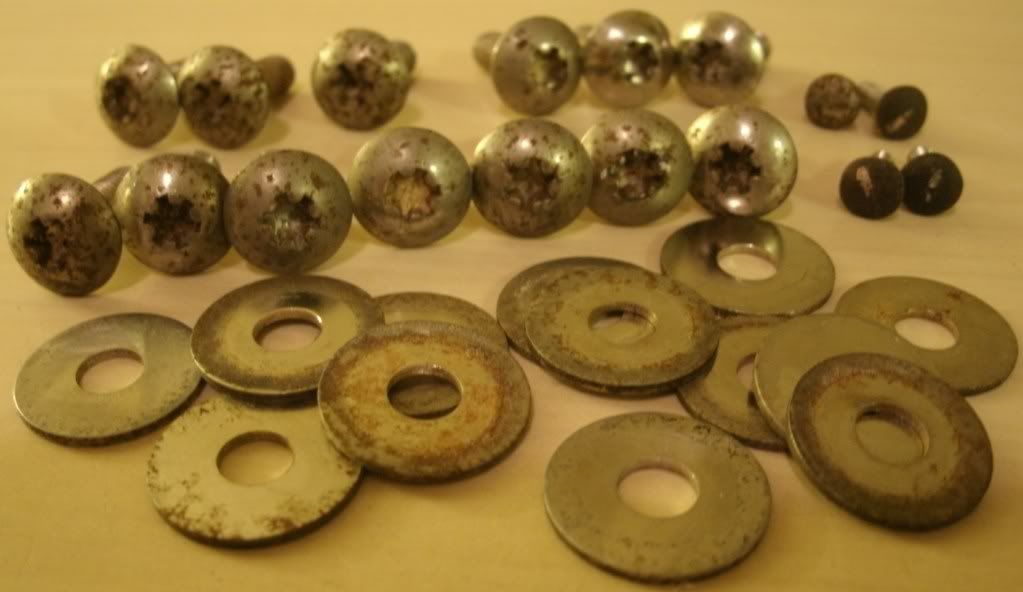
Heres some bolts I cleaned using exactly the same method for my SC19-4 cab.
Before all pitted with rust
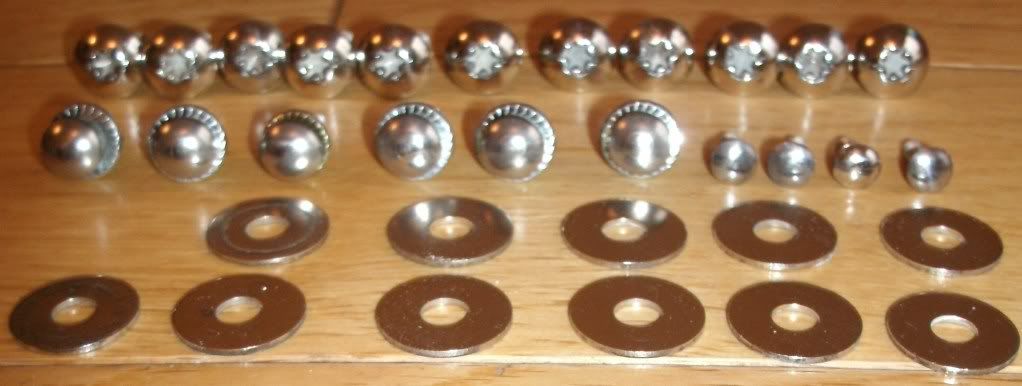
After polishing, look at them shine
HTH
P
-
Paulie
- Opens wallet, moths fly out
- Posts: 2599
- Joined: September 28th, 2011, 5:43 pm
- Location: East Ardsley, West Yorks
- eBay: retro-paulie
- Initials: PSG
Re: Sega Naomi restoration (work in progress) Updated 17/4/1
Thanks man, I'm glad you have enjoyed reading my ramblings.SuperTurbo wrote:What did you use to clean it down for primer??Paulie wrote:Not very exciting but as promised a photograph of the rear of the control pannel now ready for the primer.

btw overall great read and advice... need to start mine now
Wet and dry and a lot of elbow grease
Just use suitable grades and work through them, oh and remember to keep it wet. You will find it much eaiser/ quicker as the particles of paint will not clog the grit up as quickly and you should acheive a nicer finish too.