SNK SC19-4 restoration (work in progress) Updated 29/3/12
-
Braintrash
- Posts: 387
- Joined: February 17th, 2011, 6:31 pm
- Location: France
- eBay: yuu_madrigal
Re: SNK SC19-4 restoration (work in progress)
You could do a repro of the stickers for a complete mint looking.
-
Devil Soundwave

- Doesn't go to eleven
- Posts: 4713
- Joined: January 7th, 2009, 11:56 pm
- Location: Wetherby, Yorkshire
- eBay: DevilSoundwave
Re: SNK SC19-4 restoration (work in progress)
Paulie wrote:I've had a few thoughts regarding how I'm going to tackle this part of the resto, but nothing concrete as I've yet to test out any of my ideas on some scrap plastic (I dont want to dive stright in and eff it up)Devil Soundwave wrote:The broken plastic end piece for teh cp - you should be able to build a strong un-noticable repair using "milliput" putty. Kern has used it previously to fix a damaged CP and it did a grand job. You will need to then paint it, but better than nowt I reckon.
One idea was using some kind of clear epoxy (depending on what I have kicking around in the garage) tinted with paint then sand to shape and polish. No idea if tinting the epoxy would even work, I guess it could affect the hardning ooo er
Another was to marry another bit of matching plastic and polish again I don't know how sucessful this would be I guess I could always paint it.
Thanks for the heads up with the Milliput mate. I'll be honest I've never heard of that product before and it sounds like a better idea than my thoughts so I'll be defo checking that out esp as someone else has had good results with it
No worries. Sets hard as steel, can be sanded super smooth, is, in fact, an epoxy resin and takes paint well. Has been used to repair ship hulls as it will still set under salt water!
-
Paulie

- Opens wallet, moths fly out
- Posts: 2599
- Joined: September 28th, 2011, 5:43 pm
- Location: East Ardsley, West Yorks
- eBay: retro-paulie
- Initials: PSG
Re: SNK SC19-4 restoration (work in progress)
Rossy has done a fantastic job of reproducing the artwork and providing them all in the wiki, I've had one of his CPO's and I can personally vouch that what he has done is first rate.Braintrash wrote:You could do a repro of the stickers for a complete mint looking.
I decided to keep the original side art for 2 reasons.
1. The side art on my cab is original. If I decide to go down the repro route I can always do that at some point in the future, but once the original art has gone, it's gone forever. There may be some nos art still out there waiting to be discovered in some Japanese werehouse, but I ain't gonna stumble across it.
2. I thought I could work with the original, I knew it would never be perfect but once I acepted that fact I was happy go ahead and do the work.
I guess the small imperfections are where she gets her character
-
Rossyra

- Supermod
- Posts: 7903
- Joined: February 12th, 2009, 1:24 am
- Location: UK
Re: SNK SC19-4 restoration (work in progress)
Once you get to the point of playing games on it, these slight imperfections will mean nothing 

-
Paulie
- Opens wallet, moths fly out
- Posts: 2599
- Joined: September 28th, 2011, 5:43 pm
- Location: East Ardsley, West Yorks
- eBay: retro-paulie
- Initials: PSG
Re: SNK SC19-4 restoration (work in progress)
You're quite right my friend 
You don't look at the mantle piece when yr poking the fire
You don't look at the mantle piece when yr poking the fire
-
uberpixel

- The Photographer
- Posts: 73
- Joined: January 15th, 2012, 8:40 pm
- Location: Croydon, London
- eBay: cheekyfutch
- Initials: ALN
Re: SNK SC19-4 restoration (work in progress)
Saw this thread on the Retro Gamer forums and can't wait to see the end result. Lot of love has gone into restoring this cab!
I remember seeing one in situ outside a convenience store in Kyoto when I was wondering through some side streets trying to find a route to the temples. Never realised they made them so small. :O
I remember seeing one in situ outside a convenience store in Kyoto when I was wondering through some side streets trying to find a route to the temples. Never realised they made them so small. :O
-
Paulie
- Opens wallet, moths fly out
- Posts: 2599
- Joined: September 28th, 2011, 5:43 pm
- Location: East Ardsley, West Yorks
- eBay: retro-paulie
- Initials: PSG
Re: SNK SC19-4 restoration (work in progress)
I've now got a correctly sized CPO (well 2 on one sheet) and they look so I'm gonna get on with that little job tomorrow evening 
Seb's checking that it cuts muster
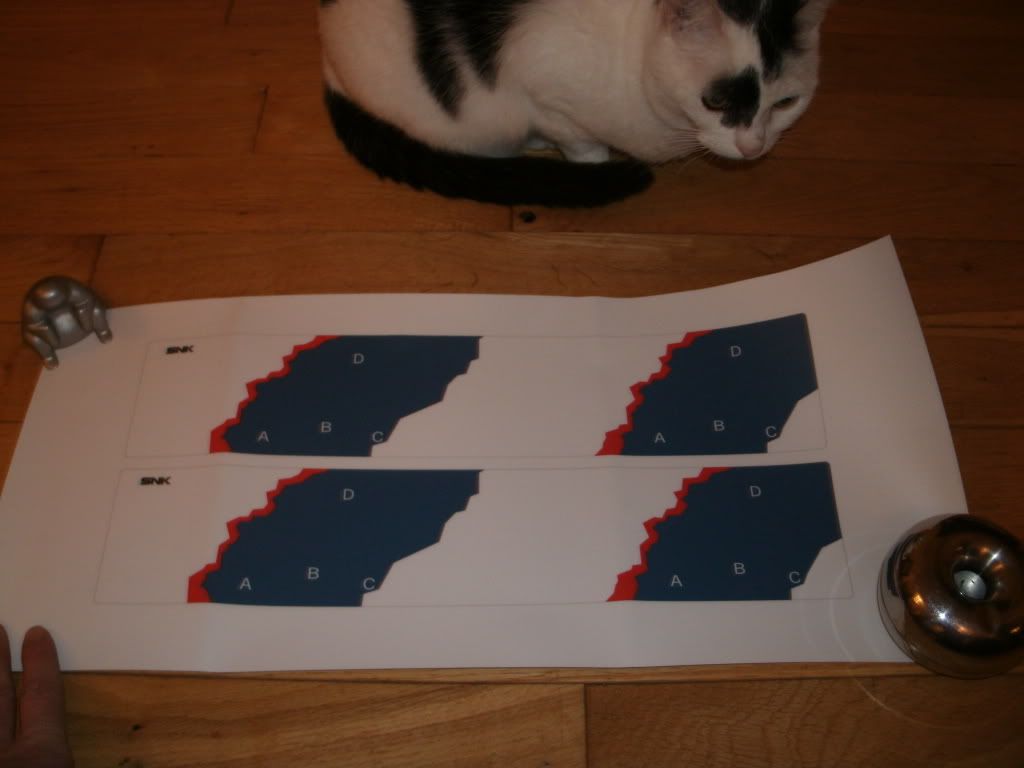
After the previous CPO disaster Scott at gameongraffix was really good and sorted me out with the correctly sized CPO FOC .
.
Seb's checking that it cuts muster
After the previous CPO disaster Scott at gameongraffix was really good and sorted me out with the correctly sized CPO FOC
-
emphatic

- Breastfeeds when required
- Posts: 5909
- Joined: April 7th, 2009, 4:14 pm
- Location: Alingsås, Sweden
- eBay: jorgen_sjolander
- Initials: JOR
Re: SNK SC19-4 restoration (work in progress)
See? That's the gameongraphics service I know and love.
My games: http://www.emphatic.se
-
Paulie
- Opens wallet, moths fly out
- Posts: 2599
- Joined: September 28th, 2011, 5:43 pm
- Location: East Ardsley, West Yorks
- eBay: retro-paulie
- Initials: PSG
Re: SNK SC19-4 restoration (work in progress)
Yep you were dead right mateemphatic wrote:See? That's the gameongraphics service I know and love.
They look and feel fantastic too
-
Paulie
- Opens wallet, moths fly out
- Posts: 2599
- Joined: September 28th, 2011, 5:43 pm
- Location: East Ardsley, West Yorks
- eBay: retro-paulie
- Initials: PSG
Re: SNK SC19-4 restoration (work in progress)
I cleaned off the old CP overlay which was a bit of a shame as it was the original screen printed art. It was covered in an industrial type clear protective film which took ages to remove, how this ever got damaged in the first please is beyond me. Usually the hair-dryer will soften this kind of thing and make it really easy to remove but I tried that trick and it did absolutely nothing, so I ended up using course then medium and finally a fine grade of wet and dry which took a lot of elbow grease (well over an hour) but it did the job.
CP as it looked when I removed it from the cab
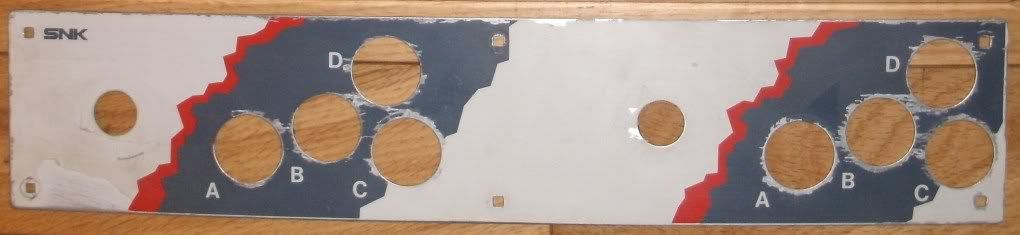
CP after I had removed the original art

The new CP overlay was dead easy to apply, first ensure the metal plate is perfectly smooth and is dust and grease free. I then cut the CPO to size, this one had a thin black outline so it was easy peasy (if you get one without and outline then as always with these things measure twice, cut once) I removed part of the CPO sticky backing film and stuck that part of the CPO down, I kept removing a little more backing and sticking a little more down using a smooth movement until it was fully applied. Take your time you need to get this right first time, you don't want air bubbles or it to be wonky or be upside down. Then the final job was to cut out the button and bolt holes, I cut them out roughly but close to size then I smoothly followed the metal holes with a blade (face side up), the last thing you want is to snag the CPO at the final hurdle so if you cut like this you can see and feel if it may snag. My tips are to take your time, don't cheap out on poor quality blades cut and apply the CPO in a smooth motion and of course make sure you have applied the art the right way up.
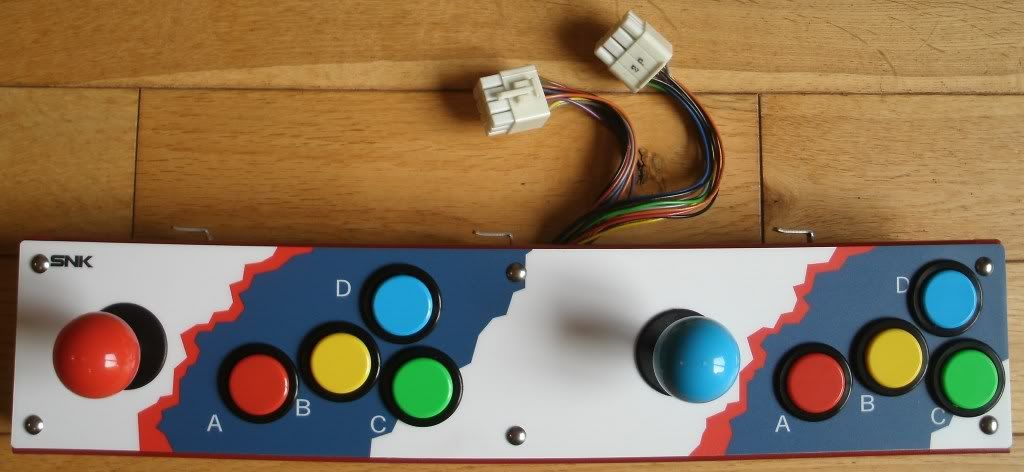
CP with the new overlay applied
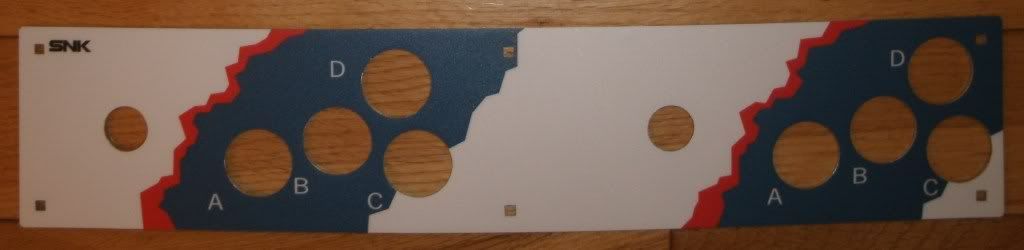
If anyone is interested the CP overlay was printed by gameongraffix, (a US company). I must say the quality is very high, and it feels very durable. There was a sizing hiccup with the first one that I received but Scott sorted that out for me for free and turned the order around very quickly. I managed to fit 2 CP overlays on 1 sheet (as the SC19-4 CP is teeny weeny) so I have a spare one. It cost $32.95 USD and about the same again for shipping to the UK.
At this point I must say a big thank you to Rossyra for helping me out a lot with this part of the restoration. Rossyra produced both this and other art for the SC19-4. It really is top notch stuff and it's all in the wiki for anyone to use . I tip my hat to your skills sir 
CP as it looked when I removed it from the cab
CP after I had removed the original art
The new CP overlay was dead easy to apply, first ensure the metal plate is perfectly smooth and is dust and grease free. I then cut the CPO to size, this one had a thin black outline so it was easy peasy (if you get one without and outline then as always with these things measure twice, cut once) I removed part of the CPO sticky backing film and stuck that part of the CPO down, I kept removing a little more backing and sticking a little more down using a smooth movement until it was fully applied. Take your time you need to get this right first time, you don't want air bubbles or it to be wonky or be upside down. Then the final job was to cut out the button and bolt holes, I cut them out roughly but close to size then I smoothly followed the metal holes with a blade (face side up), the last thing you want is to snag the CPO at the final hurdle so if you cut like this you can see and feel if it may snag. My tips are to take your time, don't cheap out on poor quality blades cut and apply the CPO in a smooth motion and of course make sure you have applied the art the right way up.
CP with the new overlay applied
If anyone is interested the CP overlay was printed by gameongraffix, (a US company). I must say the quality is very high, and it feels very durable. There was a sizing hiccup with the first one that I received but Scott sorted that out for me for free and turned the order around very quickly. I managed to fit 2 CP overlays on 1 sheet (as the SC19-4 CP is teeny weeny) so I have a spare one. It cost $32.95 USD and about the same again for shipping to the UK.
At this point I must say a big thank you to Rossyra for helping me out a lot with this part of the restoration. Rossyra produced both this and other art for the SC19-4. It really is top notch stuff and it's all in the wiki for anyone to use
-
Rossyra
- Supermod
- Posts: 7903
- Joined: February 12th, 2009, 1:24 am
- Location: UK
-
Paulie
- Opens wallet, moths fly out
- Posts: 2599
- Joined: September 28th, 2011, 5:43 pm
- Location: East Ardsley, West Yorks
- eBay: retro-paulie
- Initials: PSG
Re: SNK SC19-4 restoration (work in progress)
I forgot to add this bit to my last post (I did'nt copy and paste the full bit) 
At this point the original CP had just had a clean
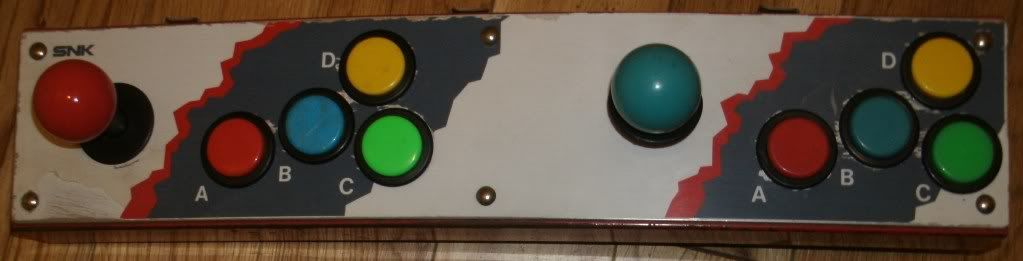
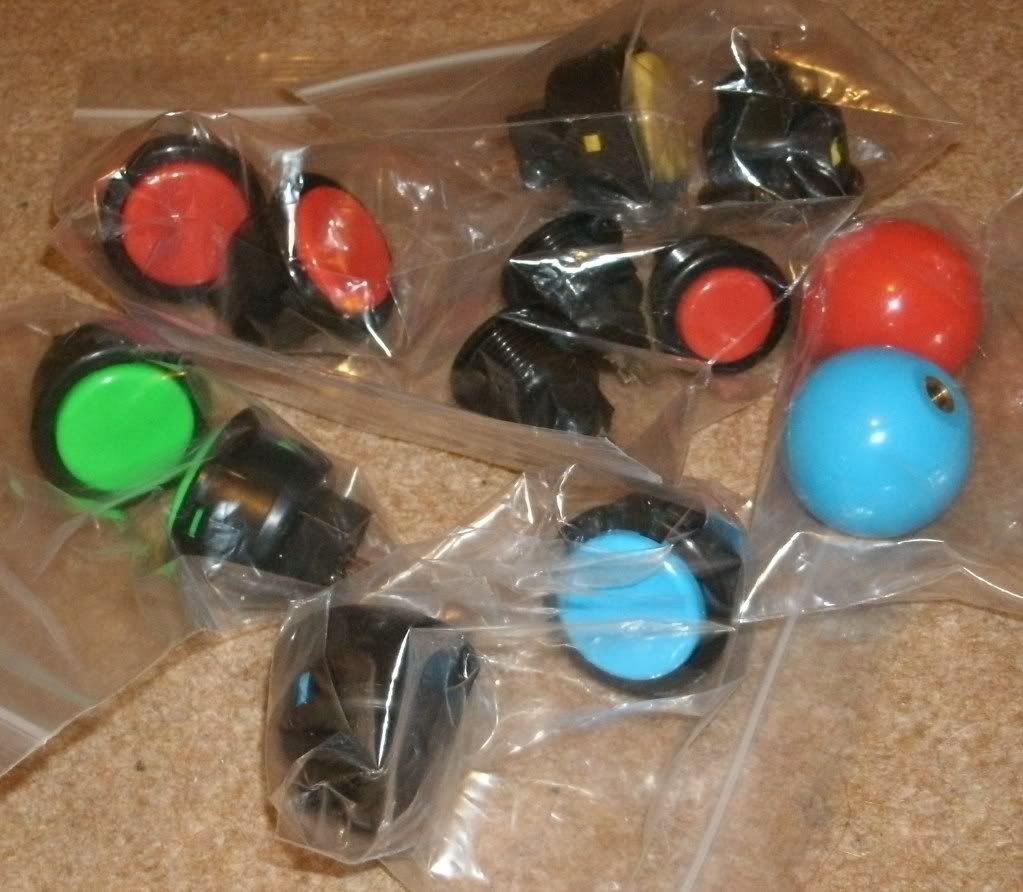
I bought new Seimitsu PS-14-G push buttons and Seimitsu LB-35 ball tops (I still need to order 2 new shafts and another red ball top as I still haven't decided if I will go with red and blue or two red ball tops) from http://www.gremlinsolutions.co.uk"
New Seimitsu PS-14-G push buttons and LB-35 ball tops
CP all re-sprayed, new overlay applied and new Seimitsu buttons and ball tops
At this point the original CP had just had a clean
I bought new Seimitsu PS-14-G push buttons and Seimitsu LB-35 ball tops (I still need to order 2 new shafts and another red ball top as I still haven't decided if I will go with red and blue or two red ball tops) from http://www.gremlinsolutions.co.uk"
New Seimitsu PS-14-G push buttons and LB-35 ball tops
CP all re-sprayed, new overlay applied and new Seimitsu buttons and ball tops
-
emphatic
- Breastfeeds when required
- Posts: 5909
- Joined: April 7th, 2009, 4:14 pm
- Location: Alingsås, Sweden
- eBay: jorgen_sjolander
- Initials: JOR
-
Paulie
- Opens wallet, moths fly out
- Posts: 2599
- Joined: September 28th, 2011, 5:43 pm
- Location: East Ardsley, West Yorks
- eBay: retro-paulie
- Initials: PSG
Re: SNK SC19-4 restoration (work in progress)
Thanks mateemphatic wrote:
Also I forgot to metion that when I got the cab the A,B,C,D button colour placement was incorrect, when I fitted the new button I rectified this
-
SuperPang

- Master or universe
- Posts: 11209
- Joined: August 16th, 2008, 2:45 pm
- Location: UK
- eBay: *_*
- Initials: JOE
Re: SNK SC19-4 restoration (work in progress)
I would plug D and only play Metal Slug
Great work btw
Great work btw
-
Paulie
- Opens wallet, moths fly out
- Posts: 2599
- Joined: September 28th, 2011, 5:43 pm
- Location: East Ardsley, West Yorks
- eBay: retro-paulie
- Initials: PSG
Re: SNK SC19-4 restoration (work in progress)
I'm ready to rollSuperPang wrote:I would plug D and only play Metal Slug
Great work btw

-
SuperPang
- Master or universe
- Posts: 11209
- Joined: August 16th, 2008, 2:45 pm
- Location: UK
- eBay: *_*
- Initials: JOE
Re: SNK SC19-4 restoration (work in progress)
Just put the top two in the bin.
-
Paulie
- Opens wallet, moths fly out
- Posts: 2599
- Joined: September 28th, 2011, 5:43 pm
- Location: East Ardsley, West Yorks
- eBay: retro-paulie
- Initials: PSG
Re: SNK SC19-4 restoration (work in progress)
5 is ok, it's not a patch on 1>3 but still fun. But I have to agree that it's probably the best place for 4 to reside.
-
Rossyra
- Supermod
- Posts: 7903
- Joined: February 12th, 2009, 1:24 am
- Location: UK
-
Paulie
- Opens wallet, moths fly out
- Posts: 2599
- Joined: September 28th, 2011, 5:43 pm
- Location: East Ardsley, West Yorks
- eBay: retro-paulie
- Initials: PSG
Re: SNK SC19-4 restoration (work in progress)
Tough crowd, mine is 1>X>3>2>5>4