Yep torx, star don't have the dot in the middlebaddy wrote:In france we call those bolts "Torx Securité (Security)" are they really called "star" in the UK ?
Sega Naomi restoration WIP - Updated Sept 2015
-
Paulie

- Opens wallet, moths fly out
- Posts: 2599
- Joined: September 28th, 2011, 5:43 pm
- Location: East Ardsley, West Yorks
- eBay: retro-paulie
- Initials: PSG
Re: Sega Naomi restoration work in progress Updated Thur 17/
-
Paulie
- Opens wallet, moths fly out
- Posts: 2599
- Joined: September 28th, 2011, 5:43 pm
- Location: East Ardsley, West Yorks
- eBay: retro-paulie
- Initials: PSG
Re: Sega Naomi restoration work in progress Updated Thur 17/
ill post the pics tonight although 1 of mine wasn't connected to anythingjase wrote:Hey Paulie,
Quick Q, I found some earth cables in the legs not attached to anything. Any chance you could let me know how many earth cables there are in each leg and what they're attached to the other end, that would be awesome.
Cheers matey
-
jase

- Posts: 692
- Joined: September 14th, 2008, 3:18 pm
- Location:
Re: Sega Naomi restoration work in progress Updated Thur 17/
Cheers matey, some pics would be awesome, much appreciated!

-
Paulie
- Opens wallet, moths fly out
- Posts: 2599
- Joined: September 28th, 2011, 5:43 pm
- Location: East Ardsley, West Yorks
- eBay: retro-paulie
- Initials: PSG
Re: Sega Naomi restoration work in progress Updated Thur 17/
@ Jase I'll re-take some pics now for you and i'll insert them in this post as it will probably be quicker than looking through 100's of photos 
On my cab the leg earth cables were as follows. I know things get messed around a lot on cabs so if mine were in the wrong places etc PLMK earthing cables will be attached to areas that are usually not painted so you may see a small are of bear metal about the size of a 5p coin
Looking from the front of the cab
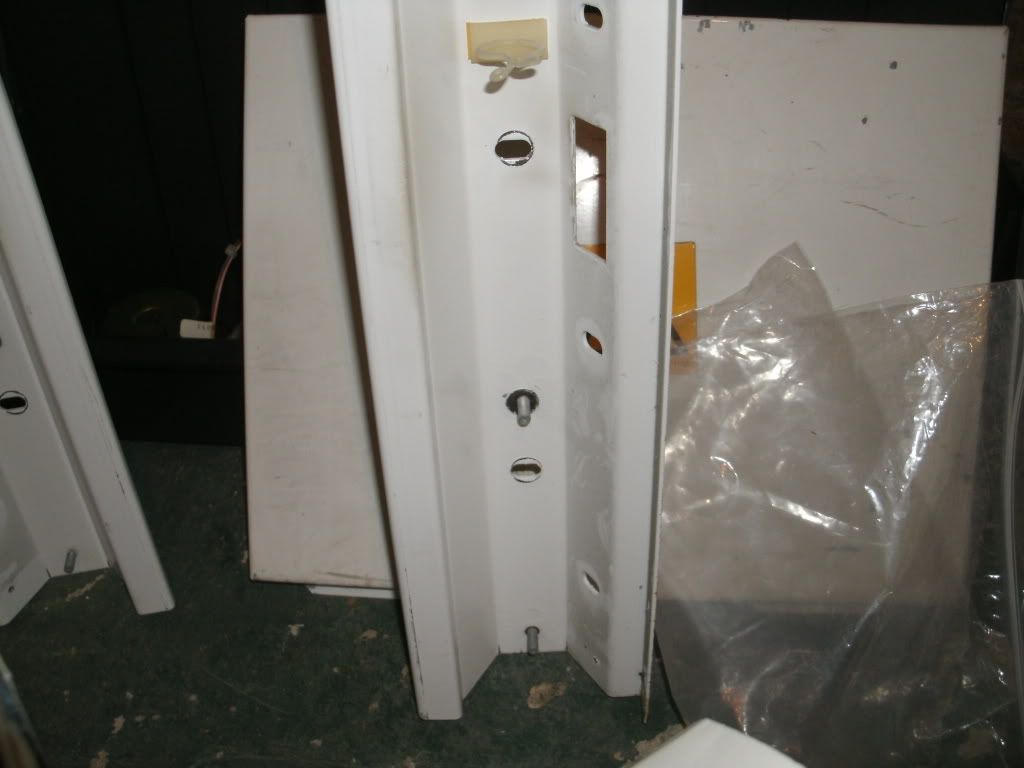
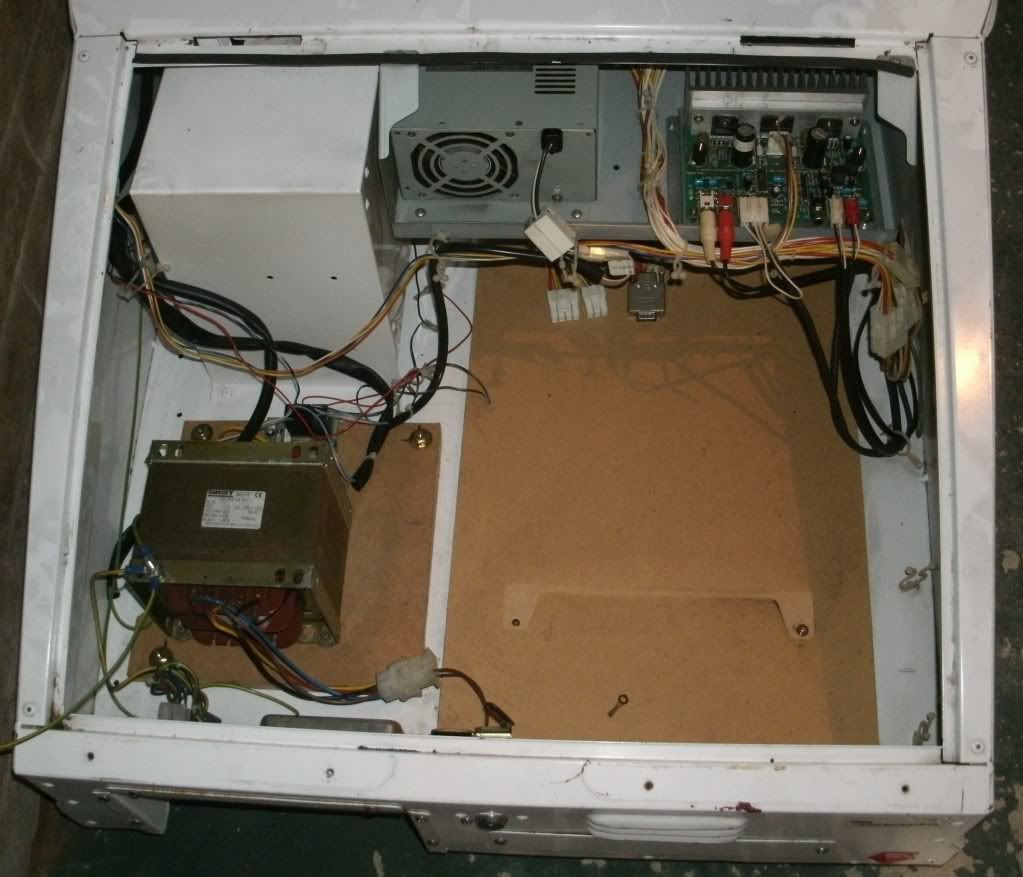
LHS Leg (2 earth cables)
Middle of the leg - one end was bolted to the leg frame, the other end was screwed to to the I/O tray (same place as the CP earth is fixed)
FROM
TO(if you look to the middle left you will see the two earths)
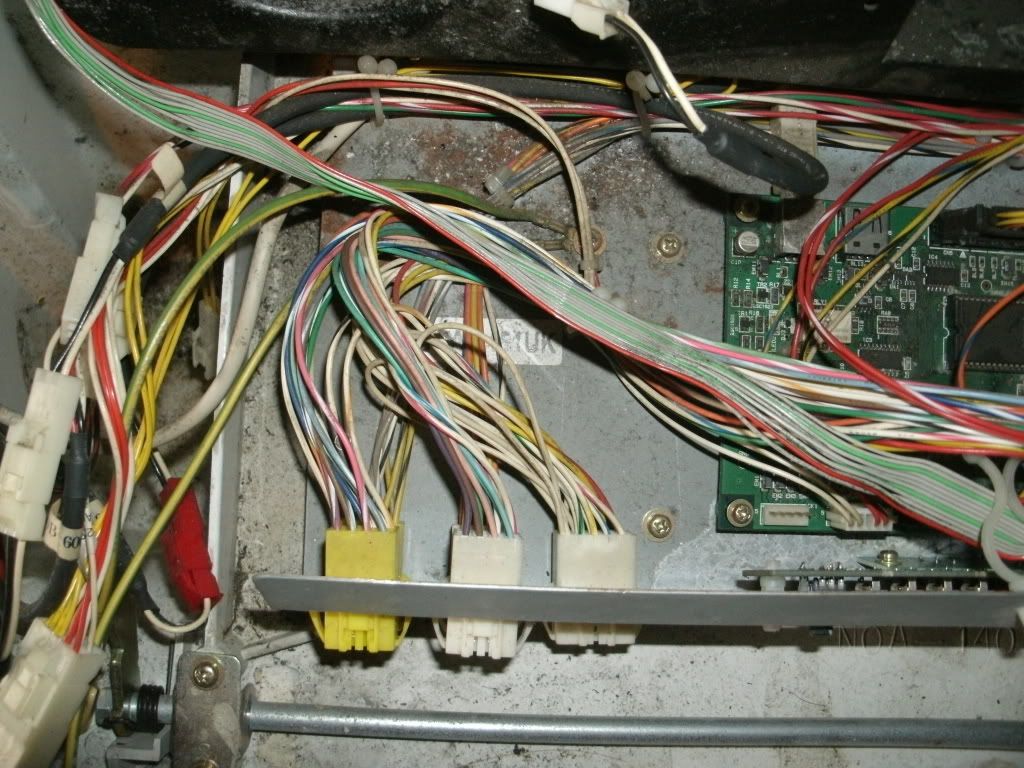
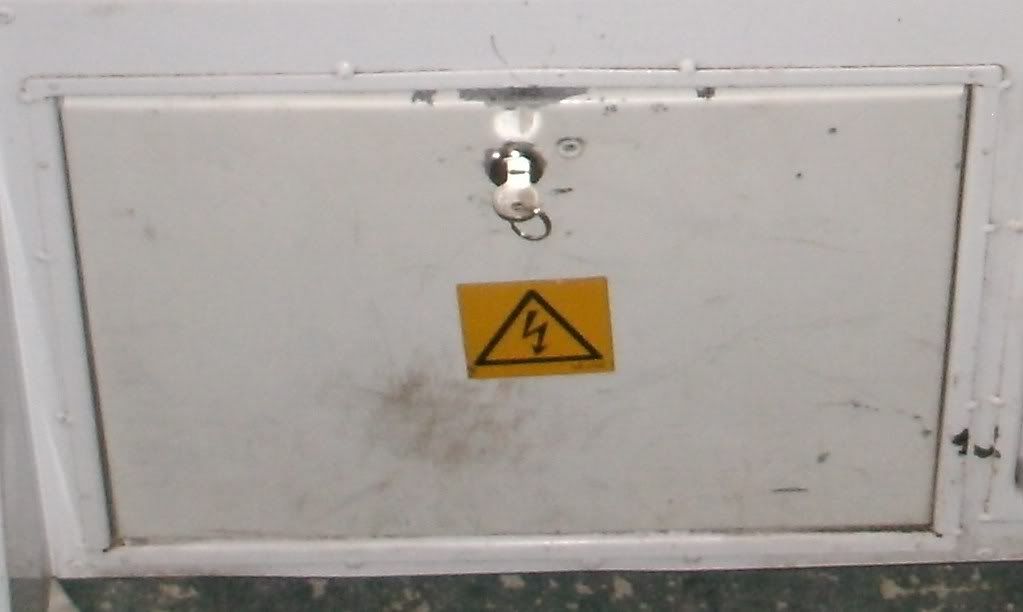
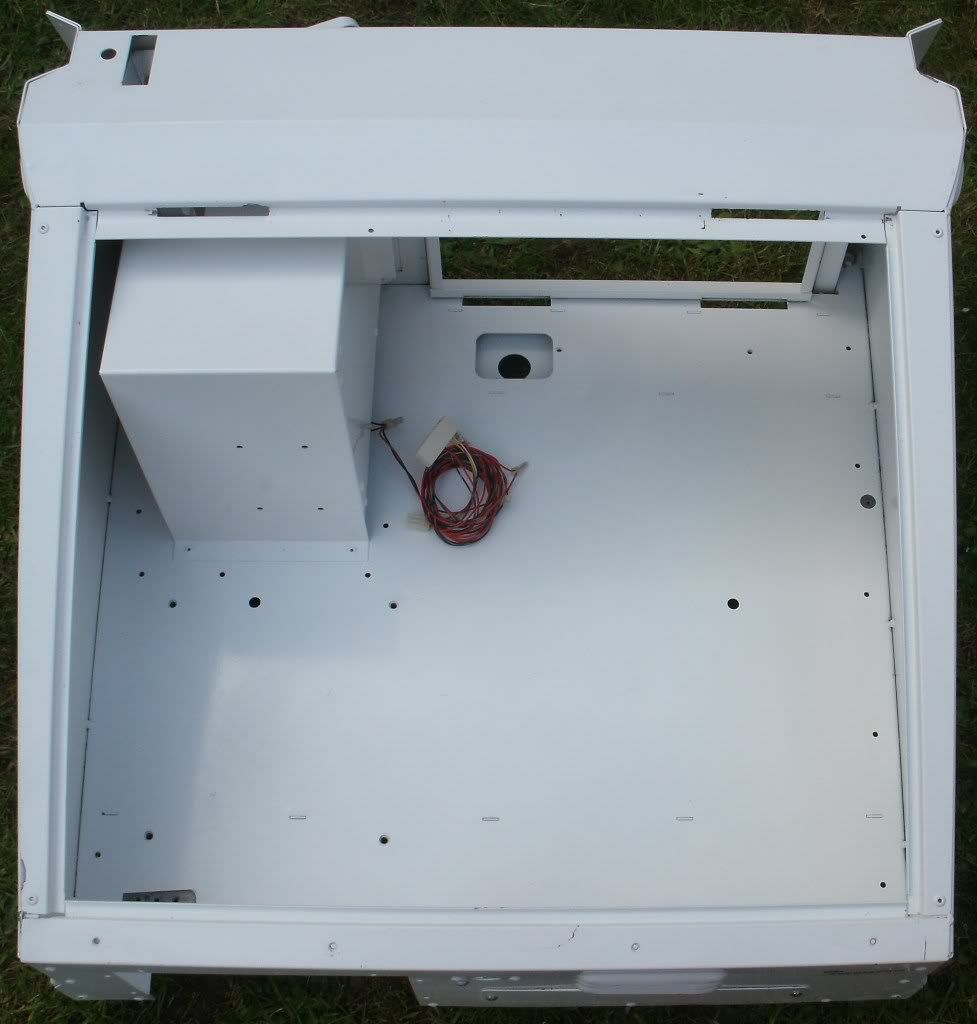
Bottom of the leg - one end was bolted to the leg frame, the other end was to the inside of the base (remove front access door and you will see a screw hole on the very left hand side of the base about 20ish cm into the cab)
FROM
TO (look to the middle of the pic you will see the screw head)
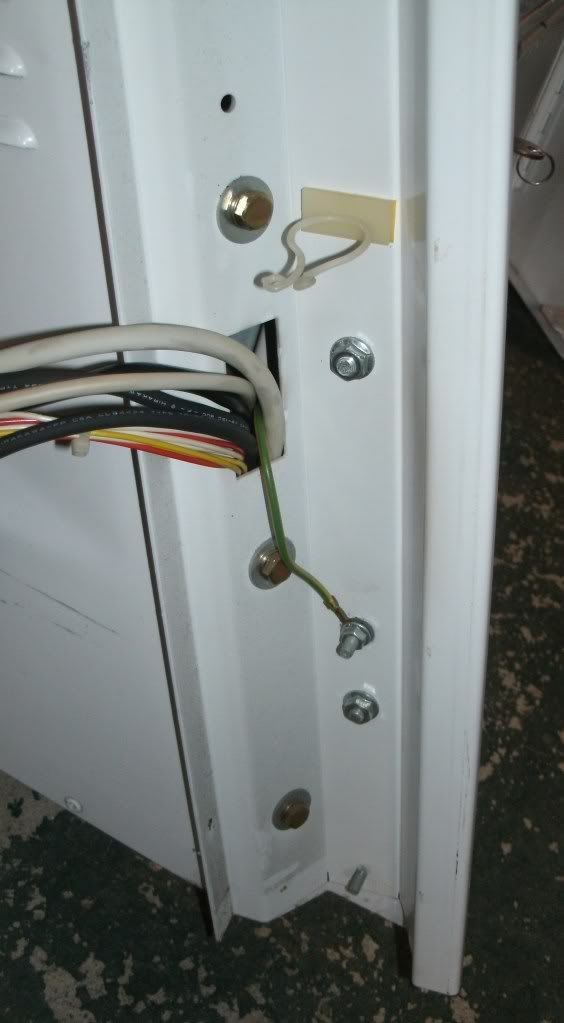
RHS Leg (3 earth cables)
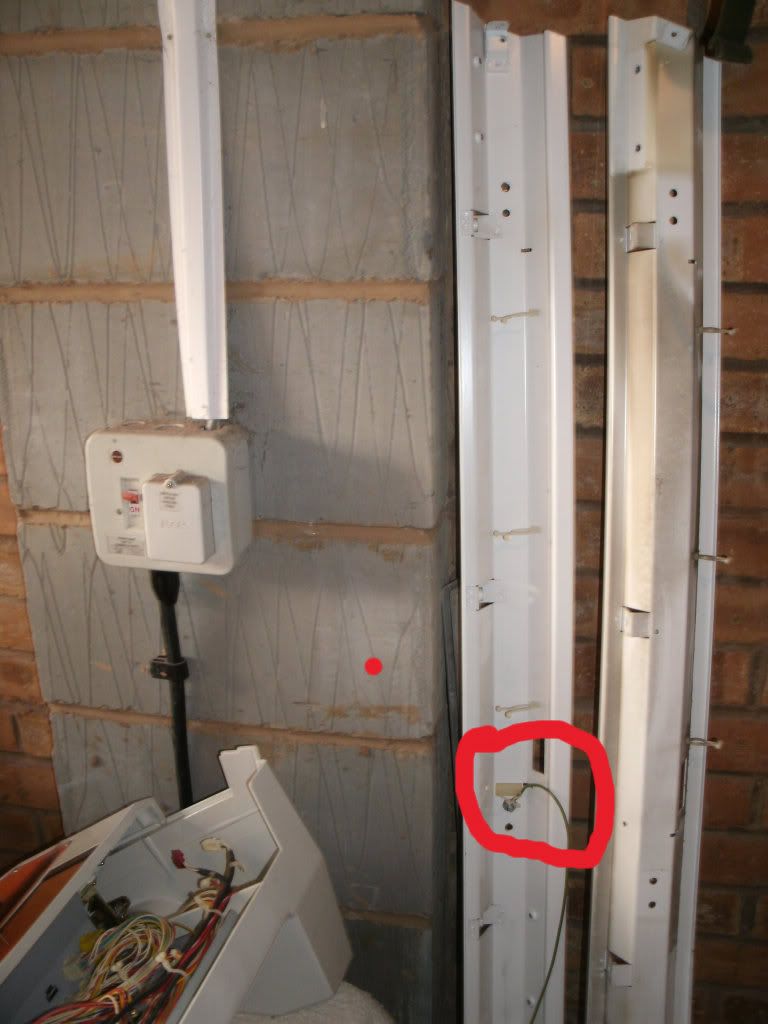
Middle - 2 earths were bolted to the leg one went to the lighting unit and was screwed to it's frame and second was (very short cable) poked through where the monitor is but that was not attached to anything on my cab, I presume it would attach to the monitor frame or the black brace ??? but if someone would let me know I would be very grateful BTW if it makes a difference my monitor is a nano.
FROM (thread in the center of the pic)
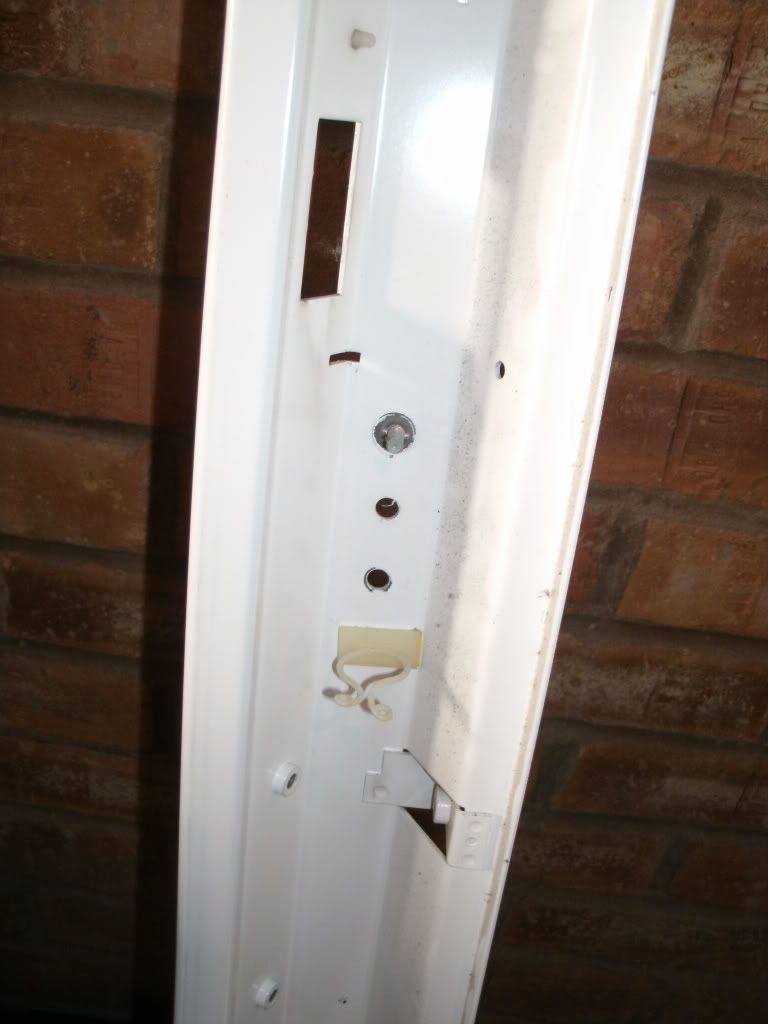
TO (in the pic its the small hole that is a few mm to the right of the screw head. left of the yellow warning sticker. sorry crap explanation but photo bucket is playing up and won't let me circle the parts I want to point out to you

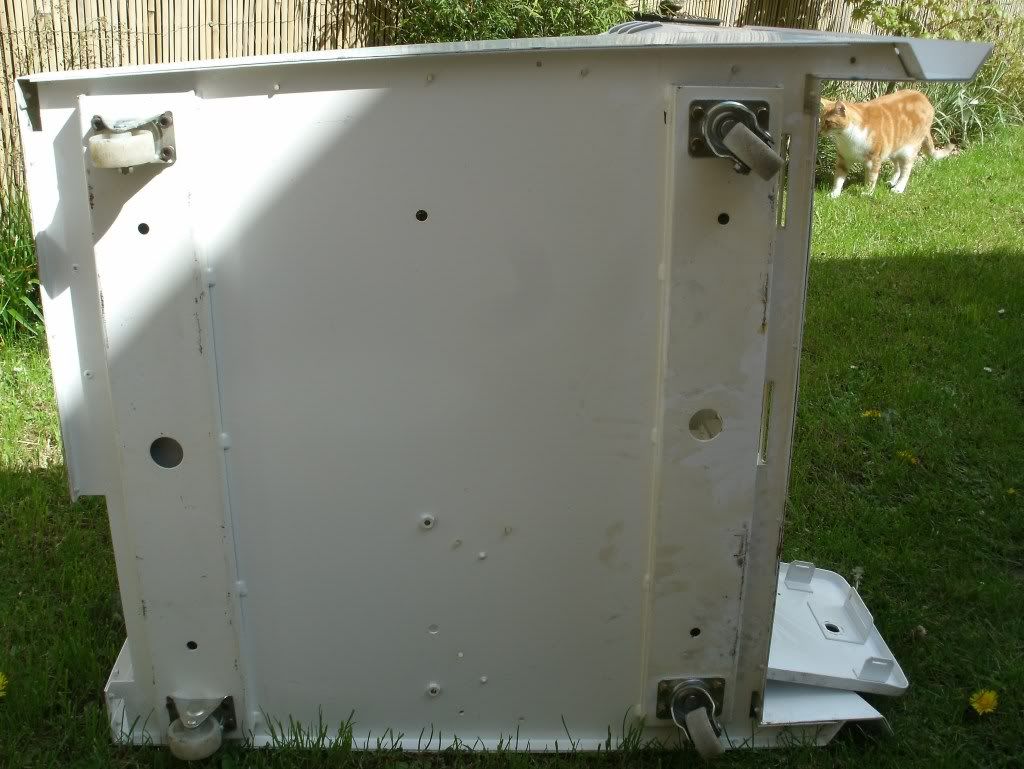
Bottom - one end was bolted to the leg frame, the other end was screwed to the rear right of the base (remove the top access door and you will see 3 earthing screw holes at the the very back of the base floor they are in the small unpainted rectagle of bear metal it was attached to one of those)
FROM (top thread of the 2 in the piccy)
TO (see top right you should see the bear metal rectangle)
HTH
P
On my cab the leg earth cables were as follows. I know things get messed around a lot on cabs so if mine were in the wrong places etc PLMK earthing cables will be attached to areas that are usually not painted so you may see a small are of bear metal about the size of a 5p coin
Looking from the front of the cab
LHS Leg (2 earth cables)
Middle of the leg - one end was bolted to the leg frame, the other end was screwed to to the I/O tray (same place as the CP earth is fixed)
FROM
TO(if you look to the middle left you will see the two earths)
Bottom of the leg - one end was bolted to the leg frame, the other end was to the inside of the base (remove front access door and you will see a screw hole on the very left hand side of the base about 20ish cm into the cab)
FROM
TO (look to the middle of the pic you will see the screw head)
RHS Leg (3 earth cables)
Middle - 2 earths were bolted to the leg one went to the lighting unit and was screwed to it's frame and second was (very short cable) poked through where the monitor is but that was not attached to anything on my cab, I presume it would attach to the monitor frame or the black brace ??? but if someone would let me know I would be very grateful BTW if it makes a difference my monitor is a nano.
FROM (thread in the center of the pic)
TO (in the pic its the small hole that is a few mm to the right of the screw head. left of the yellow warning sticker. sorry crap explanation but photo bucket is playing up and won't let me circle the parts I want to point out to you
Bottom - one end was bolted to the leg frame, the other end was screwed to the rear right of the base (remove the top access door and you will see 3 earthing screw holes at the the very back of the base floor they are in the small unpainted rectagle of bear metal it was attached to one of those)
FROM (top thread of the 2 in the piccy)
TO (see top right you should see the bear metal rectangle)
HTH
P
-
Paulie
- Opens wallet, moths fly out
- Posts: 2599
- Joined: September 28th, 2011, 5:43 pm
- Location: East Ardsley, West Yorks
- eBay: retro-paulie
- Initials: PSG
-
jase
- Posts: 692
- Joined: September 14th, 2008, 3:18 pm
- Location:
Re: Sega Naomi restoration work in progress Updated Thur 17/
A massive thanks for that, just what im after. Will be nice to finally connect the earth leads up properly.
Cheers man
Cheers man
-
Paulie
- Opens wallet, moths fly out
- Posts: 2599
- Joined: September 28th, 2011, 5:43 pm
- Location: East Ardsley, West Yorks
- eBay: retro-paulie
- Initials: PSG
Re: Sega Naomi restoration work in progress Updated Thur 17/
No worries buddy, and thank you very much for the coin box
-
ReSe2k
- Please Continue...
- Posts: 29
- Joined: May 8th, 2012, 7:00 pm
- Location: Germany
- eBay: hyaku-shiki
- Initials: RSK
Re: Sega Naomi restoration work in progress Updated Thur 17/
this thread will be a great help for my naomi. a big thanks! 
-
Paulie
- Opens wallet, moths fly out
- Posts: 2599
- Joined: September 28th, 2011, 5:43 pm
- Location: East Ardsley, West Yorks
- eBay: retro-paulie
- Initials: PSG
Re: Sega Naomi restoration work in progress Updated Thur 17/
No worries, I hope you have enjoyed reading what I've done with the cab so farReSe2k wrote:this thread will be a great help for my naomi. a big thanks!
I chopped the legs the other day.
I did this because I prefer to sit when gaming and it should look like a proper candy when reassembled so hopefully it won't look out of place when I finally get a little dedicated home arcade room and a few more candy's to fill it
Dead easy if you know the magic number.
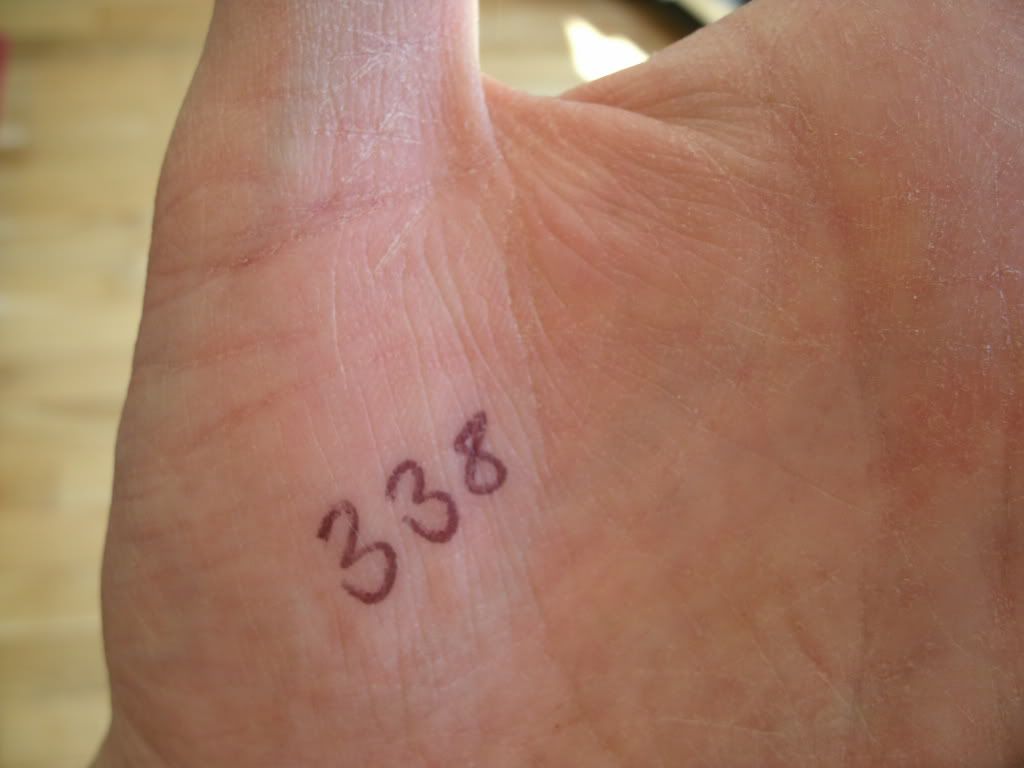
If you are not confident with cutting then let me reassure you I wouldn't have though you can go far wrong with this. So to avoid any Fubars just remember, like what my dad used to tell me MEASURE TWICE, CUT ONCE.
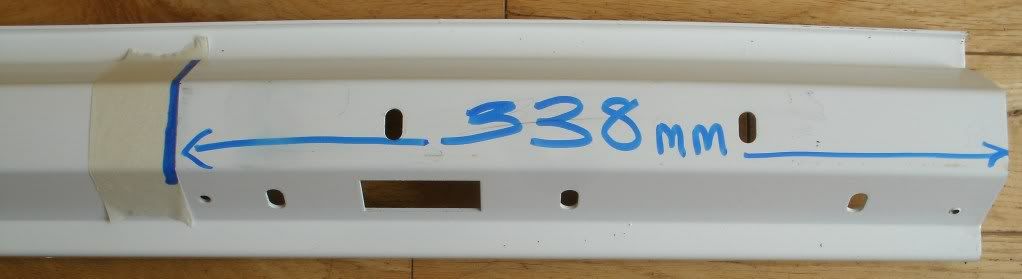
The only other thing to bear in mind when cutting something is to take into account the width of the cut. I wanted to cut 338mm off the bottom of the legs so mark the line at 338mm but cut UP TO that line, NOT on it or at the far side of it as if you do you will probably take maybe another 2mm or so off the leg. You can always cut more off or file it down if you undercut but you can't put it back on if you overcut.
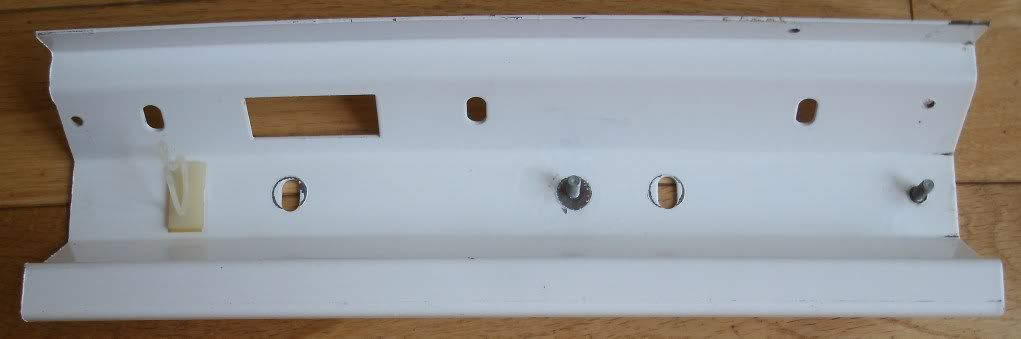
I was going to use my mitre saw but couldn't find an appropriate blade so I just cut them with an hacksaw which took a little longer but you get the same results, if you are doing it by hand remember to watch your blade don't let it stray.
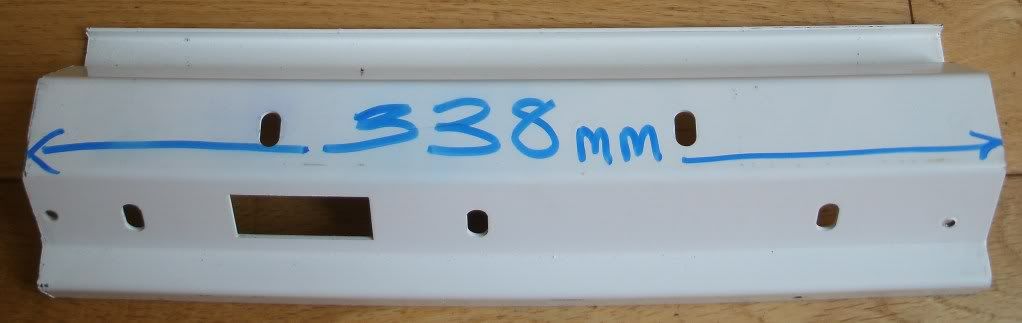
And same again for the other side

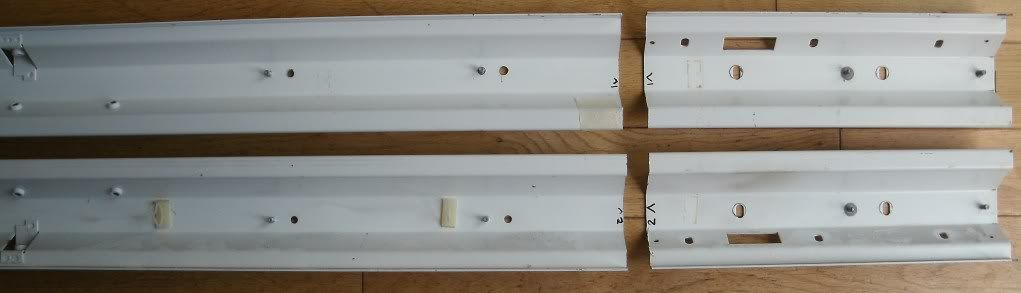
I still need to take off any burs and sharp edges. I may do that & mark where the new holes need to be and drill them out this evening.
I also have a load of other bits to write up so I'll try and post an update of those jobs soon.
Last edited by Paulie on May 24th, 2012, 11:29 pm, edited 1 time in total.
-
Paulie
- Opens wallet, moths fly out
- Posts: 2599
- Joined: September 28th, 2011, 5:43 pm
- Location: East Ardsley, West Yorks
- eBay: retro-paulie
- Initials: PSG
Re: Sega Naomi restoration work in progress Updated Thur 24/
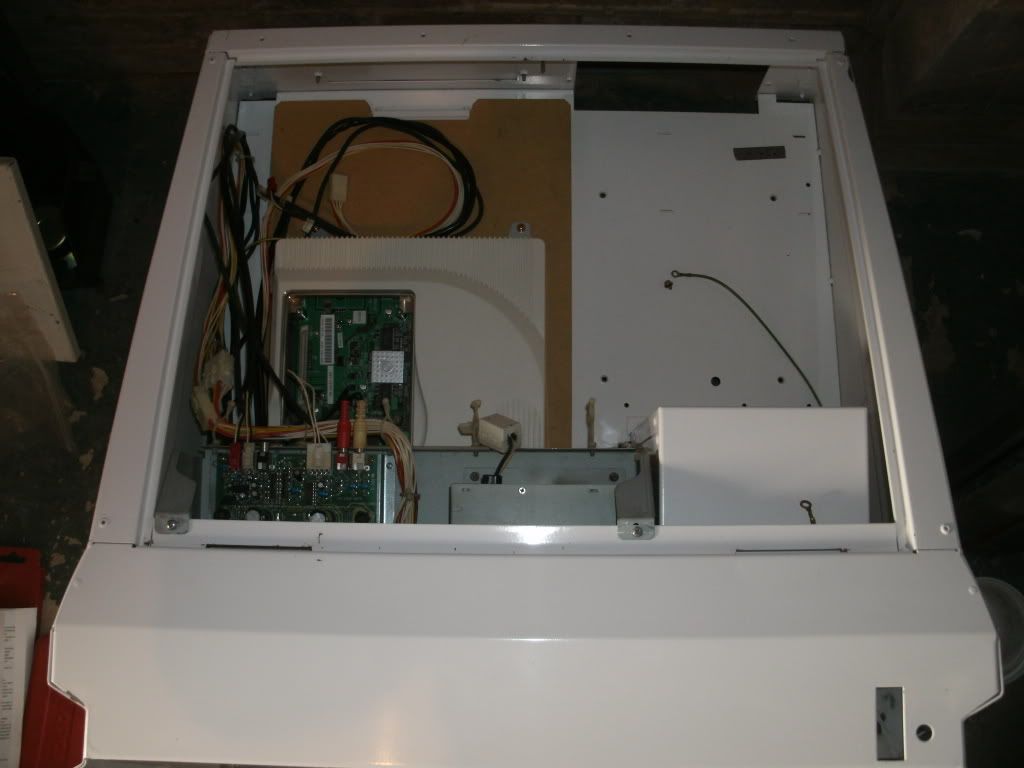
I stripped & cleaned the base.
The tools that you will need for dismantling this area are:
Adjustable Spanner
Philips CR-VPH2 bit (#2)
Torx bit (T-20)
Socket (8mm)
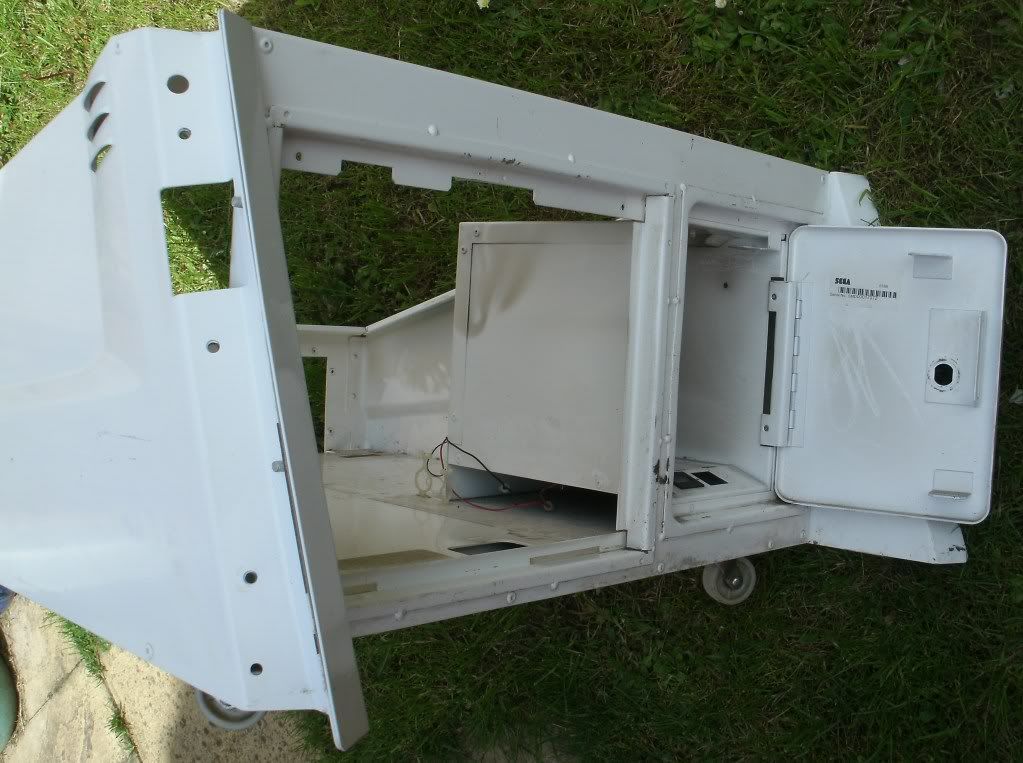
Remove the top access panel mine just lifted off but it should be fixed by 4 Torx (T20) bolts There is also a lock to the rear. Remove the earth cable bolt (socket 8mm).

Remove the front access door, just turn the key. It looks like this was too simple for someone and they wanted to make it a bit more challenging for themselves as they clearly tried to force their way into my cab at some point so as you can see mine requires a fair bit of attention
Remove the locks from the rear of the base, front access panel and coin door, just remove screw that holds the tang and then the large nut, the lock will then just push out.
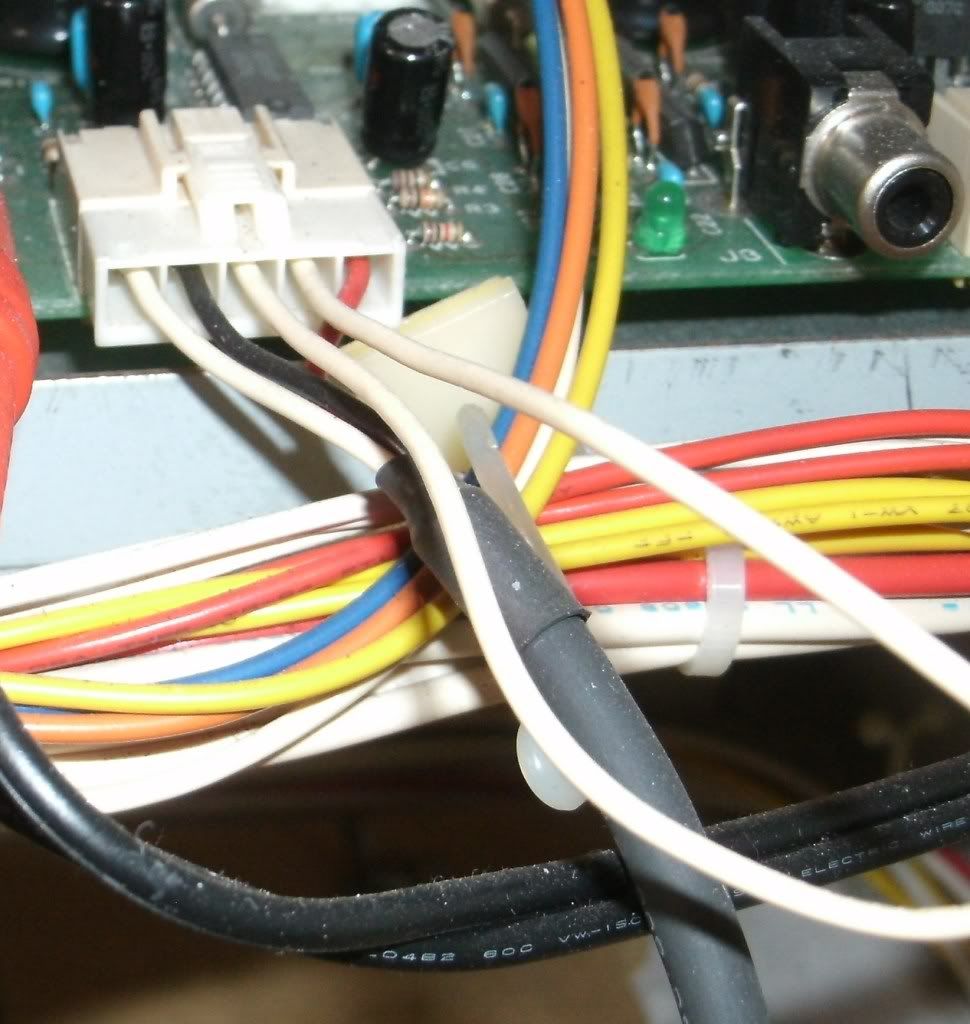
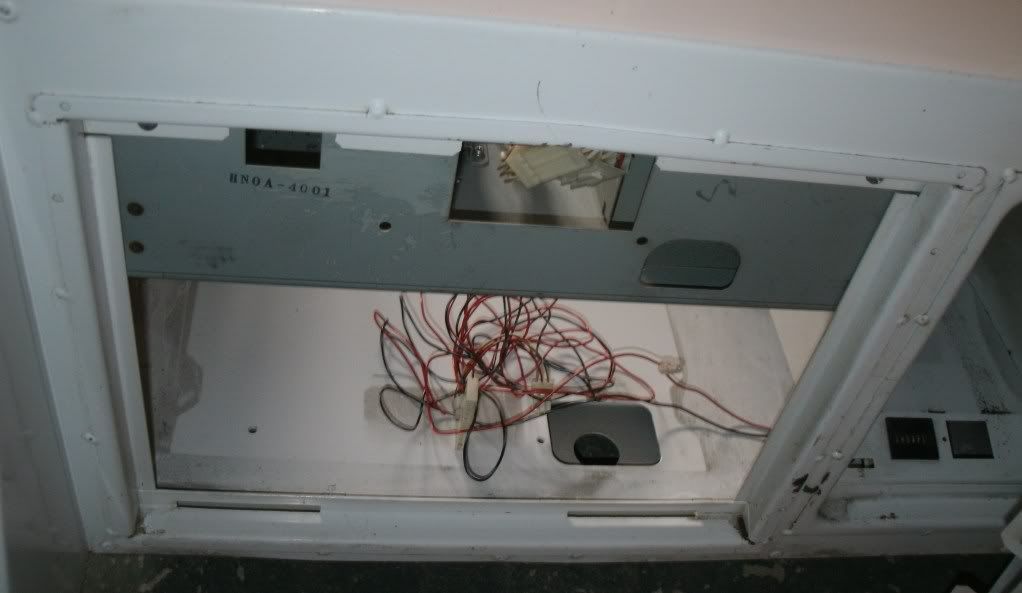
Now to remove all the wiring, there looks to be a lot and at first the thought of removing it all and putting it back correctly was a bit daunting but TBH once you strip it out you realise that there's not actually much as you first think
Unplug the JVS I/O Power extension cable (NOB-60043)

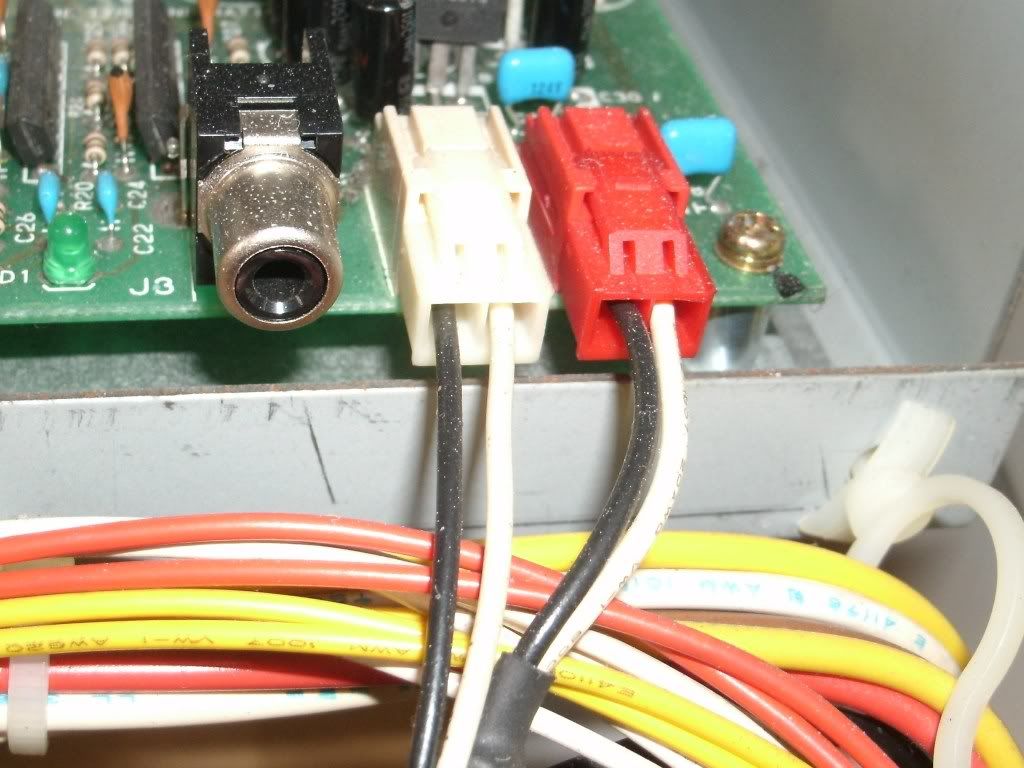
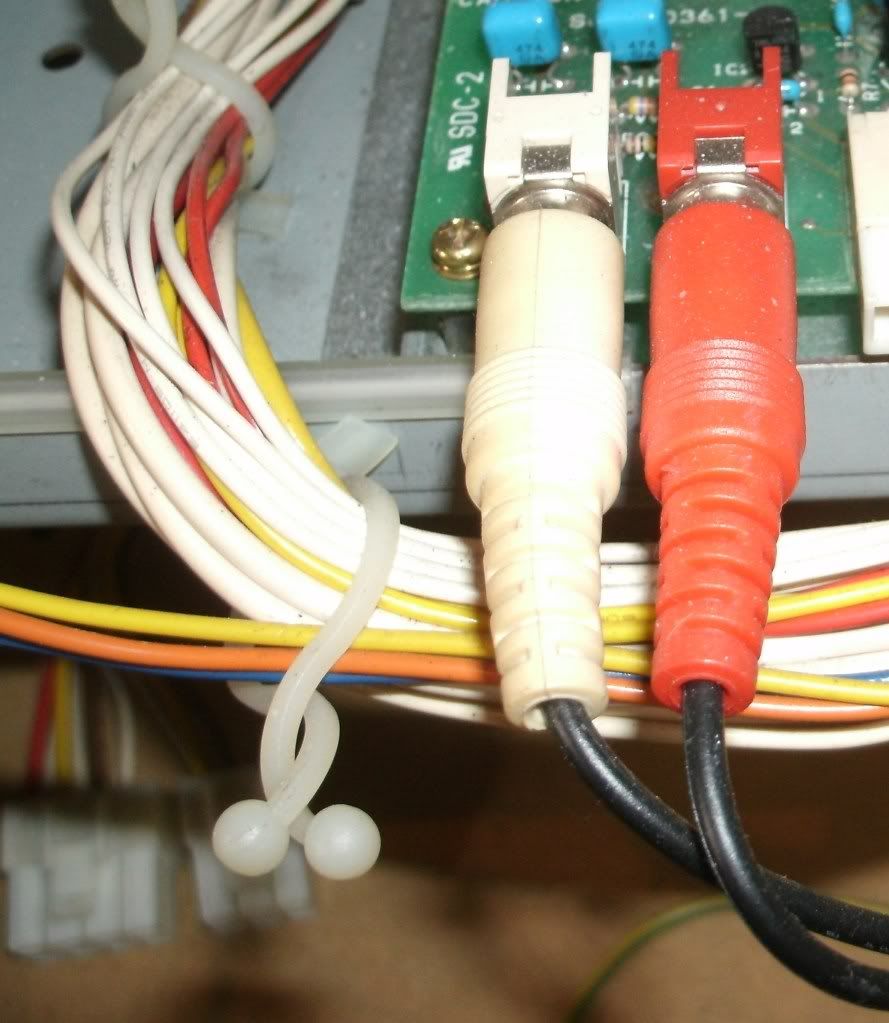
Unplug the right speaker cable (NOB-60045) & the left speaker cable white (NOB-60046)
Unplug the volume pot cable (NOB-60044)
Unplug the Phono cable (600-7158-0100)
Unplug ? (NOB-600200)
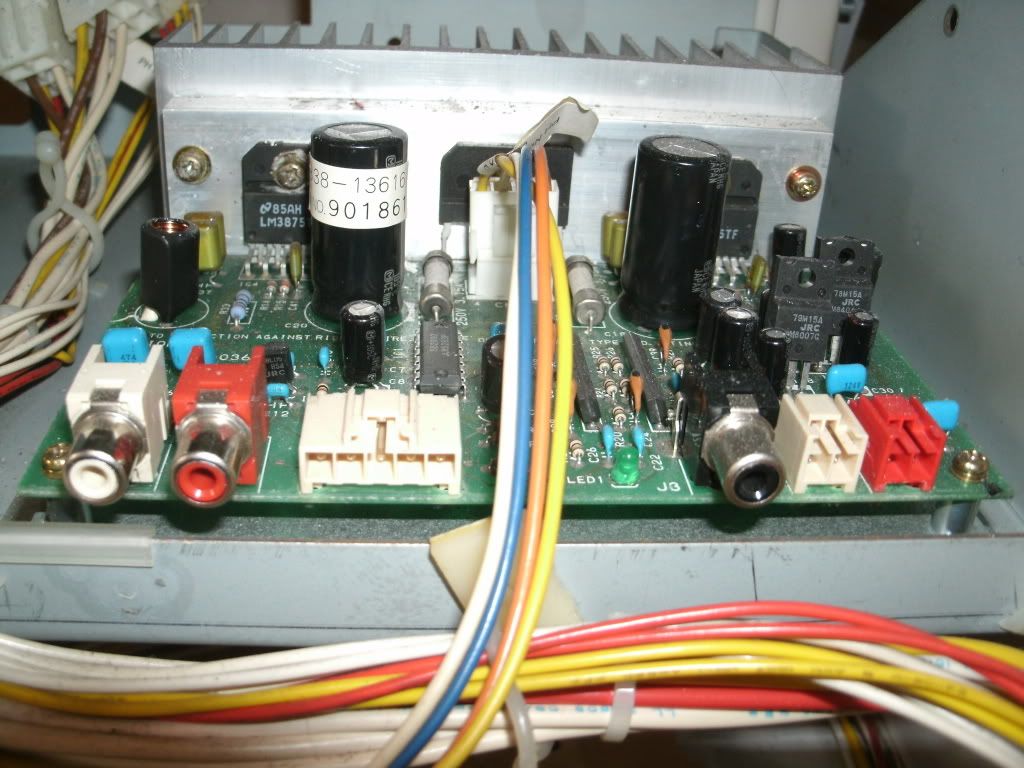
Unplug ? (NOB-60013)
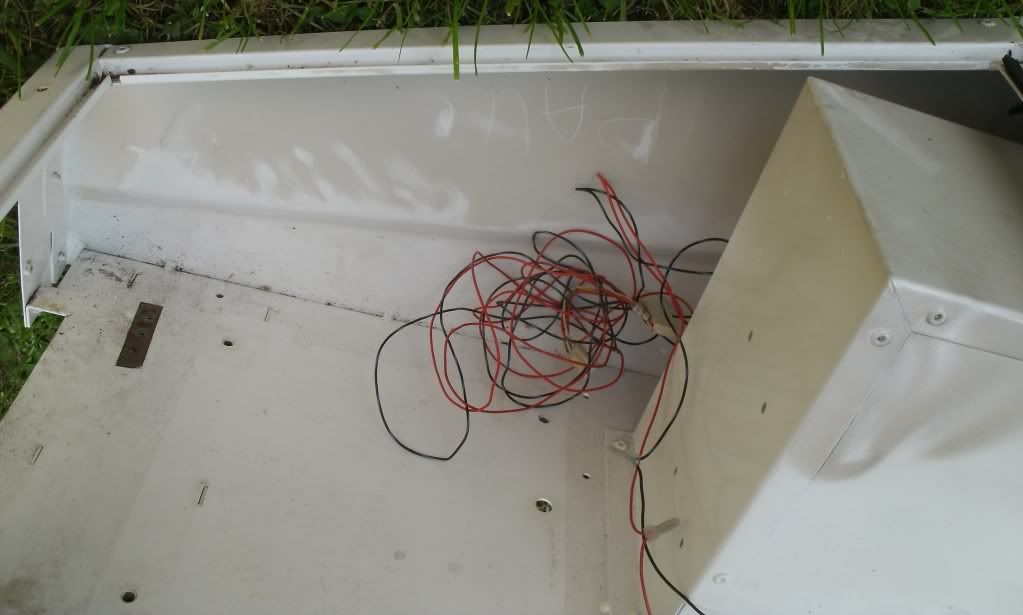
Remove the earth cables attached to the base and the 3 earth cables attached to the rear.

Remove the 4 large screws that secure the transformer MDF base to the cab and unplug the connector.
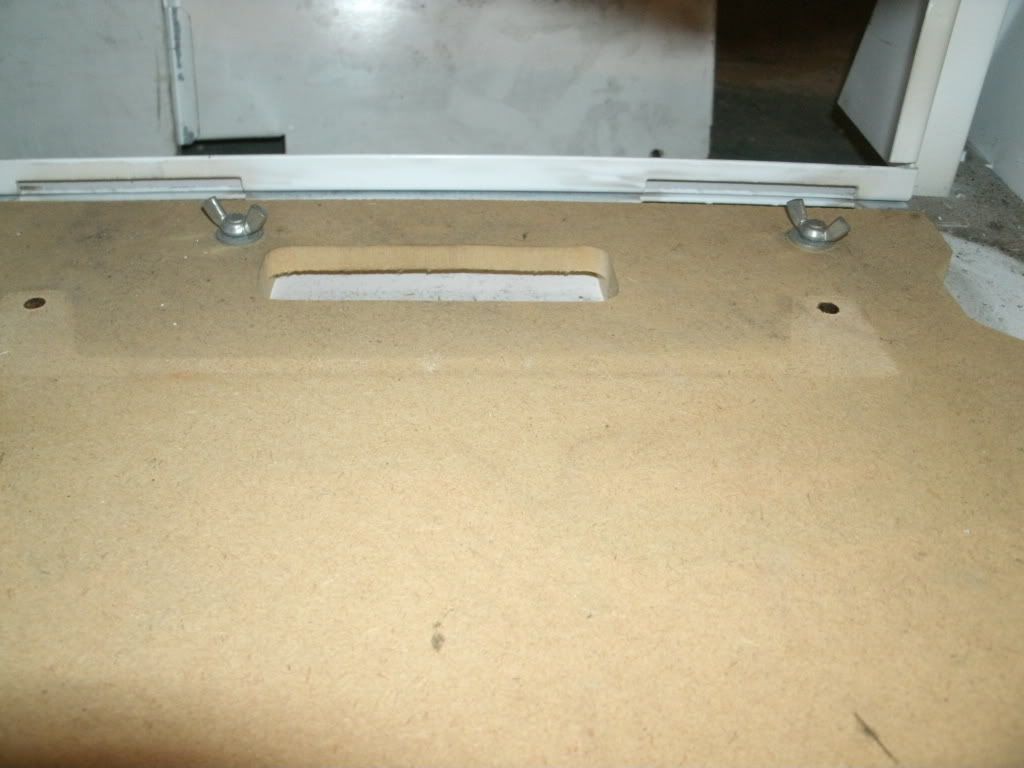
Remove the motherboard MDF base (2 wing nut bolts)
Remove the tray that holds the amp & PSU (2 screws on the top and 2 on the front).
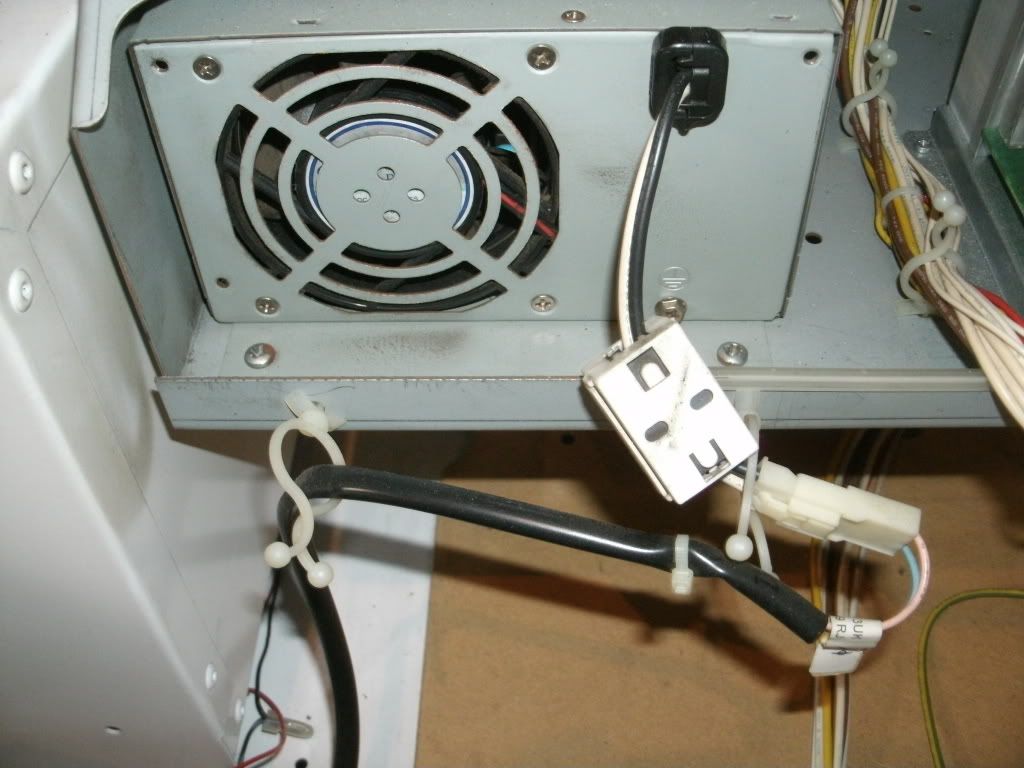
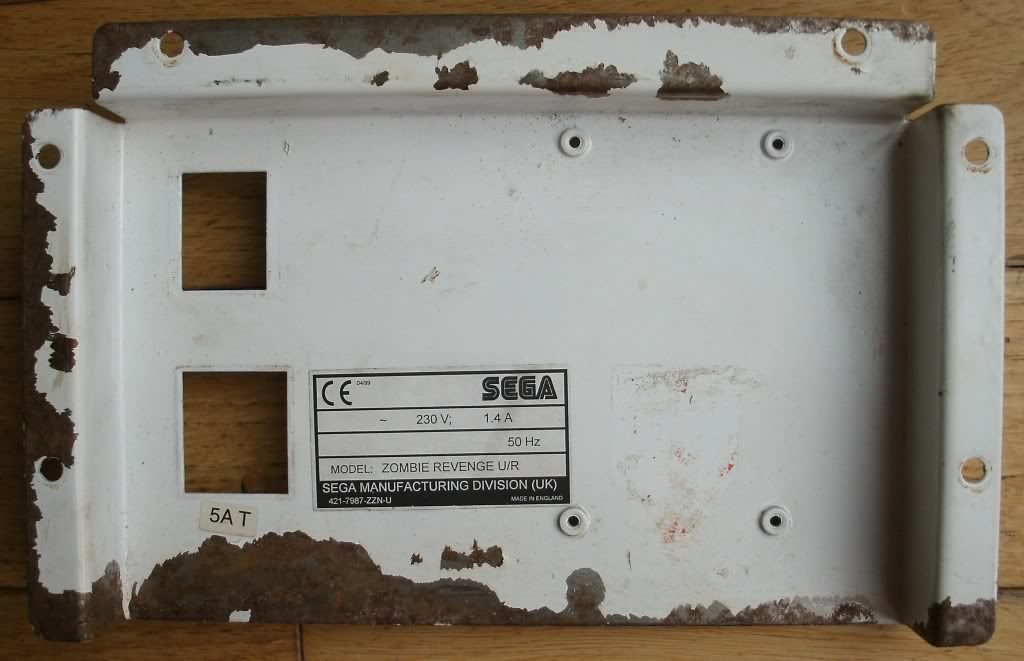
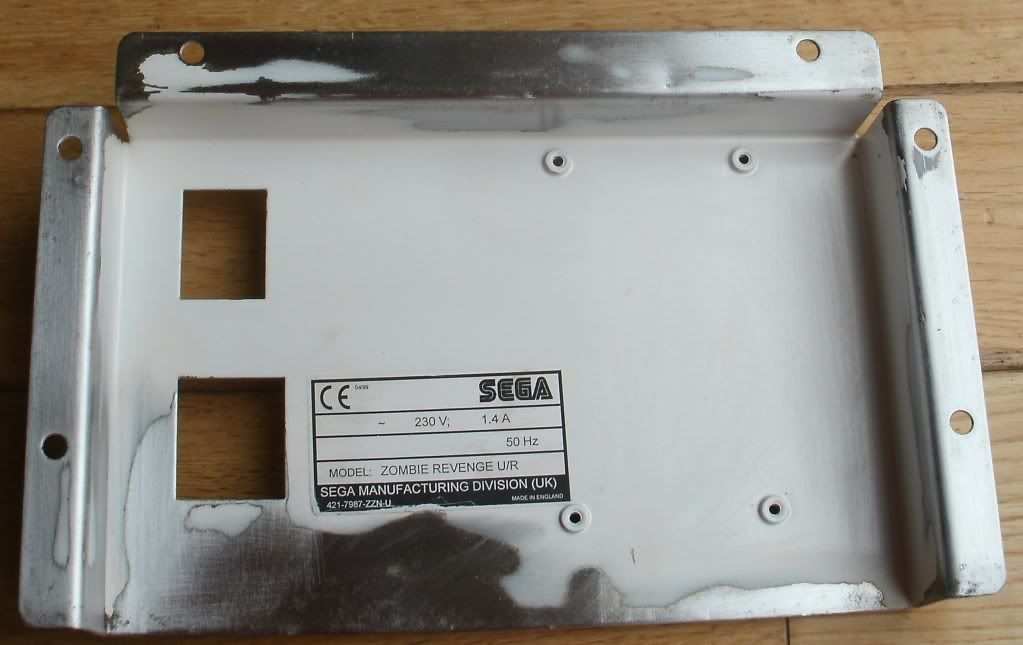
Remove the small rectangular rear panel, 2 Torx (T20) bolts, and the other rear panel that houses the power switch etc, 6 Torx (T20) bolts. I don't think this was the original panel to my cab as it was rusting quite badly but the rest of the base was rust free so I suspect it's been switched at some point. BTW from the label it originally came from a Zombie Revenge UR cab, sadly I could not salvage the label as the print just disintegrated when I touched it.
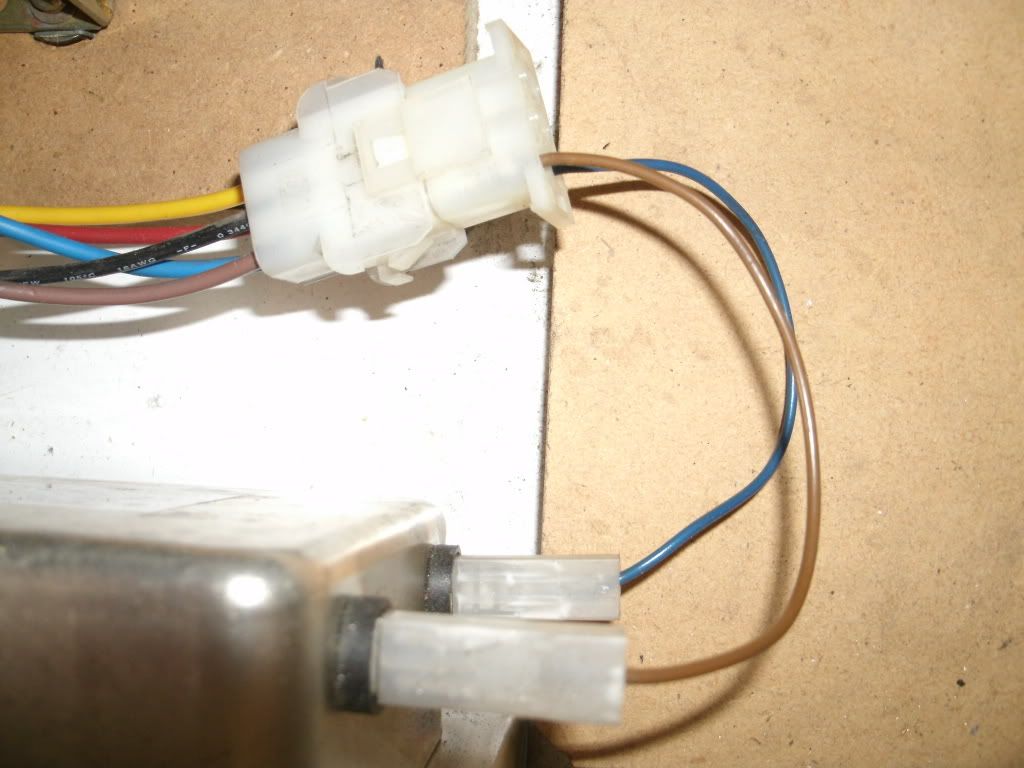
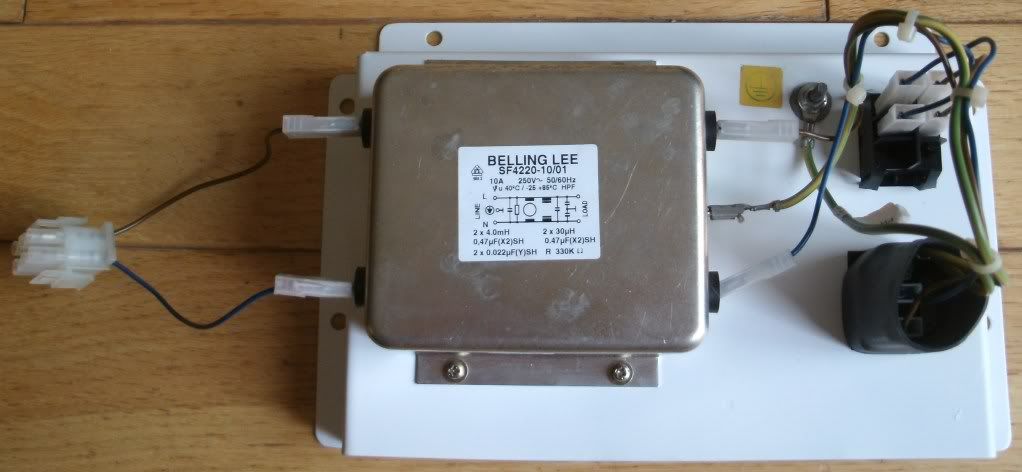
Unbolt the earth (Socket 8mm), remove the wires (PH HOB6001UK), Remove the power inlet socket (squeeze tabs and push), remove the on/off switch (squeeze tabs and push) Remove the filter board (4 Philips screws )
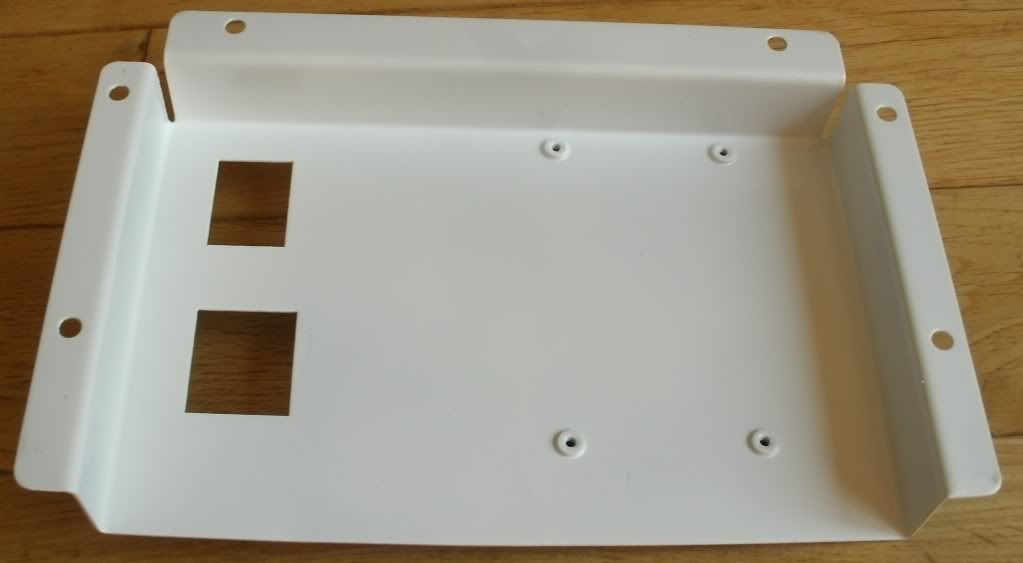
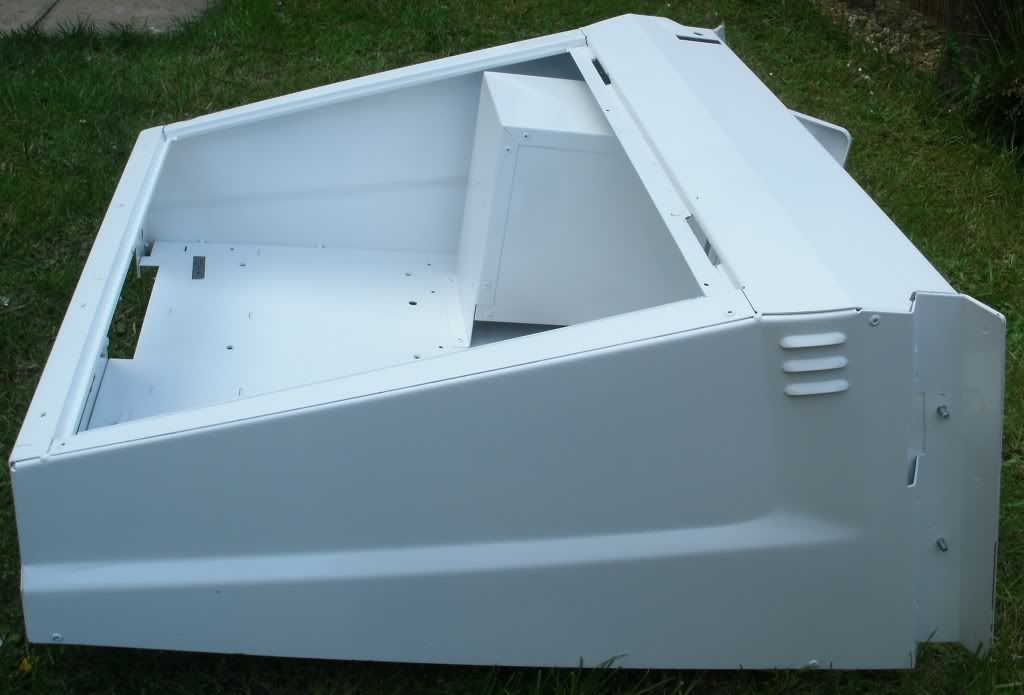
I removed the rust with wet and dry, degreased it then I primed and sprayed this part.
Part way through removing the rust
Painted
Then using my photographs for reference I popped the bits back
Now to work on the base, give everything a really good clean and polish
Before, all grubby
After cleaning, it's now all nice and shiny
Finally put everything back (sorry I can't find any photos of it reassembled on my pc although I know I took a few snaps, so I'll take some more another day and insert them here)
I still have the front access door and the top access panel to strip and respray, fit some new locks and deal with a few minor chips/ scratches in the paintwork. I can always respray the base in the future if it bothers me. I really don't like touching things up oohh er but I'm pretty sure that in this case touching up will work out pretty well.
The tools that you will need for dismantling this area are:
Adjustable Spanner
Philips CR-VPH2 bit (#2)
Torx bit (T-20)
Socket (8mm)
Remove the top access panel mine just lifted off but it should be fixed by 4 Torx (T20) bolts There is also a lock to the rear. Remove the earth cable bolt (socket 8mm).
Remove the front access door, just turn the key. It looks like this was too simple for someone and they wanted to make it a bit more challenging for themselves as they clearly tried to force their way into my cab at some point so as you can see mine requires a fair bit of attention
Remove the locks from the rear of the base, front access panel and coin door, just remove screw that holds the tang and then the large nut, the lock will then just push out.
Now to remove all the wiring, there looks to be a lot and at first the thought of removing it all and putting it back correctly was a bit daunting but TBH once you strip it out you realise that there's not actually much as you first think
Unplug the JVS I/O Power extension cable (NOB-60043)
Unplug the right speaker cable (NOB-60045) & the left speaker cable white (NOB-60046)
Unplug the volume pot cable (NOB-60044)
Unplug the Phono cable (600-7158-0100)
Unplug ? (NOB-600200)
Unplug ? (NOB-60013)
Remove the earth cables attached to the base and the 3 earth cables attached to the rear.
Remove the 4 large screws that secure the transformer MDF base to the cab and unplug the connector.
Remove the motherboard MDF base (2 wing nut bolts)
Remove the tray that holds the amp & PSU (2 screws on the top and 2 on the front).
Remove the small rectangular rear panel, 2 Torx (T20) bolts, and the other rear panel that houses the power switch etc, 6 Torx (T20) bolts. I don't think this was the original panel to my cab as it was rusting quite badly but the rest of the base was rust free so I suspect it's been switched at some point. BTW from the label it originally came from a Zombie Revenge UR cab, sadly I could not salvage the label as the print just disintegrated when I touched it.
Unbolt the earth (Socket 8mm), remove the wires (PH HOB6001UK), Remove the power inlet socket (squeeze tabs and push), remove the on/off switch (squeeze tabs and push) Remove the filter board (4 Philips screws )
I removed the rust with wet and dry, degreased it then I primed and sprayed this part.
Part way through removing the rust
Painted
Then using my photographs for reference I popped the bits back
Now to work on the base, give everything a really good clean and polish
Before, all grubby
After cleaning, it's now all nice and shiny
Finally put everything back (sorry I can't find any photos of it reassembled on my pc although I know I took a few snaps, so I'll take some more another day and insert them here)
I still have the front access door and the top access panel to strip and respray, fit some new locks and deal with a few minor chips/ scratches in the paintwork. I can always respray the base in the future if it bothers me. I really don't like touching things up oohh er but I'm pretty sure that in this case touching up will work out pretty well.
-
Paulie
- Opens wallet, moths fly out
- Posts: 2599
- Joined: September 28th, 2011, 5:43 pm
- Location: East Ardsley, West Yorks
- eBay: retro-paulie
- Initials: PSG
Re: Sega Naomi restoration work in progress Updated Thur 24/
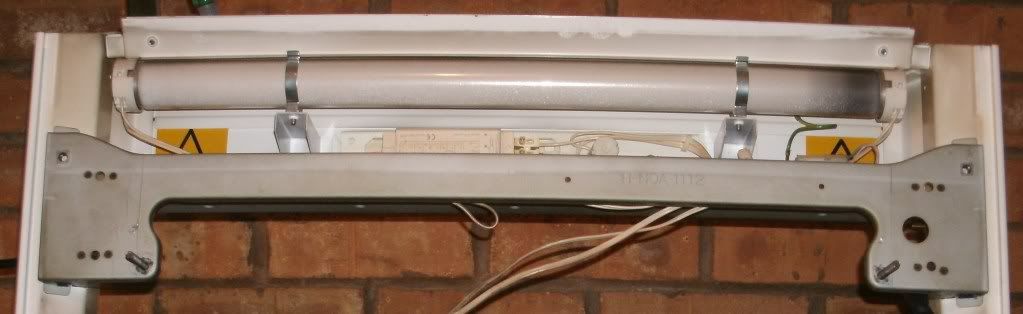
I stripped and cleaned the lighting unit.
The tools that you will need for dismantling this area are:
Philips CR-VPH2 bit (#2)
Torx bit (T-20)
Socket (8mm)
Remove the marquee holder (2 Torx bolts T20)
Remove the 3 earth cables (socket 8mm nut)
Remove the tube unclip both ends and pop the tube out
Remove the tube clips (2 Philips screws)
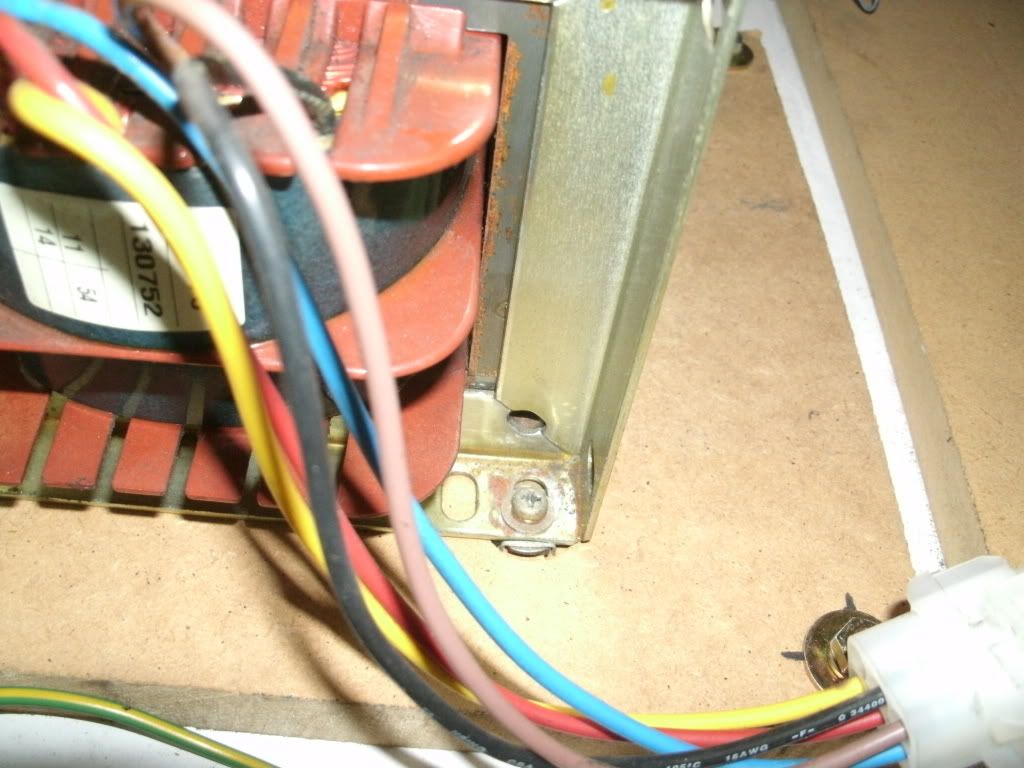
Remove the transformer (2 socket 8mm nuts)
Remove the galvanised metal strip (2 philips screws)
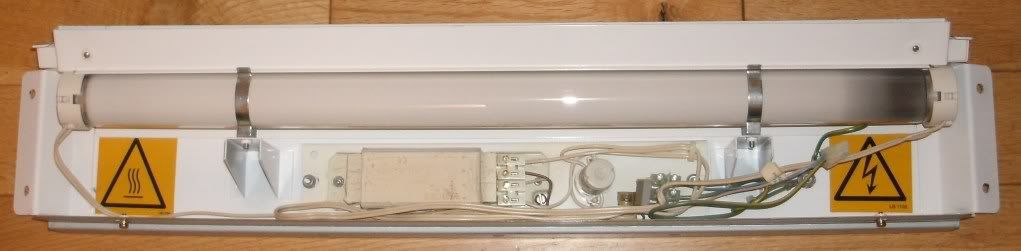
I gave it all a really good clean and polished it all then reassembled the unit. As you would expect due to the heat the transformer and white wiring have yellowed quite a lot, they are clean and look a lot better for it but they will never be sparkling white again, although I presume a replacement unit would be easy to source. I will pick up another tube and change that before I resemble the cab.
Dirty (still attached to the cab)
All clean
The tools that you will need for dismantling this area are:
Philips CR-VPH2 bit (#2)
Torx bit (T-20)
Socket (8mm)
Remove the marquee holder (2 Torx bolts T20)
Remove the 3 earth cables (socket 8mm nut)
Remove the tube unclip both ends and pop the tube out
Remove the tube clips (2 Philips screws)
Remove the transformer (2 socket 8mm nuts)
Remove the galvanised metal strip (2 philips screws)
I gave it all a really good clean and polished it all then reassembled the unit. As you would expect due to the heat the transformer and white wiring have yellowed quite a lot, they are clean and look a lot better for it but they will never be sparkling white again, although I presume a replacement unit would be easy to source. I will pick up another tube and change that before I resemble the cab.
Dirty (still attached to the cab)
All clean
-
Paulie
- Opens wallet, moths fly out
- Posts: 2599
- Joined: September 28th, 2011, 5:43 pm
- Location: East Ardsley, West Yorks
- eBay: retro-paulie
- Initials: PSG
Re: Sega Naomi restoration work in progress Updated Fri 25/5
Here's what's left to do.
Life is a bit hectic at the moment so I don't have a lot of time to work on the cab but in an ideal world I would like to do these bits over the next couple of weeks then I'll be able to drop in a credit or two
*Drill and clean up the freshly chopped legs
*Clean up the speaker unit and monitor casing
*Clean up both of the support braces
*Respray the front PCB door and the top access panel and touch up a couple of minor chips
*Chop & work on the leg covers although I may just chop them for now (still not exactly sure what I'm going to do with them. I may try to tidy them up or strip and polish them and keep my peepers peeled for some replacement art)
*Fit new locks
*Put it all back together
Also Franco is making me a JAMMA>JVS loom so I'll be putting that in the cab at some point too
I'm not in any rush to do the following, so they will happen when I see the bits I want at an affordable price
*Sort out sticks, buttons and art for a couple more control panels
*Get another marquee holder as mine is damaged
*Get a GD-Rom set up
-
AeroCityMayor

- Previously alien_mame
- Posts: 2005
- Joined: July 25th, 2009, 1:05 pm
- Location: West Yorks, UK
- eBay: air_fortless
- Initials: ACM
Re: Sega Naomi restoration work in progress Updated Fri 25/5
Looks like a lot of hard work went into that matey.
Looks amazing compared to the condition you picked it up in.
Congrats!
Ralph.
Looks amazing compared to the condition you picked it up in.
Congrats!
Ralph.

-
Scaffa

- Posts: 268
- Joined: April 23rd, 2011, 4:12 am
- Location: Church Village, Wales
- eBay: casimpson1985
- Initials: CAS
Re: Sega Naomi restoration work in progress Updated Fri 25/5
Amazing detail.
I'd love to see the pictures you take when you give the kitchen a clean
I'd love to see the pictures you take when you give the kitchen a clean
-
crunchywasp

- stompin' an' jumpin'
- Posts: 8104
- Joined: February 10th, 2012, 2:51 pm
- Location: Northern Ireland
- eBay: crunchywasp
- Initials: MAK
Re: Sega Naomi restoration work in progress Updated Fri 25/5
Loving this thread Fantastic work and great, detailed write-up. Really looking forward to seeing the finished article!

-
Paulie
- Opens wallet, moths fly out
- Posts: 2599
- Joined: September 28th, 2011, 5:43 pm
- Location: East Ardsley, West Yorks
- eBay: retro-paulie
- Initials: PSG
Re: Sega Naomi restoration work in progress Updated Fri 25/5
Eye it's been hard work Raph but very enjoyable none the lessalienmame wrote:Looks like a lot of hard work went into that matey.
Looks amazing compared to the condition you picked it up in.
Congrats!
Ralph.
Scaffa wrote:Amazing detail.
I'd love to see the pictures you take when you give the kitchen a clean
Cheers buddy, me too, I'm itching to get it all back together so I can play in 31Khz goodness, shouldn't be too long now though. I just hope it all works when it's put back togethercrunchywasp wrote:Loving this thread
-
crunchywasp
- stompin' an' jumpin'
- Posts: 8104
- Joined: February 10th, 2012, 2:51 pm
- Location: Northern Ireland
- eBay: crunchywasp
- Initials: MAK
Re: Sega Naomi restoration work in progress Updated Fri 25/5
Paulie wrote:
It's funny cos my other halfs mum comes round every Friday to clean the house for us

-
whitecomet

- Posts: 226
- Joined: March 24th, 2009, 2:29 pm
- Location: Gloucestershire
- Initials: DNA
Re: Sega Naomi restoration work in progress Updated Fri 25/5
Did you remove the speaker grills??? they seem to be pushed over plastic which stops them being removed unless u break the clips... if you do this anyone found a go way to retain them back on??
-
baddy

- Posts: 387
- Joined: January 28th, 2010, 12:40 am
- Location: Sweden, Stockholm
- eBay: irishfrog89
- Initials: CHI
Re: Sega Naomi restoration work in progress Updated Fri 25/5
yup, you need to break the plastic nubs, then remove the grills, then put them back and use heat to remelt the remaining plastic (soldering iron, lighter, whichever works best).
-
Paulie
- Opens wallet, moths fly out
- Posts: 2599
- Joined: September 28th, 2011, 5:43 pm
- Location: East Ardsley, West Yorks
- eBay: retro-paulie
- Initials: PSG
Re: Sega Naomi restoration work in progress Updated Fri 25/5
Yup, I removed them but mine were really loose anyway, because they were so loose they just required a bit of jiggling and popped off with no problem.
As baddy said you will just need to melt the tabs a little to fix them back in place, I havn't got around to fixing them back yet, but they hold themselves in place fine at the moment and will only pop out if you give em a good poke.
As baddy said you will just need to melt the tabs a little to fix them back in place, I havn't got around to fixing them back yet, but they hold themselves in place fine at the moment and will only pop out if you give em a good poke.