
Sega Mini Cab Conversions
-
Spectre

- By Spectre
- Posts: 1694
- Joined: January 22nd, 2009, 5:42 pm
- Location: Suffolk, UK
- eBay: spectre-uk
- Initials: JIM
Re: Sega Mini Cab Conversions
Last pic for today, textured the ground, did some lighting and added some shadows to the elements already coloured.
Marquees: http://spectre.myartsonline.com/
-
backfield22
- Posts: 312
- Joined: July 14th, 2011, 9:58 am
- Location: Innerleithen, Scotland.
- eBay: nosetackle99
- Initials: MAT
-
cools

- Armed Police Buttrider
- Posts: 13619
- Joined: August 17th, 2008, 4:49 pm
- Location: Wales, United Kingdom
- eBay: hordarian
- Initials: CLS
-
Spectre
- By Spectre
- Posts: 1694
- Joined: January 22nd, 2009, 5:42 pm
- Location: Suffolk, UK
- eBay: spectre-uk
- Initials: JIM
Re: Sega Mini Cab Conversions
Well it's supposed to be ambient light and the car is coming off the ground somewhat. I'm not exactly practiced at drawing shadows from 2d elements 
Marquees: http://spectre.myartsonline.com/
-
gargoyle67

- The movie topic guy!
- Posts: 5083
- Joined: August 22nd, 2008, 11:33 am
- Location: Clacton-On-Sea init
- eBay: gargoyle1967
Re: Sega Mini Cab Conversions
You should commission Mikonos to sort out some nice artwork 


"Yeah lets all get ponys instead, wait no lol trendy cabs" Err I think you meant Ponies didn't you ?
-
crunchywasp

- stompin' an' jumpin'
- Posts: 8104
- Joined: February 10th, 2012, 2:51 pm
- Location: Northern Ireland
- eBay: crunchywasp
- Initials: MAK
Re: Sega Mini Cab Conversions
Great work on the cabs and art. Everything in this thread look ace and even the jokes are good

-
supergoose

- Please Continue...
- Posts: 737
- Joined: September 12th, 2010, 10:38 pm
- Location: Raccoon City, Germany
Re: Sega Mini Cab Conversions
I know I'm in the minority but I like the "before" versions a bit better. They are more what I would picture in my mind, if I was thinking about classic arecade artwork. You really did a great job. It's just that the "after" pictures look a bit too modern, imo.
Wanted: SNK Candy 18 spares. Mainly looking for a marquee holder & the "video games" sign.
-
opt2not

- Posts: 500
- Joined: March 8th, 2011, 11:14 pm
- Location: California
- eBay: n/a
- Initials: OPT
Re: Sega Mini Cab Conversions
Good progress on the side art Spectre!
If I can make a few suggestions -- I'd get rid of the penumbra of the ambient shadows, and make them more hard-edged. Then lighten up them up a bit. Personally I've found that soft-shadows mixed with hard ones gives the image a confusing look to the eye, messing with focus.
For the car, some highlights would do, try to achieve that shiny gloss-look by putting on some hard-edged bright highlight lines on the areas closest to your imaginary light-source. Also, are you going to try for that chrome look on the grill and fender area?
Keep up the good work, it's turning out great so far!
-
Spectre
- By Spectre
- Posts: 1694
- Joined: January 22nd, 2009, 5:42 pm
- Location: Suffolk, UK
- eBay: spectre-uk
- Initials: JIM
Re: Sega Mini Cab Conversions
So less blur and more opacity you sayopt2not wrote:Good progress on the side art Spectre!
If I can make a few suggestions -- I'd get rid of the penumbra of the ambient shadows, and make them more hard-edged. Then lighten up them up a bit. Personally I've found that soft-shadows mixed with hard ones gives the image a confusing look to the eye, messing with focus.
The problem I had is I didn't really know where to put the highlights, as the panels are all curved. Also, that was my attempt at a chrome look on the fenderFor the car, some highlights would do, try to achieve that shiny gloss-look by putting on some hard-edged bright highlight lines on the areas closest to your imaginary light-source. Also, are you going to try for that chrome look on the grill and fender area?
Keep up the good work, it's turning out great so far!
Marquees: http://spectre.myartsonline.com/
-
g4rou
- Posts: 114
- Joined: April 26th, 2009, 10:53 am
- Location: London
- eBay: g4rou
- Initials: EDF
Re: Sega Mini Cab Conversions
Spectre wrote:Last pic for today, textured the ground, did some lighting and added some shadows to the elements already coloured.
The shadows look good
-
Spectre
- By Spectre
- Posts: 1694
- Joined: January 22nd, 2009, 5:42 pm
- Location: Suffolk, UK
- eBay: spectre-uk
- Initials: JIM
Re: Sega Mini Cab Conversions
Tried to chrome up the fender area better, an improvement hopefully!

Marquees: http://spectre.myartsonline.com/
-
opt2not
- Posts: 500
- Joined: March 8th, 2011, 11:14 pm
- Location: California
- eBay: n/a
- Initials: OPT
Re: Sega Mini Cab Conversions
Chrome is a tricky thing to get right, mainly because it uses really hard dark colours for the reflection, as well, the reflections don't always sit like shadows do. They tend to be separated away from the outlines on curved surfaces. I'm not sure if that makes sense to you, but what I tend to do for chrome (or polished gold/silver-- same technique) is look at real-world chrome images and take queues on how the reflection is working:
I hope these examples help...best thing to do when you're stuck in art is look up reference as much as possible, then pick it apart and figure how to recreate that in illustrative form.
Notice how the base colour is light-gray, with dark thick lines that are positioned away from the edges, so you get the under reflection of light around the outlines of the objects. The main colours for chroming in illustration is Black, White and Light Gray. For some reason most reflections in chrome come out black or dark, while following the contour of the surface it's on. At the same time, you can mix in some additional colour elements of the surrounding scene to ground it to the world the object is in (the car example). You could use some gradations in the colour elements, like the blue sky to white reflection in the car example, but I'd use it sparingly.


I hope these examples help...best thing to do when you're stuck in art is look up reference as much as possible, then pick it apart and figure how to recreate that in illustrative form.
-
opt2not
- Posts: 500
- Joined: March 8th, 2011, 11:14 pm
- Location: California
- eBay: n/a
- Initials: OPT
Re: Sega Mini Cab Conversions
Not stepping on your toes Spectre, just wanted to give you an example of what I was talking about:

The base-colour is that blueish grey, which can be changed to whatever, even lightened if needed, but the black lines and white is what really makes chrome 'pop'. Follow the contours of the object, factor in any objects that are near for reflection purposes, then take your smudge tool and "squiggle up" the black lines. You can put as much or as little of the black as you want, here I just threw a bunch on for the example, but if you lessen what I've got it'll make for a more smoother surface. I would also put in some small inserts of green and orange -- whatever is around the car, just to pick up some of the things around.
The base-colour is that blueish grey, which can be changed to whatever, even lightened if needed, but the black lines and white is what really makes chrome 'pop'. Follow the contours of the object, factor in any objects that are near for reflection purposes, then take your smudge tool and "squiggle up" the black lines. You can put as much or as little of the black as you want, here I just threw a bunch on for the example, but if you lessen what I've got it'll make for a more smoother surface. I would also put in some small inserts of green and orange -- whatever is around the car, just to pick up some of the things around.
-
Spectre
- By Spectre
- Posts: 1694
- Joined: January 22nd, 2009, 5:42 pm
- Location: Suffolk, UK
- eBay: spectre-uk
- Initials: JIM
Re: Sega Mini Cab Conversions
Well ****, that's about 20 billion times better than my effort! I'll be the first to admit I'm a bit out of my depth here, so if you want to take a crack at finishing this thing off to a decent standard, you're more than welcome. 
Marquees: http://spectre.myartsonline.com/
-
emphatic

- Breastfeeds when required
- Posts: 5910
- Joined: April 7th, 2009, 4:14 pm
- Location: Alingsås, Sweden
- eBay: jorgen_sjolander
- Initials: JOR
-
pubjoe

- Fosters Political Ambitions
- Posts: 10070
- Joined: August 19th, 2008, 8:58 am
- Location:
Re: Sega Mini Cab Conversions
That chrome looks georgeous opt2not. If it was me I think I'd incorporate more of the ground/sky. Deserts and chrome were made for eachother.
It all depends what you want to go for. The line art looks really nice. Supergoose makes a fair observation about the screen print look. The kind of detail you're getting into with added reflections and shadow is moving beyond colouring really. If that's the desire, fine. Just needs that advance decision.
It all depends what you want to go for. The line art looks really nice. Supergoose makes a fair observation about the screen print look. The kind of detail you're getting into with added reflections and shadow is moving beyond colouring really. If that's the desire, fine. Just needs that advance decision.
-
opt2not
- Posts: 500
- Joined: March 8th, 2011, 11:14 pm
- Location: California
- eBay: n/a
- Initials: OPT
Re: Sega Mini Cab Conversions
Spectre wrote:Well ****, that's about 20 billion times better than my effort! I'll be the first to admit I'm a bit out of my depth here, so if you want to take a crack at finishing this thing off to a decent standard, you're more than welcome.
Like I said, I don't want to step on your toes, you've done a great job so far getting this together and getting the theme locked-down. Its tough when you feel like you're out of your comfort zone to learn this stuff on the fly.
I'll be starting up on the other art pieces shortly anyways, probably the CP first, then monitor Bezel, and lastly the marquee and base images. So this would help me get into the ball rolling!
Just send me the source files of what you've got done so far, and I'll finish it off.
Noted! And I agree, chrome effects are definitely a polish-pass item. It can still work well with the screen-print illustrative style, as long as it's done with the same hard-edged shading as the shadowing. Franny sent me a few reference images of his poster and there are definitely some hints on how to get that look and style of the shading and colouring.pubjoe wrote:That chrome looks georgeous opt2not. If it was me I think I'd incorporate more of the ground/sky. Deserts and chrome were made for eachother.
It all depends what you want to go for. The line art looks really nice. Supergoose makes a fair observation about the screen print look. The kind of detail you're getting into with added reflections and shadow is moving beyond colouring really. If that's the desire, fine. Just needs that advance decision.
-
Spectre
- By Spectre
- Posts: 1694
- Joined: January 22nd, 2009, 5:42 pm
- Location: Suffolk, UK
- eBay: spectre-uk
- Initials: JIM
Re: Sega Mini Cab Conversions
Ok, will ping you what I've got so far and also PM Franco to make sure he's happy. 
Marquees: http://spectre.myartsonline.com/
-
FrancoB

- J+ member of the year finalist!
- Posts: 4806
- Joined: June 8th, 2009, 10:42 pm
- Location: Oxfordshire
- eBay: francosquashking
- Initials: FRN
Re: Sega Mini Cab Conversions
Apologies for the late reply dudes, I've hardly had chance to get online the past couple of days.
All I can say to Spectre and opt2not is
The colour shading is looking ace Jamie and the chrome affect looks awesome Bryan! Thank you both so much for your help with this.
After speaking to you both it looks like the baton of is being passed over to opt2 for the rest of this. Thanks again for your help Jamie
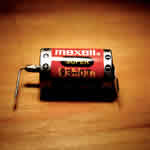
The CPs use 21 way JST connectors too which I'm going to wire up and so I think I'll use the same ones for the link cable. I've actually managed to indirectly get enough free samples to do a couple of CP looms and link cables from JST which is a bonus.
The panel mount cutout for the YLR-21V connectors is the large one to the right of this photo:

They sure are filthy at the moment
I should be able to use that as a template to help cut the ones in the back. I've just ordered a small square file as all of my flat ones will be too big to cut out some of the profile properly.
I'm thinking of mounting the link connectors in the power inlet section at the rear of the cabinet:

I should be able to remove that panel to work on the cutouts which will be easier than trying to cut them in the back of the cabinet its self. Being recessed it should also protect the connectors and allow the cabs to be placed closer when back to back if required.
All I can say to Spectre and opt2not is
The colour shading is looking ace Jamie and the chrome affect looks awesome Bryan! Thank you both so much for your help with this.
After speaking to you both it looks like the baton of
This I like.PrincessPrinPrin wrote:Scart would be awkward. I would use something more appropriate for a cab like JST YL (21-way).
The CPs use 21 way JST connectors too which I'm going to wire up and so I think I'll use the same ones for the link cable. I've actually managed to indirectly get enough free samples to do a couple of CP looms and link cables from JST which is a bonus.
The panel mount cutout for the YLR-21V connectors is the large one to the right of this photo:
They sure are filthy at the moment
I should be able to use that as a template to help cut the ones in the back. I've just ordered a small square file as all of my flat ones will be too big to cut out some of the profile properly.
I'm thinking of mounting the link connectors in the power inlet section at the rear of the cabinet:
I should be able to remove that panel to work on the cutouts which will be easier than trying to cut them in the back of the cabinet its self. Being recessed it should also protect the connectors and allow the cabs to be placed closer when back to back if required.
-
grainflavour

- Please Continue...
- Posts: 141
- Joined: March 16th, 2013, 7:21 pm
- Location: Lancashire
- eBay: grain-flavour
Re: Sega Mini Cab Conversions
Funny man! I thought yours looked alright until opt2not shat all over it from great heightSpectre wrote:Well ****, that's about 20 billion times better than my effort! I'll be the first to admit I'm a bit out of my depth here, so if you want to take a crack at finishing this thing off to a decent standard, you're more than welcome.