Sega Swing restoration

Show off your wares.
User avatar
zipper
Posts: 122
Joined: March 20th, 2015, 11:47 am
Location: Southend on Sea
eBay: bazpatts
Initials: BAZ

Sega Swing restoration

Post by zipper »

FINISHED! - pics have been messed up by postimg, but you can see them in this gallery https://postimg.cc/gallery/phjz1l8g/

I got a Swing off these forums a couple of weeks back and thought I'd keep a little log of the restoration work. It came needing some love, but I was looking for a project to keep me out of trouble this summer 8-) .
The Swing is not everyones cup of tea... infact if you search the forum, it's nominated on page 1 of 'Gallery of ****'. Personally, I love it to bits.
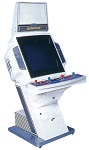
Here's a shot of it on day of arrival (Apologies for the sideways photo):


I just love the curved smoked glass. It would be impossible to replace, so I'm really happy it's in great shape. It just had a tiny scratch that I polished out straight away with a bit of stainless steel cleaner. Also the white header guard is intact (you can just see it on the floor next to the cab).

I'll keep a log here of the stuff I get done. The biggest things are... A lot of cleaning, fabricate and populate new control panel, fabricate new lower door, fabricate a new header, clean up the wiring, fabricate new speaker mounts (and add speakers), add lighting, fill some holes in the back of the cab, paint.

First thing was a bit of outside cleaning. The rubber on the glass fittings had melted and put a thick black sludge on the machine:

That took some serious scrubbing. I replaced them with rubber washers used for screwing mirrors to walls.

The speaker covers were scratched, and someone had clearly tried to prize them off with a screwdriver:

I was really pleased to find that the speaker grilles were reversable. That fixed the scratches immediately :). A bit of soft hammering on the bent bits put them pretty much back to flat. As good as it's going to get anyway.

The control panel housing was very dirty:

I used some pretty hefty grit sandpaper to remove the heaviest scratches, then went up through the grades, before using stainless steel cleaner, then Novus polish. It looks much better now:


Here are all those parts together looking nice, with C&D on the monitor. It's an MS8-26, and it looks great (after a couple of minutes warming up). The tube has some pretty crazy Puzzle Bobble burn, but the smoked glass does a great job of hiding it:


The header had the corners broken off. This seems pretty standard with the Swing. It's a terrible design to be honest... I can't imagine it lasting more than 10 mins in an arcade before looking like this:

The screw holes for mounting make the plastic weak in the corners. I went to a local plastic cutter last week, and he cut me a replacement. It's pretty much an exact replica:

I used some car pinstriping vinyl to put the line around it. I think it looks great. All it needs now is the artwork stuck behind it. I've got the art and will pop to the printers next week.

A local stell fabrication company is in the process of cutting me the PCB door and a new control panel. I'm hoping to have those in the next week or 2. I've already got the new control panel overlay ready:


I'll post about the wiring next. It's been great fun working it all out!
Last edited by zipper on June 20th, 2018, 6:01 pm, edited 2 times in total.
User avatar
Brettster
Posts: 185
Joined: February 21st, 2015, 10:07 am
Location: Leeds, UK

Re: Sega Swing restoration

Post by Brettster »

Great Thread
Will be looking forward to the next instalment :D
Looking for More Space!
User avatar
Paulie
Opens wallet, moths fly out
Posts: 2599
Joined: September 28th, 2011, 5:43 pm
Location: East Ardsley, West Yorks
eBay: retro-paulie
Initials: PSG

Re: Sega Swing restoration

Post by Paulie »

Looks like your'e doing a fine job!

I've never seen a swing in the flesh but I think it's a cool looking cab. It may not be a conventionally pretty cab but I generally like Marmite cabs.

I always enjoy reading restoration threads and I don't recall reading one about a Sega Swing so this has really piqued my interest.
User avatar
denson
Please Continue...
Posts: 517
Joined: February 22nd, 2012, 10:36 am
Location: Norwich, Norfolk
eBay: chubba100

Re: Sega Swing restoration

Post by denson »

Great work so far, I look forward to following this :)

I too like the look of the swing, though haven't actually seen one up close. Good luck with the rest of the restoration 8-) :thumbupright:
User avatar
zipper
Posts: 122
Joined: March 20th, 2015, 11:47 am
Location: Southend on Sea
eBay: bazpatts
Initials: BAZ

Re: Sega Swing restoration

Post by zipper »

Thanks guys. I'm using your excellent restore threads as reference. Here's what I've done so far with the wiring...

I'm making the Swing 4l12b as part of the restore, so am getting the harnesses all set for that. I started by buying 4 new 1 player Sega looms. They have the standard 12-pin AMP UP connectors that you find on Astros (and the Swing). However, players 3 and 4 in the Swing use a 9-pin AMP instead.
So I removed 2 of the connectors on my bought looms.... Which was harder than I thought, until I straightened up a keyring loop to form the perfect tool :) :
Image
I could then just push the pins into the new, smaller connectors. Here's the 2x 9-pin and 2x 12-pin all done:
Image

The old wiring looms I took off the original control panel were pretty grubby, chopped up and soldered directly to microswitches:
Image

But they were absolutely perfect donors for the missing Player 3 and 4 harness in the PCB area! I just popped 9-pin AMP UPs on the end and stripped the wires:
Image

I think I now have the control wiring ready for time the control panel is finished :)

Inside the cabinet I found this credit board:
Image

It was chopped into the coin counter wire, the power lines and the P1 coin up switch cable. I stripped it out, binned it, and joined all the original leads back together. I don't have a coin mech or a complete cradle (missing the piece that holds a microswitch + coin exit guide)... But will look to get an AD81P and the missing bits:
Image
(the switch in the picture is part of the credit board - binned it. I know it needs a good clean. I'll get round to that!)

The monitor power was being supplied by really dodgy cable, twisted and sellotaped to a cable with a plug:
Image
I bought a US plug off ebay for a couple of quid and tidied that up nice:
Image

The cabinet itself had a Euro plug, and a stepdown transformer inside. I swapped the plug for a UK one, disconnected the monitor and plugged the cab in. The transformer had a big 220v sticker on it, so when I put the multimeter on it I was expecting to see the voltage looking a bit high... It read 115v (target is ~100v):
Image

When I started looking at the transformer, I noticed a bunch of other unused wires. These actually allowed for various other input voltages. All I had to do was swap the orange wire for the purple one to change it to 230v. Once I did that, I read 105v on the output and was happy to connect the monitor back up. Here's the transformer through the lower, front door. You can also see the jamma and extra player sockets + harness coming out the roof on the left.
Image
Last edited by zipper on June 10th, 2016, 12:29 pm, edited 1 time in total.
User avatar
emphatic
Breastfeeds when required
Posts: 5909
Joined: April 7th, 2009, 4:14 pm
Location: Alingsås, Sweden
eBay: jorgen_sjolander
Initials: JOR

Re: Sega Swing restoration

Post by emphatic »

Nice work so far. It looks like a great cabinet to play D&D on. :awe:
User avatar
copados33
Please Continue...
Posts: 538
Joined: March 20th, 2013, 1:30 pm
Location: Uruguay South America
eBay: psycho-q

Re: Sega Swing restoration

Post by copados33 »

Best and only candy cab for 4 player games, control panel has the right size to accomodate all players, the size of the monitor is also a plus since it's bigger than the default wells gardener found on most western multiplayer cabinets, nice work on the resto, can't wait to see it fully restored :awe: .
User avatar
Mokum
Please Continue...
Posts: 599
Joined: July 27th, 2011, 8:20 am
Location: Perugia, Italy
eBay: noizer2k3
Initials: MKM

Re: Sega Swing restoration

Post by Mokum »

I'm glad someone is taking care of it! I remember it from the selling forum and it really needed some love. Can't wait to see it fully restored! :awe:
alienmame wrote:Christ on a bike man
User avatar
nem
Needs a custom rank
Posts: 2892
Joined: August 17th, 2008, 6:59 pm
Location: Finland

Re: Sega Swing restoration

Post by nem »

This looks like an excellent restoration. I'm glad it went to someone who's willing to put time and effort into it.

Great work!
User avatar
Molloy
Posts: 186
Joined: August 29th, 2008, 8:37 pm
Location:

Re: Sega Swing restoration

Post by Molloy »

These machines look way better in person. They'd one in Stansted airport for several years but I never saw one anywhere else.
User avatar
zipper
Posts: 122
Joined: March 20th, 2015, 11:47 am
Location: Southend on Sea
eBay: bazpatts
Initials: BAZ

Re: Sega Swing restoration

Post by zipper »

Thanks guys. A few things done this week.
The coin slots are bare. I've seen pictures where these are covered in a piece of acrylic. I've got a piece of 3mm white acrylic cut, drilled and screwed into place. I'll be cutting a chrome coin slot in at some stage.
Before:
Image
After:
Image

The cabinet had no lighting. I don't honestly know where to easily pick up 100v fluorescent set up (other than ripping out of another cab). If anyone has any leads, let me know! So I fed 12v to the 2-pin AMP that feeds the lightbox, and popped a bit of acrylic up there with LED strips. It isn't authentic, but it does the job really well. I can't wait to get the art up there on the header now. It's currently with the printers.
Before:
Image
After:
Image
Let there be light:
Image

Lastly, I filled the holes in the back of the cab and polished the chrome handles. I used white Milliput to fill. It's pretty cool stuff. I sanded it down after leaving it overnight. It's not 100%... A little too white, but much better than holes! The chrome handles look good after a rub down with autosol.
Before:
Image
After:
Image

Next week I will have the control panel finished I hope!
User avatar
emphatic
Breastfeeds when required
Posts: 5909
Joined: April 7th, 2009, 4:14 pm
Location: Alingsås, Sweden
eBay: jorgen_sjolander
Initials: JOR

Re: Sega Swing restoration

Post by emphatic »

:clap:
User avatar
Paulie
Opens wallet, moths fly out
Posts: 2599
Joined: September 28th, 2011, 5:43 pm
Location: East Ardsley, West Yorks
eBay: retro-paulie
Initials: PSG

Re: Sega Swing restoration

Post by Paulie »

Fab work! 8-)
User avatar
zipper
Posts: 122
Joined: March 20th, 2015, 11:47 am
Location: Southend on Sea
eBay: bazpatts
Initials: BAZ

Re: Sega Swing restoration

Post by zipper »

Thanks guys! I had some time today, so popped to my father's workshop to borrow his stuff and do a couple of bits.
There was a large crack in the back of the control panel. Not visible from the front, but weakens the panel a lot + only a matter of time before it cracks through. Here is is:
Image
We drilled a small hole at the top of the crack. This stops it from cracking further. Then dremelled the crack a little, clamped it in place, applied fiberglass to the back and set it with some strong 2-part resin. Leaving that overnight, but hopefully it has filled and strengthened the crack... if it hasn't melted the panel away :D Will find out tomorrow:
Image
The panel is cut (from a free piece of steel :awe: ), and the holes are drilled using a step cone drill bit. Here's the underside of the panel:
Image
The mounts I got from this forum. They have been taped in place and will be welded to the panel tomorrow. You can see the overlay in the background - that was from arcadeartshop. I'm looking forward to applying that. I've got all the sticks and buttons ready to push in too. I'm going for the stock look (red and blue)... but I'm using Sanwa sticks.
The holes for the carriage bolts were 4mm holes that have been squared with a square file.

Credit to these guys (esp. ooyk) on Neo Arcadia for scanning and drawing the repro overlay and making it public: http://www.neo-arcadia.com/forum/viewto ... &start=225
And nicoken on Neo Arcadia for doing the same with the header: http://www.neo-arcadia.com/forum/viewtopic.php?t=53228
Having these available is a massive help!
User avatar
moshpit
Fantasy Zone Finder
Posts: 1025
Joined: February 19th, 2009, 9:26 pm
Location: Germany
Initials: RON

Re: Sega Swing restoration

Post by moshpit »

I see it's in good hands :thumbup: :) :thumbupright:
WARNING! A HUGE BATTLESHIP IS APPROACHING FAST!
User avatar
emphatic
Breastfeeds when required
Posts: 5909
Joined: April 7th, 2009, 4:14 pm
Location: Alingsås, Sweden
eBay: jorgen_sjolander
Initials: JOR

Re: Sega Swing restoration

Post by emphatic »

Thanks for the pics as usual! :awe:
User avatar
zak
Acetated
Posts: 1720
Joined: October 19th, 2014, 1:35 pm
Location: UK
eBay: NA

Re: Sega Swing restoration

Post by zak »

Get SegaSonic The Hedgehog on this thing! :)

Great job btw! :thumbup:
User avatar
zipper
Posts: 122
Joined: March 20th, 2015, 11:47 am
Location: Southend on Sea
eBay: bazpatts
Initials: BAZ

Re: Sega Swing restoration

Post by zipper »

zak wrote:Get SegaSonic The Hedgehog on this thing! :)

Great job btw! :thumbup:
Thanks. I would love Segasonic. I know they had it at Sega World....
Image
I can't find a single image of the panel though. I hear the trackballs were yellow, blue and red... and I suppose they went on the 3p Swing panel... but i've never seen one of those either!

Right now, I'm waiting on:
1/ The 4p panel to be welded so I can finish it off (apply overlay, sticks, buttons and wire it up).
2/ The vinyl for the header to come back from the printers.
3/ Getting the PCB door back from the fabricators.
4/ I'm keeping an eye open for a coin mech cradle (not urgent).

Things I can already be getting on with:
1/ Knocking together a MAME pc that interfaces with the jamma + 3/4 player harness.
2/ I Need to take the monitor out to screw the chassis to the frame, and clean inside.
3/ Draw-up new speaker mounts, buy some wood and get them cut (I bought a couple of speakers).

3/ Lots of cleaning!

Things I'll be doing in the coming weeks:
1/ Buy 3 locks for the 3 front doors. I was really lucky that the cabinet came with 4x 5380s locks and the tongues for the monitor surround and the control panel! The tongues would be hard to replace, and I already have a few keys. But I do need to fit new locks to the front doors.
2/ Remove all the rust, prepare the metalwork (and new door panel) for painting. Will go for the RAL 9002 that has been recommended. I need to learn how to paint!

Cheers for the nice comments guys + moshpit for packing and shipping the Swing to me. I really appreciate the opportunity to pick one up! 8-)
Last edited by zipper on July 19th, 2016, 9:38 am, edited 1 time in total.
User avatar
Mokum
Please Continue...
Posts: 599
Joined: July 27th, 2011, 8:20 am
Location: Perugia, Italy
eBay: noizer2k3
Initials: MKM

Re: Sega Swing restoration

Post by Mokum »

This is some serious work! Thanks a lot for sharing! :awe:
alienmame wrote:Christ on a bike man
User avatar
zipper
Posts: 122
Joined: March 20th, 2015, 11:47 am
Location: Southend on Sea
eBay: bazpatts
Initials: BAZ

Re: Sega Swing restoration

Post by zipper »

The control panel came together this morning :awe:
The welding got done (thanks alberto1225 for the excellent mounts):
Image
So I got to apply the overlay:
Image
I then knifed out the holes (loads of them!):
Image
... and got to add all the controls.... this is the money shot :awe: :
Image