Getting an atomiswave to STFU.
Posted: October 17th, 2008, 12:17 am
ALL WORK DONE AT YOUR OWN RISK
The atomiswave is an irritatingly noisy ****.
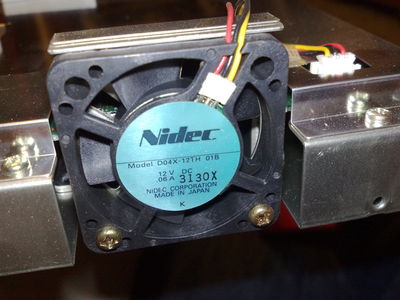
This is down to the standard nidec fan that comes with it, it spins at 7,000RPM and whines like a banshee, to make things worse it runs at balls out full throttle ALL the time
I replaced the standard nidec with a 3,500RPM 'Scythe Mini Kaze' you can grab these off eBay and pc shops online, will set you back around £7 inc P&P on the bay. Expensive, but the noise difference is like night and day, do keep in mind that this obviously does reduce the airflow, but to be honest I don't see this being an issue unless you site your machine in a furnace room
You will need.
Phillips head screwdriver
Flat head screwdriver (for terminal blocks)
Atomiswave system
2 Terminal blocks (another 1 if you want to revert back to original fan)
Common sense
Undo all the screws on the awave, theres 2 either side of the interfaces and 2 on the sides, you would have to be a total moron to break anything at this point.
Note the fan is simply plugged in, you can obviously unplug this... you will note at this point there's a yellow wire, this is to monitor the pulse of the fan, or some crap like that.
All I did at this point was unscrew the nidec fan, then cut the default wires at a sensible point ie not too close to either side, cut the Sycthe fan wires, then wire up the black and the red to the Scythe fan using the terminal blocks and just leave the yellow alone.
It may be wise to put a bit of tape on it to seal the yellow off, I couldn't be arsed myself, it's not like I expect it to dance around, screw the Sycthe in as you found the nidec, thats it, the awave has ample space for the terminal blocks to rest on top, now put it back together.
If you want to put it back as it was, just use the additional terminal block to re-wire it back as you found it.
http://www.vimeo.com/1990898/" <- a short video of it running, note theres another fan next to it thats on the mame cpu, and obviously when installed it will be inside the machine behind a door!
The atomiswave is an irritatingly noisy ****.
This is down to the standard nidec fan that comes with it, it spins at 7,000RPM and whines like a banshee, to make things worse it runs at balls out full throttle ALL the time
I replaced the standard nidec with a 3,500RPM 'Scythe Mini Kaze' you can grab these off eBay and pc shops online, will set you back around £7 inc P&P on the bay. Expensive, but the noise difference is like night and day, do keep in mind that this obviously does reduce the airflow, but to be honest I don't see this being an issue unless you site your machine in a furnace room
You will need.
Phillips head screwdriver
Flat head screwdriver (for terminal blocks)
Atomiswave system
2 Terminal blocks (another 1 if you want to revert back to original fan)
Common sense
Undo all the screws on the awave, theres 2 either side of the interfaces and 2 on the sides, you would have to be a total moron to break anything at this point.
Note the fan is simply plugged in, you can obviously unplug this... you will note at this point there's a yellow wire, this is to monitor the pulse of the fan, or some crap like that.
All I did at this point was unscrew the nidec fan, then cut the default wires at a sensible point ie not too close to either side, cut the Sycthe fan wires, then wire up the black and the red to the Scythe fan using the terminal blocks and just leave the yellow alone.
It may be wise to put a bit of tape on it to seal the yellow off, I couldn't be arsed myself, it's not like I expect it to dance around, screw the Sycthe in as you found the nidec, thats it, the awave has ample space for the terminal blocks to rest on top, now put it back together.
If you want to put it back as it was, just use the additional terminal block to re-wire it back as you found it.
http://www.vimeo.com/1990898/" <- a short video of it running, note theres another fan next to it thats on the mame cpu, and obviously when installed it will be inside the machine behind a door!